Table of Contents
Advertisement
Advertisement
Table of Contents

Related Manuals for GE Mini Field Agent


Summary of Contents for GE Mini Field Agent
- Page 1 GFK-2993F Field Agents* User Guide July 2017 For public disclosure...
- Page 2 It is understood that GE may make changes, modifications, or improvements to the equipment referenced herein or to the document itself at any time. This document is intended for trained personnel familiar with the GE products referenced herein.
- Page 3 Safety Symbol Legend Indicates a procedure or condition that, if not strictly observed, could result in personal injury or death. Warning Indicates a procedure or condition that, if not strictly observed, could result in damage to or destruction of equipment. Caution Indicates a procedure or condition that should be strictly followed to improve these applications.
- Page 4 If you purchased this product through an Authorized Channel Partner, please contact the seller directly. General Contact Information Online technical support https://ge-ip.force.com/communities/CC_Contact Additional information http://www.geautomation.com/contact-us Solution Provider http://www.geautomation.com/solution-partners Technical Support If you have technical problems that cannot be resolved with the information in this manual, please contact us by telephone or on the web at https://ge-ip.force.com/communities/CC_Contact...
-
Page 5: Table Of Contents
Contents Overview ............................8 Applicable Products ........................8 Related Documentation ........................ 9 Field Agent Architecture ......................10 Mini Field Agent (MFA) ....................... 11 1.4.1 MFA Specifications ..............................12 Embedded Field Agent (EFA) ..................... 14 1.5.1 Mark* VIe IS420UCSCH1A CPU w/ Field Agent ....................14 1.5.2... - Page 6 Using OAuth Authentication Code Enrollment ..................62 5.10.1.5 Verify the Field Agent is Online in EdgeManager ..................63 5.10.2 Enrolling Mini Field Agent Using iPhone App ...................... 64 Using the Field Agent ........................66 Device Management ........................66 6.1.1 Field Agent Status ..............................66 6.1.1.1...
- Page 7 6.2.5.2 Using Store and Forward with the OPC UA Machine Adapter ................82 6.2.5.3 Using the Modbus TCP Machine Adapter......................83 6.2.5.4 Using Store and Forward When Internet Connectivity is Disrupted and Restored ..........84 6.2.6 Reconfigure the Field Agent ..........................85 6.2.6.1 First Time Configuration ............................
-
Page 8: Overview
• AT&T private cellular ICMFA001EU1 Includes optional Wi-Fi hotspot for or European country code and network in the Mini Field Agent (MFA) provisioning and optional private cellular frequencies per catalog number U.S./Canada or cloud connection on AT&T®. European Union per catalog number •... -
Page 9: Related Documentation
Mark* VIe and Mark* VIeS Control Systems Volume I: System Guide GEH-6721 Vol II Mark* VIe and Mark* VIeS Control Systems Volume II: General-purpose Applications GEH-6721 Vol III Mark* VIe and Mark* VIeS Control Systems Volume III: For GE Industrial Applications GEH-6839 Mark* VIe Control Systems Secure Deployment Guide GEH-6700... -
Page 10: Field Agent Architecture
Asset owners can evolve past a break-fix model and implement predictive analytics to minimize unplanned downtime. GE has developed a family of Field Agent devices to address the challenges of communicating equipment data. A Field Agent has two primary functions: •... -
Page 11: Mini Field Agent (Mfa)
1.4 Mini Field Agent (MFA) The GE Mini Field Agent* (MFA) module is a Machine to Cloud collector that securely forwards data to a Predix* Time Series Database Service. The MFA is based on the ARM architecture and designed to meet low power, harsh environment specifications for industrial use. -
Page 12: Mfa Specifications
1.4.1 MFA Specifications Note For the latest information, refer to the webpage at http://www.geautomation.com/products/field-agent Item Description TI AM3352 32-bit ARM processor, 800MHz Processor 512MB DDR3 RAM Memory 2GB on-board flash -40°C to 70°C (0°C to 70°C ATEX), 5 to 95% non-condensing Ambient Temperature, Humidity Use above 55°C requires installation in a restricted access location Real Time Clock Battery... - Page 13 Item Description Housing dimensions 5.53 x 5.33 x 1.55 Inches (140.5 x 135.3 x 39.4 mm) Mounting DIN rail or panel mount Refer to the section Agency Certifications and Standards Certifications IEC 600068-2-6 Operational Vibration 10-57Hz, 0.012"ppk displacement 57-500HZ, 2.0g acceleration IEC 60068-2-27 Operational Shock 15g, 11ms (sine wave)
-
Page 14: Embedded Field Agent (Efa)
1.5 Embedded Field Agent (EFA) The GE Embedded Field Agent (EFA) is available in two physical form factors: the Mark* VIe controller, which is part of the ControlST family of products, and the CPE400 controller, which is part of the PACSystems* family of products. The EFA resides in one of the virtual machines on the controller and uses the Ubuntu®... -
Page 15: Virtual Field Agent (Vfa)
1.6 Virtual Field Agent (VFA) The GE Virtual Field Agent (VFA) is a Virtual Machine that uses the Ubuntu operating system. It contains Predix Machine to allow streaming data to the cloud or running applications locally. It also incorporates User Interfaces for configuring networks and time synchronization, getting Field Agent Product and Linux OS Updates, and checking status and running commands. -
Page 16: Mfa Hardware Instructions
2 MFA Hardware Instructions 2.1 Internal Components The only user-serviceable components in the Mini Field Agent are the Real Time Clock Battery and cellular SIM card. Do not remove or alter any other components on the Mini Field Agent. Caution The MFA module is shipped with a battery pre-installed. -
Page 17: Installation
2.1.1 Installation There are two different mounting options for the MFA: DIN Rail Mount Panel Mount. The ICMFAACC001 MFA Panel Mounting Kit is required to use the Panel Mount option. After mounting the MFA, connect it to the facility network using standard Ethernet cables. -
Page 18: Din Rail Mount
2.1.1.1 DIN Rail Mount The MFA comes equipped with a DIN Rail mounting clip as displayed in the following figure. For DIN Rail mounting, pull the clip down and lock it in place. Place the unit on the DIN rail, and then push the clip up to secure it. The optional panel mounting plate should not be attached because it will prevent DIN rail mounting. -
Page 19: Panel Mount
2.1.1.2 Panel Mount To panel mount the MFA module, attach the ICMFAACC001 panel mount plate to the side of the MFA module using the four M3 screws included with the mounting kit. Attach the panel mount plate in the orientation as displayed in the following figure. -
Page 20: Mfa Interface Details
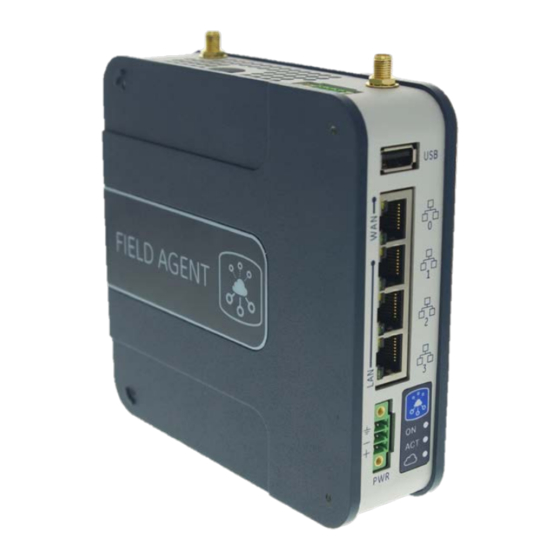
2.1.1.3 MFA Interface Details Note Refer to Mini Field Agent (MFA) Important Product Information (GFK-2997) for version-specific interface details. The following figure displays all four sides of the MFA module with details for connections. Cellular Antenna MicroSD slot Connections (for GE internal use only) -
Page 21: Power Requirements
Grounding There are two ground connections on the Mini Field Agent. One is located on the front power connector and the other is a chassis screw located on the bottom of the unit. BOTH grounds must be connected to earth ground to comply with CE performance requirements. -
Page 22: Pin Definitions
LAN and WAN MFA Interface Details Ethernet interfaces. The default WAN and LAN IP addresses of the Mini Field Agent are displayed in the following table. Item IP Address Obtain using DHCP 192.168.1.100... -
Page 23: Push Button And Leds
2.1.2 Push Button and LEDs The front panel of the MFA contains a blue push button and three indicator LEDs. The LEDs have different behaviors depending on whether the push button is being held. When the push button is not being used, the LEDs behave as follows. ON LED: •... -
Page 24: Push Button Operations
2.2 Push Button Operations The Push Button on the front of the Mini Field Agent (above the green ON LED) is used for the following activities based on how long the Push Button is held and released. Each time interval that corresponds to an operation has a unique fast blink pattern that indicates releasing the Push Button at this time will perform an operation. -
Page 25: Reboot
2.2.2 Reboot If the Push Button is released during this time interval, the Mini Field Agent will perform a graceful reboot and will return to normal operation. 2.2.3 Factory Reset If the Push Button is released during this time interval, the Mini Field Agent will perform a factory reset. This operation will take several minutes, after which the Field Agent will reboot. -
Page 26: Field Agent Sales Catalog
ICMFA001EU0 Mini Field Agent with Cellular and Wi-Fi certified for European Union ICMFA001EU1 Mini Field Agent with Cellular and Wi-Fi certified for European Union, and AT&T SIM card ICMFA002EU0 Mini Field Agent with Wi-Fi certified for European Union 2.3.2 MFA Included Items The following items are included with the MFA (not ordered separately). -
Page 27: Agency Certifications And Standards
2.4 Agency Certifications and Standards Refer to Mini Field Agent (MFA) Installation and Maintenance Requirements (IMR) (GFK-2998) for conformance to these standards. Description Marking Comments North America Safety for Information Certification by Underwriters Laboratories: UL 61010-1, Technology Equipment 61010-2-201, UL 60950-1, UL 60079-0, UL 60079-15, and ISA-12.12.01-2013. -
Page 28: Federal Communications Commission (Fcc)
2.4.1 Federal Communications Commission (FCC) Changes or modifications not expressly approved by the party responsible for compliance could void the user's authority to operate the equipment. Caution GFK-2993F 28 For public disclosure... -
Page 29: Replacement And Spares
System troubleshooting should be at the module level. The failed module should be removed and replaced with a known good spare. The failed device should be returned to GE for repair. Do not attempt to repair it on site. To prevent equipment damage, do not remove, insert, or adjust board connections while power is applied to the equipment. -
Page 30: Renewals And Spares
2.5.2 Renewals and Spares Renewals and spares (or those not under warranty) should be ordered by contacting the nearest GE Sales or Service Office, or an authorized GE Sales Representative. Prior to ordering a replacement part: • Identify the part (e.g. ICMFA000000-AAAA) •... - Page 31 Notes GFK-2993F 31 For public disclosure...
-
Page 32: Efa Hardware Instructions
3 EFA Hardware Instructions Note: The EFA will only respond to ping messages when it is in configuration mode. 3.1 Mark* VIe IS420UCSCH1A CPU w/ Field Agent This section only describes the hardware aspects of the Mark VIe UCSC that explicitly pertain to the Field Agent functionality. For general information about the UCSC hardware, please see GEH-6721_Vol_II Mark VIe and Mark VIeS Control Systems, Volume II: General-purpose Applications. -
Page 33: Ucsc Efa - Push Button And Led
3.1.2 UCSC EFA – Push Button and LED The UCSC Hardware only contains one push button and one LED that affect/reflect information about the EFA. Field Agent Status Indicators (LEDs) LED State Operating State FAOK On Green Field Agent Running and Connected to Cloud. Blinking Green Field Agent Starting. -
Page 34: Pacsystems Ic695Cpe400 Rx3I Rackless Cpu W/ Field Agent
3.2 PACSystems IC695CPE400 RX3i Rackless CPU w/ Field Agent This section only describes the hardware aspects of the CPE400 that explicitly pertain to the Field Agent functionality. For general information about the CPE400 hardware, please see PACSystems RX7i & RX3i CPU Reference Manual, GFK-2222Y or later. 3.2.1 CPE400 EFA -- Network Configuration The CPE400 EFA uses the EFA Port (found on the bottom of the CPE400) to connect to the Predix... -
Page 35: Cpe400 Efa - Led, Display, And Push Buttons
3.2.2 CPE400 EFA – LED, Display, and Push Buttons The CPE400 Hardware only contains one LED and a four-line display (manipulated by two push buttons) that affect/reflect information about the EFA. The description of the Display contents below only covers items related to the Field Agent. -
Page 36: Ge Efa Orderable Items
3.3 GE EFA Orderable Items Catalog Number Description ICCP4MGMT1YR Annual Device Management Fee ICPREDIXSERVICES Predix Services as Consumed GFK-2993F 36 For public disclosure... -
Page 37: Vfa Instructions
Simplex uses VMware vSphere Client. 4.4 Virtual Machine Snapshots Note, once the VFA is up and working it is recommended that a snapshot be made of the VM for backup purposes. 4.5 GE VFA Orderable Items Catalog Number Description ICVFAMGMT1YR... -
Page 38: Getting Started With The Field Agent
5 Getting Started with the Field Agent 5.1 What’s the Minimum I Need to Do to Get Going? This lists the minimum steps that need to be done to start using a Field Agent. The details of how to perform each step are described elsewhere in this document and are just referenced here. -
Page 39: Collect Enrollment And Configuration Information
5.4 Start the Field Agent After providing the Mini Field Agent or the controller with Embedded Field Agent with power, the Field Agent will begin to boot. The green ON LED (for MFA) or FAOK LED (for EFA) will begin blinking when Predix Machine is starting, which is a process that can take approximately one minute. -
Page 40: Log Into The Web Console
5.5 Log into the Web Console To log into the Predix Machine Web Console: Connect a computer to the appropriate port on the Field Agent. For an MFA, use LAN port 1, 2, or 3. For an EFA use the EFA or IICS Cloud Port on the bottom of the device. For a VFA, use LAN1 or LAN2 Configure the computer’s network adapter to be an address on the Field Agent’s network. - Page 41 7. Login using the default credentials. Default User Name: predix • • Default Password: predix2machine 8. A prompt to change the default password displays. Complete the form to change the default password. The password complexity requirements display if the chosen password if not sufficiently complex.
-
Page 42: Configure The Network
255.255.240.0 By default, the Mini Field Agent’s WAN interface is set to acquire an IP address from a DHCP server on the network. The network interface settings that were automatically obtained from the DHCP server can be displayed in the Web Console. - Page 43 To identify a DHCP assigned address for a CPE400 EFA, use the Display on the front of the CPE400. Navigate to FA Settings, and then to Network Config. At this time, it is not recommended to use DHCP for a UCSC EFA, since there is no way to determine what address was assigned to the EFA.
-
Page 44: Configure A Network Proxy
5.6.2 Configure a Network Proxy A Network Proxy is only required when your network architecture is configured to restrict access directly to the Internet. Contact your network administrator for the Network Proxy information. If a network HTTP/HTTPS proxy server is used to route traffic from the intranet to the Internet, the network proxy must be configured in the Web Console under Technician Console, Network Configuration. -
Page 45: Configure The Cellular Network
From the Web Console, navigate to the Technician Console, Network Configuration page. Select Cellular Modem for the cloud connection interface and save changes. The Mini Field Agent can connect to the cloud using either the Ethernet WAN or Cellular Modem. If both interfaces are connected, only the interface selected will be used. -
Page 46: Configure The Access Point Name
The Access Point Name identifies the gateway for the cellular network being used and must be configured based on the installed SIM card. If the Mini Field Agent was ordered with a SIM installed, the correct APN will already be configured. -
Page 47: Configure Time Synchronization
5.7 Configure Time Synchronization In order for industrial data time-stamping and Field Agent diagnostic information to operate reliably, it is important for the Field Agent to have an accurate time source. The Field Agent has two methods of synchronizing time – either by using a Network Time Protocol (NTP) server or by pulling time from a web page hosted by an HTTPS web server with its own reliable time source. -
Page 48: Using Https Time Synchronization
5.7.2 Using HTTPS Time Synchronization Time synchronization can also be configured to use an HTTPS web server's time by pulling it from the header of the web page it serves. To configure HTTPS time synchronization, select the HTTPS Server radio button on the Time Sync Configuration page, enter a valid HTTPS URL, and press the Save button. -
Page 49: Update The Field Agent
GE strongly recommends that customers keep their Field Agent OS up-to-date. In order to ensure that Linux package updates do not break the existing Predix functionality running on the Field Agent, GE uses a daily continuous integration process to verify that updates remain compatible with all Field Agent hardware and Predix software before they become available to installed Field Agents. - Page 50 2. Verify that the Field Agent Updater page displays. GFK-2993F 50 For public disclosure...
-
Page 51: Method 1: Manual Local Update Using A Local Area Network
Using a computer that can be connected to the Field Agent's Local Area Network, navigate to the appropriate Firmware Image page and download the desired Field Agent package version, which ends with a .MAX file extension. Mini Field Agent: https://digitalsupport.ge.com/communities/en_US/Download/ICMFA000000-Mini-Field-Agent-MFA-Firmware-Image Embedded Field Agent: https://digitalsupport.ge.com/communities/en_US/Download/IC695CPE400-Embedded-Field-Agent-EFA-Firmware-Image... -
Page 52: Method 2: Manual Cloud Update Over The Internet
5.8.3 Method 2: Manual Cloud Update over the Internet Before setting up an Automatic Cloud Update schedule using Method 3 below, it is recommended that this method be used to verify connectivity to the selected Update URL and network proxy settings. Attention If the Field Agent has a network path to the Internet, customers can choose to manually initiate an on-demand update of the Field Agent over the Internet. -
Page 53: Method 3: Automatic Cloud Update Over The Internet
5.8.4 Method 3: Automatic Cloud Update over the Internet This is the recommended long-term method for updating the Field Agent. Attention Field Agents with a network path to the Internet can be configured to update themselves automatically on a daily or weekly cadence by specifying a date and/or time for the update to occur. -
Page 54: Upgrade Predix Machine If Applicable
5.8.5 Upgrade Predix Machine If Applicable As new versions of Predix Machine are released by GE Digital, they are integrated into the various Field Agents from GE’s Automation & Controls (A&C), validated, and released as officially supported versions. Due to resource constraints, performance optimizations, and security considerations, the default Predix Machine container is heavily customized to the profile of each A&C Field Agent. -
Page 55: Configure Edgemanager Access
5.9 Configure EdgeManager Access EdgeManager provides a single point of entry for deploying and monitoring devices remotely. You can also administer your apps and configuration files at both a device and fleet level, which helps you keep your device software current and up to date. -
Page 56: Enroll Field Agent In Predix Cloud
Enroll Field Agent in Predix Cloud To administer a Field Agent, it must first be enrolled. Each Field Agent can be enrolled using EdgeManager. Additionally, the Mini Field Agent can be enrolled using the Field Agent Manager iPhone app. 5.10.1 Enroll using EdgeManager The enrollment process involves the following activities. -
Page 57: Create A Device Representation In Edgemanager
(Optional) The Description is a freeform text field. The Enrollment option is either Certificate or OAuth. Certificate is the preferred method and should be used whenever possible. Certificate based enrollment is currently supported on the Mini Field Agent. Other platforms should continue to use OAuth. -
Page 58: Obtain Enrollment Information
5.10.1.2 Obtain Enrollment Information The four pieces of information needed for enrollment are listed below along with where they can be found in EdgeManager. EdgeManager Enrollment URL is available in EdgeManager on the Settings menu pick. • User Authentication and Authorization (UAA) URL is available in EdgeManager on the Settings menu. The •... -
Page 59: Log Into Predix Cloud Enrollment Page In Field Agent Web Console
This is the location of the Device ID and the Activation Code. 5.10.1.3 Log into Predix Cloud Enrollment Page in Field Agent Web Console Follow the steps to Log into the Web Console for the Field Agent being enrolled, and navigate to the Predix Cloud Enrollment page under Technician Console, Predix Cloud Enrollment. -
Page 60: Using Certificate Enrollment
5.10.1.4.1 Using Certificate Enrollment GFK-2993F 60 For public disclosure... - Page 61 After pressing the Enroll Device button, the Enroll Device button will become grayed out while the Field Agent generates a certificate and sends the corresponding Certificate Signing Request (CSR) to the Predix Cloud to be signed and for enrollment to complete. This process can take up to 30 seconds to complete before an enrollment success message is displayed. After certificate enrollment is complete, Predix Machine will restart itself before it appears in EdgeManager as Online.
-
Page 62: Using Oauth Authentication Code Enrollment
5.10.1.4.2 Using OAuth Authentication Code Enrollment GFK-2993F 62 For public disclosure... -
Page 63: Verify The Field Agent Is Online In Edgemanager
After pressing the Enroll Device button, the Technician will be prompted to authorize the enrollment. If an active EdgeManager session is not detected, the Technician will also be prompted to provide EdgeManager credentials. If the EdgeManager Enrollment URL is not accessible from the Field Agent, or if the Technician is not assigned to this Field Agent, a failure message will be displayed in the Predix Cloud Enrollment page. -
Page 64: Enrolling Mini Field Agent Using Iphone App
The GE Energy Connections Field Agent Manager iPhone app is available to GE employees in the GE App Store. It will be available to all customers through the Apple App Store® in a future release. - Page 65 Notes GFK-2993F 65 For public disclosure...
-
Page 66: Using The Field Agent
6 Using the Field Agent 6.1 Device Management 6.1.1 Field Agent Status 6.1.1.1 Using Edge Manager - Field Agent Health Status and Resource Usage The Device Manager in EdgeManager displays several health indications for each Field Agent including reachability, processor utilization, memory utilization, and disk utilization. In the Devices page of the Device Manager, the Status column shows the reachability of each Field Agent. - Page 67 GFK-2993F 67 For public disclosure...
-
Page 68: Field Agent Commands
6.1.2 Field Agent Commands 6.1.2.1 Using Edge Manager - Supported Field Agent Commands EdgeManager can be used to send commands to one or more Field Agents. The list of available commands is extensible, but the core list of commands supported on all A&C Field Agents and meanings are listed below. Additional information on Commands, including how to add and delete Custom Commands, can be found by searching for “Commands Overview”... -
Page 69: Using Web Console - Sending Commands
6.1.2.2 Using Web Console – Sending Commands From the Web Console, navigate to the Technician Console, Status and Commands page. On this page, you can perform the following commands, depending upon which Field Agent you are using: Status Meaning Disable MFA: Disables the Wi-Fi hotspot. -
Page 70: Configuration Management
Embedded Field Agent Predix Machine configuration files can be obtained from the following location: https://digitalsupport.ge.com/communities/en_US/Download/IC695CPE400-Embedded-Field-Agent-EFA-Configuration- Templates Mini Field Agent Predix Machine configuration files can be obtained from the following location: https://digitalsupport.ge.com/communities/en_US/Download/ICMFA000000-Mini-Field-Agent-MFA-Configuration-Templates Virtual Field Agent Predix Machine configuration files can be obtained from the following location: https://digitalsupport.ge.com/communities/en_US/Download/ICVFA000000-Virtual-Field-VFA-Agent-Configuration-... -
Page 71: Compression Utilities
Once a Configuration is uploaded to the EdgeManager Repository, it can be deployed to one or more Field Agents from the Device Manager or Operations pages. Add one or more Field Agents or groups of Field Agents to the Selected Items list and press the Deploy Configuration button. -
Page 72: Predix Machine Web Console Configuration Management
Note If you are not comfortable using the Terminal, the following third-party utilities have been verified to create zip files compatible with the MFA when using their default settings: •StuffIt™ 16 (http://my.smithmicro.com/stuffit-deluxe-mac.html) •WinZip® (http://www.winzip.com/mac/en/index.html) Both of these utilities can be found in the Apple App Store or purchased directly from their manufacturer . Linux: A compatible zip file can be created from the shell. - Page 73 To adjust any of the parameters in a given configuration file, click the row corresponding to the bundle to be updated, edit the parameters, and press the Save button. GFK-2993F 73 For public disclosure...
-
Page 74: Application Management
Embedded Field Agent Predix Machine application bundles can be obtained from the following location: https://digitalsupport.ge.com/communities/en_US/Download/IC695CPE400-Embedded-Field-Agent-EFA-Application-Templates Mini Field Agent Predix Machine application bundles can be obtained from the following location: https://digitalsupport.ge.com/communities/en_US/Download/ICMFA000000-Mini-Field-Agent-MFA-Application-Templates Virtual Field Agent Predix Machine application bundles can be obtained from the following location: https://digitalsupport.ge.com/communities/en_US/Download/ICVFA000000-Virtual-Field-Agent-VFA-Application-Templates... - Page 75 The OSGi, Bundles page allows individual application bundles to be installed, updated, removed, stopped, and started. To install or update an application bundle, click the “Install/Update…” button in the upper right-hand corner to open the “Upload/Install Bundles” dialog. Click the “Choose File” button, browse to the JAR file of the application bundle, and click the “Open”...
-
Page 76: How To Open Ports On A Field Agent
TCP ports and a line for UDP ports. The following example shows opening up TCP ports 8080 and 8081 and UDP ports 7937 and 18246. com.ge.ac.fieldagent.network.ports.open.lan.tcp="8080,8081" com.ge.ac.fieldagent.network.ports.open.lan.udp="7937,18246" Once the com.ge.ac.fieldagent.network.ports.cfg file is edited as required for this job, it must be deployed. For instructions on deploying a configuration, see Configuration Management. -
Page 77: Configuring Data Collection And Sending Data To The Cloud
OPC UA Server or Modbus Slave, and streaming data to a Time Series Database. A copy of this tool and its associated User’s Guide can be found at the following URL: https://digitalsupport.ge.com/communities/en_US/Download/Field-Agent-Configuration 6.2.3 Configure the Field Agent Data Source This section and the next describe how to manually configure a Field Agent. -
Page 78: Configure An Opc Ua Data Source
Configure an OPC UA Data Source The steps to configure the OPC UA Machine Adapter are: Open the file com.ge.dspmicro.machineadapter.opcua-0.config for editing. Edit line 52 to specify the path to the OPC UA configuration XML file, which by default will be: •... -
Page 79: Configure A Modbus Tcp Data Source
Configure a Modbus TCP Data Source The steps to configure the Modbus Machine Adapter are: Open the file com.ge.dspmicro.machineadapter.modbus-0.xml for editing. Edit the data contained within the dataNodeConfigs and dataSubscriptionConfigs elements to specify the following: Each channel element corresponds to a Modbus Slave Server from which this program will read values. -
Page 80: Configure Sending Data To The Predix Cloud
This is done by specifying a Zone ID, which is unique to each EdgeManager tenancy. The steps to configure the Hoover Spillway and WebSocket River are: Open the file com.ge.dspmicro.hoover.spillway-0.config for editing. Edit line 60 to set com.ge.dspmicro.hoover.spillway.dataSubscriptions to include only the data subscription names defined in section Configure the Field Agent Data Source. -
Page 81: Guidelines For Maximum Configured Variables
NOTE Using the OPC UA Machine Adapter without Store and Forward is not currently supported on the EFA or VFA. When Store and Forward is disabled, the OPC UA Machine Adapter limits for the Mini Field Agent platform are displayed in the following table. -
Page 82: Using Store And Forward With The Opc Ua Machine Adapter
PublishInterval does not match its available subscription intervals. It is recommended to confirm that the OPC UA Server to which the Mini Field Agent is connected can serve data at the requested interval. Note The minimum supported OPC UA Machine Adapter PublishInterval on the Field Agent is 500ms when running Predix Machine 17.1.2 or later. -
Page 83: Using The Modbus Tcp Machine Adapter
6.2.5.3 Using the Modbus TCP Machine Adapter The Modbus TCP Machine Adapter limits for each Field Agent platform are displayed in the following table. Supported Configurations for Modbus TCP Machine Adapter Update MFA Max Configured and Published EFA Max Configured and Published Interval (ms) 4-Byte Variables 4-Byte Variables... -
Page 84: Using Store And Forward When Internet Connectivity Is Disrupted And Restored
Using Store and Forward When Internet Connectivity is Disrupted and Restored At a publish rate of 100 4-Byte Variables every second, the Mini Field Agent can store data for one hour when Internet connectivity has been disrupted. At maximum load, the Embedded Field Agent can store data for 24 hours when Internet connectivity has been disrupted. -
Page 85: Reconfigure The Field Agent
6.2.6 Reconfigure the Field Agent After completing the local changes to Configure the Field Agent Data Source Configure Sending Data to the Predix Cloud, complete one of the two methods for updating the configuration on the Field Agent to reflect these local changes. •... - Page 86 Notes GFK-2993F 86 For public disclosure...
- Page 87 For public disclosure...
Need help?
Do you have a question about the Mini Field Agent and is the answer not in the manual?
Questions and answers