Table of Contents
Advertisement
Advertisement
Table of Contents

Summary of Contents for Quadivator ST50
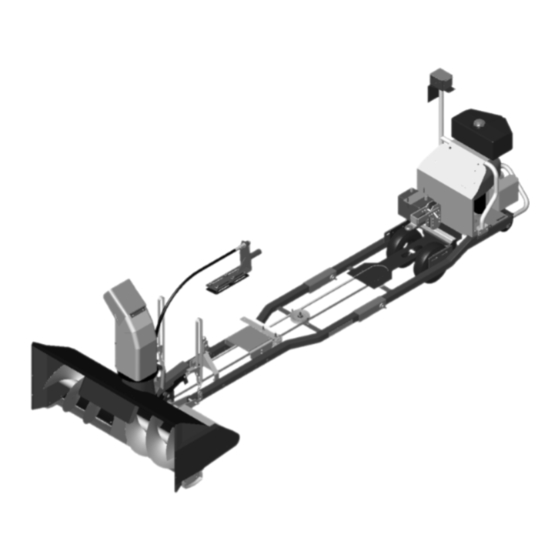
- Page 1 Quad Snow Thrower ST50 - 05 Assembly/Operators/Parts Manual English Language Version 05 Printed: January, 2005 ST50 - Snow Thrower 50" Width READ & SAVE THIS MANUAL QUADIVATOR INC. 1000 6th Ave. NE Portage La Prairie, MB Canada, R1N 3C5 www.quadivator.com...
- Page 3 SAFETY FIRST This symbol, the industry’s “Safety Alert Symbol”, is used throughout this manual and on labels on the device itself to warn the possibility of personal injury. Read these instructions carefully. It is essential that you read the instructions and safety regulations before you attempt to assemble or use this mower.
- Page 4 FOREWARD You are now the owner of a Quadivator ST50 Snow Thrower. To obtain the best use of your Snow Thrower, read this manual carefully. It will help you become familiar with the operation and maintenance of the Quadivator ST50.
- Page 5 1Start the Quadivator Snow Thrower and allow it to run for 5 – 10 minutes, check for excessive operation or unusual noise. 1The Quadivator Snow Thrower has been tested and to the best of my knowledge, is ready to be delivered to the customer! Date Predelivered –...
- Page 7 1 Parts & Service Availability. Prior to delivery to the customer, do the following: 1 Record Serial Numbers for the Quadivator Products 1 Sign and remove this section for the dealer’s record. 1Give the customer the Operator’s Manual and encourage the customer to read the manual.
-
Page 9: Table Of Contents
.2 Snow Thrower Terminology 4. Set – Up .1 Setting up the ST50 Snow Thrower. 5. Mounting of the ST50 to the ATV – Initial Fit Up 6. Mounting and Dismounting Routine of the Snow Thrower to the ATV –... - Page 10 .4 Be sure the area is clear of bystanders, children and pets before operating. Stop machine if anyone or anything enters the area. NEVER CARRY PASSENGERS while clearing snow with the ST50 - EVEN IF YOURS is a TWO-UP ATV! When operating the ATV Mounted Snow Thrower –...
- Page 11 .4 Adjust the collector housing height of the ST50 Snow Thrower to clear gravel or crushed rock surface that is being cleaned. .5 Never attempt to make adjustments to the ST50 Snow Thrower while the engine (motor) is running!! .6 Let engine (motor) and machine adjust to outdoor temperatures before starting clear snow.
- Page 12 .9 Do not clear snow across the face of slopes. Exercise extreme caution when changing direction on slopes. Do not attempt to clear steep slopes. .10 Never operate the snow thrower without proper guards, plates or other safety protective devices in place. .11 Never operate the snow thrower near glass enclosures, automobiles, window wells, drop offs and the like without proper adjustment of the snow discharge angle.
-
Page 13: Service
2. There is a serial number on the left side of the snow thrower, just to the left of the collector chute. 3. For your reference, record the serial number of your Quadivator product at the front of this manual and keep it for reference when contacting your dealer and/or Quadivator. -
Page 14: Setting Up The St50 Snow Thrower
4. The ST50 Discharge Chute Crank Mechanism 5. ST50 Belt Tension and hardware package .2 Set the ST50 Impeller housing on a smooth level surface for assembly! .3 Attach the Discharge Chute & Spout Assembly to the Impeller Housing with the 4 attaching sliders and hardware – as shown! .4 Attach the ST50 Discharge Chute Crank Mechanism –... - Page 15 4. Winch is attached to the hook location and lifted. 5. Snow Thrower is adjusted side to side. This initial fit up – Quadivator ST50 to ATV - should take place on a flat hard surface that has enough room to mount the thrower to the ATV, and then...
- Page 16 NOTE – the initial lifting of the ST50 by winch should be done very cautiously, the winch should “bottom” on the winch hook – before the ST50 contacts the ATV front frame or the ATV itself. Use the chain provided to loop through the mounted hole as shown in illustration below.
- Page 17 – adjust if required to ensure smooth movement. Step 7 – Level the ST50 from side to side with spacers under the scraper blade and adjust the skid shoes to the same height, start with 10 mm (3/8”) and then to...
- Page 18 Level from side to side from the ground with spacer from the scraper blade to ground. Chain drive behind the guard on the LHS of the ST50. Skid shoe adjust up and down via slotted bolts. Lift height need be no more than 4.0”...
- Page 19 1. Allow the engine to warm up to operating temperature before engaging the ST50 for the first time. 2. Engage the clutch for the ST50 at just above idle, then run the engine to maximum RPM, and allow the ST50 to rotate or operate for several minutes to reach operating temperatures in all of the drives.
- Page 20 ALWAYS shut the motor engine off before disconnecting from the ATV. Step 1 - Stop the ATV where you want to leave the ST50, SHUT OFF the ATV and place in PARK and apply the handbrake – ensure the ST50 motor is off. Step 2 –...
-
Page 21: Operating Section
7. Operating Section – ST50 The Quadivator ST50 Snow Thrower mounted to an ATV is designed to clean snow from roads, paths and driveways. Your ST50 Snow Thrower mower should be attached to an ATV in the manner described in this manual and... - Page 22 7.2 Adjusting the Scraper Blade Clearance - ST50 Snow Thrower Lower the ST50 to the ground. Loosen the bolts holding the skid shoes on either end of the ST50 frame. Adjust the distance from the scraper blade to skid shoes to 3 mm for smooth surfaces.
- Page 23 Avoid injury – ALWAYS shut off the ST50 and the CAUTION ST50 motor when you leave the ATV seat. DANGER Warning Decals on the discharge spout & ends of the impeller housing warn of the possible danger of trying to unplug a rotating impeller on a ST50!
- Page 24 Adjusting the ST50 Discharge Chute – Left to Right The hand crank mechanism on the RHS of the front rack turns the discharge chute from side to side on the ST50 – clockwise turns the chute left, counter clockwise turns the chute right.
- Page 25 Impeller to STOP before attempting to adjust the discharge spout. Transporting of the ST50 Snow Thrower When transporting a ST50 w. ATV on a trailer – use a trailer with legal lights: - drive the ATV & ST50 to the trailer deck...
-
Page 26: Maintenance Section
Check Deck Drive Belt Tension – Engine to the Mower Deck Replace Impeller Shear Bolt Check Drive Belts for Physical Wear Replacement of the Impeller Shear Bolt – ST50 WARNING To avoid personal injury ALWAYS shut the engine off when working on the impeller. - Page 27 Drive Belt Tension is adjusted two ways, one with the slack side tension spring located on the LHS of the impeller drive between the ATV & ST50 and secondly with the belt tensioning device at the rear of the Power Unit.
- Page 28 8.5 Replacement of the Scraper Blade The scraper blade is located on the front of the ST50 Snow thrower housing. Bolts along the scraper blade are removed – they are Carriage Bolts – ¼ x 5/8 Gr5 ZP. The scraper blade, Part # 89246 can be reversed for longer life! 8.6 Replacement of the Skid Shoes...
- Page 29 The impeller drive chain can be changed by removing the auger drive shield on the LHS of the ST50 and locating the connector link on the chain. Remove the clip and the retaining link and then take the old chain from the ST50 drive and replace with a new chain and connector link! ALWAYS replace the chain drive shield on the LHS of the ST50 Snow Thrower.
- Page 30 8.9 Torque Tightening Chart This Torque Tightening Chart is to be used to ensure that the hardware used on the Quadivator Product is tightened adequately to the deign capacity of the hardware. Use the Torque Tightening Chart when ensuring that the hardware on your Quadivator Product is...
- Page 31 9. Troubleshooting – ST50 Snow Thrower Problem Probable Cause Correction 1. Out of fuel 1. Fill the fuel tank. 2. Fuel shut off valve - Closed 2. Open the fuel shut off valve. 3. Turn off the engine, remove key, wait for 3.
- Page 32 Quad Snow Thrower 10-1 Snow Thrower Assembly Snow Thrower Assembly (89200-05): ITEMS NOT SHOWN Roller Chain Parts Manual - Version 05...
- Page 33 10-2 Quad Snow Thrower Snow Thrower Assembly - Parts List Snow Thrower Assembly Parts List (89200-05): ITEM PART DESCRIPTION 89200-05/QTY. 30091 Spacer - Door Hinge 88540 Spacer - Bushing 88574 Idler Pulley - 3" 88579 UNMW - Flange Bearing 89085 Weldment - 8"...
- Page 34 Quad Snow Thrower 10-3 A/C Snow Thrower Assembly Snow Thrower Assembly (89200-AC): *This model applies to the Arctic Cat Show Thrower ITEMS NOT SHOWN Roller Chain Parts Manual - Version 05...
- Page 35 10-4 Quad Snow Thrower A/C Snow Thrower Assembly - Parts List Snow Thrower Assembly Parts List (89200-AC): 89200-AC/QT ITEM PART DESCRIPTION 30091 Spacer - Door Hinge 88540 Spacer - Bushing 88579 UNMW - Flange Bearing 89085 Weldment - 8" Pulley 89090 Weldment - Sprocket, Small 89204...
- Page 36 Quad Snow Thrower 10-5 Hose Crank Assembly Hose Crank Assembly (89300, 89300-AC): 89300-AC Arctic Cat 89300 Quadivator ITEM PART DESCRIPTION 89300/QTY. 89300-AC/QTY. 88579 UNMW - Flange Bearing 89285 W.A. - Hose Crank 89295 W.A. - Support Bracket 89312 Handle - Crank...
- Page 37 10-6 Quad Snow Thrower Decal Locations Item No. PART # DESCRIPTION QTY. 89541 Warning - ST50 Foot SW108 Danger - Moving Parts 17264 Tape - Red 88666 Serial Plate 89543 Warning - ST50 General 89542 Warning - ST50 Hand 88665...
- Page 38 Quadivator Snow Thrower ST-50 – 05. To obtain replacement parts, please contact your Quadivator Dealer for Service. To locate the nearest dealer, please contact a Quadivator Representative using the contact information below. When ordering parts – please have the following information on hand: -Part Number you are looking for.
-
Page 39: Quadivator Warranty Statement
Any engine service difficulty is the responsibility of the engine manufacturer and in no way is Quadivator Inc. or its agents responsible for the engine warranty. The Briggs & Stratton Engine Service Hot Line is 1-800-233-3723. -
Page 41: Warranty Registration
WARRANTY REGISTRATION – Quadivator ST50 Snow Thrower – 05 Please fax this sheet to (204) 239-4271 or mail it to: Quadivator Inc. PO Box 1127 1000 – 6 Ave NE Portage la Prairie Manitoba R1N3C5 CANADA Snow Thrower Model # -...
Need help?
Do you have a question about the ST50 and is the answer not in the manual?
Questions and answers
The front belt "b116" keeps dropping down from the center Pulley and destroyed itself. I can't figure out why?