Table of Contents
Advertisement
Quick Links
Download this manual
See also:
Instruction Manual
Overview
The NMX-ENC-N2151 Encoder and NMX-DEC-N2251 Decoder provide a flexible,
feature-rich, and simple-to-deploy Digital Media Distribution and Switching solution
which satisfies the most demanding 4K applications with resolutions up to 3840x2160.
JPEG2000 compression allows Ultra HD media to be switched and distributed over
standard gigabit Ethernet networks.
HD signals from the N2151 Encoder are provided simultaneously as:
•
JPEG2000-compressed 900-Mbps stream through the RJ-45 or small-form-
pluggable (SFP+) connector.
•
Uncompressed stream through the SFP+ connector compatible with fiber or
copper.
Any source can be sent to any number of displays by routing through layer-3 switches.
System scalability is limited only by up-link and stacking connector bandwidths.
Standard features like input and output scaling, bi-directional serial, IR, embedded 7.1
audio, and KVM-over-IP extension are included. The N2151 and N2251 cards are
compatible with SVSi's N9206 card cage for high-density applications.
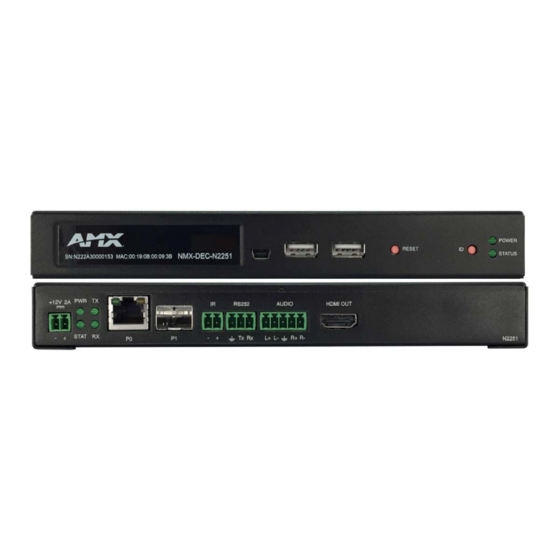
N2X51 USB AND SFP+ PORTS
FIG. 1
Basic Installation Guidelines
Connections
Options
Power:
Connect a 12V regulated power supply (included in shipment) to the unit's
two-pin terminal block plug connector labeled +12V 2A.
Network:
Connect the P0 port to the network using an Ethernet cable, or connect
the P1 port to the network (fiber transceiver or direct attach cable
required as explained in FIG. 1).
Video:
N2151 Encoders
• For video encoding of a digital source, connect the source to the
Encoder's HDMI IN port using a video cable with an HDMI connector (or
adapter).
• For video encoding of an analog source, connect the source to the
Encoder's VGA IN port using a video cable with a VGA connector (or
component adapter).
N2251 Decoders
• For video decoding, connect a digital display to the Decoder's HDMI
OUT port using a video cable with an HDMI connector (or adapter).
Audio:
N2151 Encoders
• For audio encoding, connect a line level analog audio source to the
Audio input terminal block plug connector, or
• Use the embedded audio from the video source.
N2251 Decoders
• For analog audio decoding, connect a line level analog audio device to
the Audio output terminal block plug connector, or
• Send embedded digital audio (embedded in the HDMI connection) to a
monitor's speakers.
NOTE: Connecting both network connections to the same network simultaneously can
create a network loop. Therefore, for uncompressed or fiber applications, only use the
SFP+ port.
One USB Mini-B Port
(supported by Encoders)
Two USB Standard-A Ports
(supported by Decoders)
P1 port accepts a 10G SFP+ fiber transceiver
or a 10G SFP+ direct attach cable
SVSI N2151/N2251
Product Specifications
Models Available (in
NMX-ENC-N2151 Encoders
stand-alone or card
NMX-DEC-N2251 Decoders
versions):
Power Requirements:
2.0 Amp @ 12 Volts DC; 100-240 Volts AC power supply with
country-specific power cord (included in shipment)
Dimensions (HWD):
1.05" x 7.888" x 5.5" (2.67cm x 20.04cm x 14cm)
Weight:
1.55 lbs (0.7kg)
Certifications:
FCC, CE, and NTRL
Environmental:
Temperature: 32° to 104°F (0° to 40°C)
Humidity: 10% to 90% RH (non-condensing)
Mounting Options:
Stand alone, surface mount, wall mount, or rack mount.*
NOTE: *Mounting wings (part number N9101) required for surface and wall mounting.
Rack shelf (part number N9102) or card cage (part number N9206) required for rack
mounting. Shelf accommodates two side-by-side N-Series stand-alone Encoders and
Decoders. Card cage accommodates up to six N-Series Encoder and Decoder cards
(mix and match any series). Mounting accessories sold separately and are compatible
with most N-Series devices.
Establishing Connection
Before using your N2X51 unit, it must be configured using the free N-Able device
management software. However, you will not be able to configure units until they are in
the same subnet as the host computer. N-Series devices are shipped in Auto-IP mode
with a default IP address of 169.254.xxx.xxx. The sample steps below show how the
required changes (to the host computer's IP settings) are made in a Windows
environment.
Steps for IP address configuration (for Windows 7 and 8):
1.
From the Control Panel > Network and Internet dialog box, select Network and
Sharing Center.
2.
Select Change adapter settings.
3.
Select the wired interface connected to your AV network.
4.
Click the Properties button.
5.
Scroll down in the list to the Internet Protocol Version 4 (TCP/IPv4) option.
Highlight it and click the Properties button.
6.
Enable the Use the following IP address option, and enter the static IP address
provided to you by your network administrator.
NOTE: If the computer does not need Internet access, you can simply enter a unique
169.254.xxx.xxx IP address with a 255.255.0.0 Subnet mask. Please contact your
network administrator if you are unsure of how to configure the existing interface. If the
computer has a statically-assigned IP address, click on the Advanced button. Then click
Add to enter a unique 169.254.xxx.xxx address with a subnet of 255.255.0.0.
Steps for auto discovering devices on the network:
1.
Use the host computer to download and install the latest version of N-Able:
PC version -
http://www.amx.com/products/N-ABLE-PC.asp
Mac version -
http://www.amx.com/products/N-ABLE-MAC.asp
2.
Attach your N2X51 unit(s) to the layer-3 network switch.
3.
Disable the wireless adapter on your computer (it must be hard-wired to the
switch).
4.
Connect the host computer to the layer-3 network switch.
5.
Open the N-Able application.
If all devices do not appear automatically, click the Auto Discover button on the
Unit Management tab. This issues a broadcast command that will discover all units
even if they are not in the same IP subnet.
Logging in Using N-Able Software
Once the host IP address is configured properly, you can view all discovered units using
the N-Able software. Access the N2X51 units from the following tabs:
•
Unit Management tab - N-Series 4K Encoder/Decoder is listed in the Type field.
•
Video Matrix tab - N2X51 units are found on the Uncompressed 4K and
Compressed 4K sub-tabs of this screen.
Double-click the unit's name (in one of the lists mentioned above) to view its control
page. If prompted, enter admin and password for the default username and password.
Once logged in, you can change the username and password (using the options on the
unit's Settings page).
NOTE: If you would like for N-Able to support auto-login to your units, make sure
N-Able's Device Auto-login settings match the unit's username and password (by
selecting N-Able > Settings from the N-Able tool bar).
NOTE: N2X51 units force HTTPS connections, so your web browser may give you a
security warning. N-Able on Windows will ask you to download OpenSSL for Windows to
connect HTTPS. You can disable the Force HTTPS Connection checkbox on the unit's
Security page if desired.
QUICK START GUIDE
4K HD Series
Advertisement
Table of Contents

Related Manuals for AMX NMX-ENC-N2151


Summary of Contents for AMX NMX-ENC-N2151
- Page 1 QUICK START GUIDE SVSI N2151/N2251 4K HD Series Overview Product Specifications The NMX-ENC-N2151 Encoder and NMX-DEC-N2251 Decoder provide a flexible, Models Available (in NMX-ENC-N2151 Encoders feature-rich, and simple-to-deploy Digital Media Distribution and Switching solution stand-alone or card NMX-DEC-N2251 Decoders which satisfies the most demanding 4K applications with resolutions up to 3840x2160.
- Page 2 HARMAN. Oracle, Java and any other company or brand name referenced may be trademarks/registered trademarks of their respective companies. AMX does not assume responsibility for errors or omissions. AMX also reserves the right to alter specifications without prior notice at any time.
Need help?
Do you have a question about the NMX-ENC-N2151 and is the answer not in the manual?
Questions and answers