AMX NMX-ENC-1105 Quick Start Manual
Hide thumbs
Also See for NMX-ENC-1105:
- Instruction manual (60 pages) ,
- Instruction manual (58 pages) ,
- Quick start manual (2 pages)
Table of Contents
Advertisement
Quick Links
Download this manual
See also:
Instruction Manual
Overview
The NMX-ENC H.264 encoder is an audio/video encoder which supports high-definition
video and H.264 encoding and recording. The encoder can stream either unicast or
multicast streams. Dual streaming is also supported (one unicast stream and one
multicast stream, or two unicast streams. Two multicast streams are not supported.)
The NMX-ENC is available in two different versions: NMX-ENC-1100 (FG3201-01) and
NMX-ENC-1105 (FG3201-02). The NMX-ENC-1105 has the same features as the
NMX-ENC-1100 and adds SDI input and pass-thru ports on its rear panel.
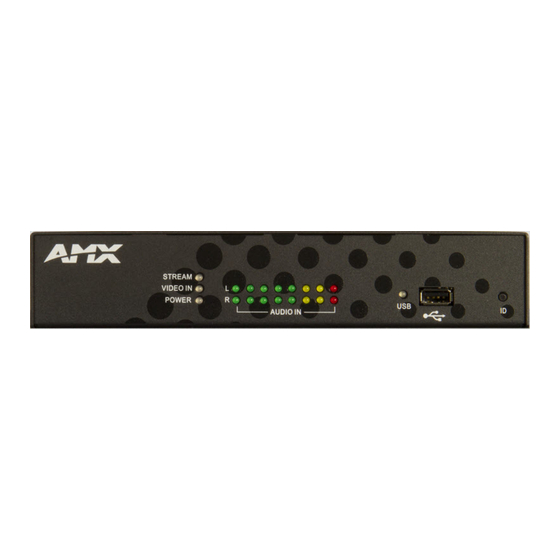
FIG. 1 displays the NMX-ENC encoder.
FIG. 1 NMX-ENC encoder
Specif ications
The following table lists the specifications for the encoder:
NMX-ENC ENCODER SPECIF ICATIONS
Power:
Maximum Consumption: 13W
Typical Consumption: 10W
Operating Voltage: 10VDC to 18VDC
Environmental:
Operating Temperature: 32º to 104º F (0º to 40º C)
Storage Temperature: –4º to 158ºF (–20º to 70ºC)
Operating Humidity: 5% to 85%, non-condensing
Dimensions:
1 5/8" x 8 3/4" x 5 1/8" (4.2cm x 22.16cm x 13.08cm) (HWD)
Weight:
NMX-ENC-1100: 2.25 lbs. (1.02kg)
NMX-ENC-1105: 2.3 lbs. (1.04kg)
Certifications:
RoHS, FCC Part 15 Class B, CE, IEC60950, UL
Included
1 Power Supply, 4.5A, 13.5VDC, 3.5mm retained Phoenix connector
Accessories:
(FG423-46)
1 Connector, Phoenix3, F, BLACK
1 Connector, Phoenix4, F, TH, BLACK, 3.5mm
Minimum Performance Specif ications
A client PC playing back streams from the encoder should have the following minimum
specifications:
•
2.4 GHz Core2 Duo
•
4 GB RAM
Mounting the Encoder
You can mount the encoder in a rack by using an NMX-VRK V-Style Rack Shelf
(FG3201-60). The encoder also has rubber feet you can attach to the bottom of the
unit for table-top mounting. Consult the NMX-VRK V-Style Rack Shelf Quick Start Guide
for further information on mounting the encoder.
Installation
FIG. 2 displays the rear panel of the NMX-ENC-1105. Note that the NMX-ENC-1100 has
the same features, but does not have SDI ports.
SDI
LAN (connect Port 1 to network)
Audio
Multi-format
(for video input)
HDMI (for
video output)
FIG. 2 NMX-ENC-1105 rear panel
USB
Power
NMX-ENC-1100/1105
Step 1: Connecting the Encoder to a Video Output
There are several options for connecting audio and video sources to the encoder.
•
The multi-format video input source can accept DVI Video sources directly with
audio connected to corresponding audio input.
•
You can connect HDMI, component video, composite video, S-Video, and RGB
sources to DVI-I by using appropriate adapter cables. You can connect the audio
associated with these sources to the appropriate audio jack on the rear panel of
the encoder.
•
Digital audio embedded in HDMI through the DVI connector can be multiplexed
and used for encoding and pass through to monitor output.
•
On the NMX-ENC-1105, the SDI input can receive video with 2 channel LPCM
audio at 48kHz sampling frequency.
The following table lists the audio options for each video type:
AUDIO OPTIONS PER VIDEO TYPE
Digital Audio
Multi-Format (DVI)
Only if embedded in
an HDMI signal
SDI
Step 2: Connecting the Encoder to Your Network
Using Cat5 cable, connect LAN port 1 to your facility network.
IMPORTANT: You must have access to a DHCP server to initially conf igure the encoder.
CAUTION: It is possible to disable LAN ports 2-4 and leave only port 1 enabled. Since it is
possible to turn off these ports, you should ALWAYS connect your main network artery to
port 1.
NOTE: The Ethernet switch in the encoder is intended to be used as a workgroup extender
switch for conveniently connecting devices such as PCs, touch panels, and other
network-connected A/V equipment. It is not a smart switch, and as such other encoders
or streaming devices should not be connected to the switch ports on the encoder. If
multiple encoders are to be used in a location they should each have a dedicated facility
network connection or a smart switch should be added that can have multiple encoders
connected to it.
Step 3: Applying Power to the Encoder
The encoder must be powered locally using the included power supply. Apply power by
connecting the power supply to the PWR port.
Retrieving the IP Address of the Encoder
You can retrieve the IP address and other configuration information for the encoder by
inserting a USB drive into the encoder and pressing the ID pushbutton. The encoder
creates and copies a text (.txt) file to the USB drive with a list of configuration
information including the IP address of the encoder. Perform these steps to locate the
IP address of the encoder:
1.
Insert a USB drive into the USB port on the front panel of the encoder. The USB
LED beside the port appears green once the USB drive is mounted.
NOTE: NTFS-formatted drives are not supported.
2.
Press the ID pushbutton. When the LED flashes green, the encoder is copying a
.txt file to the USB drive. The encoder is finished transferring the file to the USB
drive when the LED stops flashing.
3.
Remove the USB drive from the encoder and insert it into a PC or any other device
which can read the file.
4.
On the PC, navigate to the USB drive. The filename contains the encoder's serial
number, IP address, and IP type (DHCP or Static). You can open the file to view the
MAC address, subnet mask, and gateway address.
NOTE: If the encoder is unable to receive the IP address at the time of retrieval, the
f ilename will have "unavailable" listed in place of the IP address.
FIG. 3 displays an example of a configuration file. The filename contains the encoder's
serial number, IP address, IP type, and a time stamp.
FIG. 3 Encoder configuration file
NOTE: Writing the conf iguration f ile to the USB drive can only occur once per drive
insertion. If you need the encoder to copy the f ile another time, you must remove the
USB drive and insert it again into the USB port on the front panel.
QUICK START GUIDE
H.264 Encoder
Analog Audio
No Audio
(through Audio
inputs)
Advertisement
Table of Contents

Related Manuals for AMX NMX-ENC-1105


Summary of Contents for AMX NMX-ENC-1105
-
Page 1: Quick Start Guide
.txt file to the USB drive. The encoder is finished transferring the file to the USB drive when the LED stops flashing. FIG. 2 displays the rear panel of the NMX-ENC-1105. Note that the NMX-ENC-1100 has the same features, but does not have SDI ports. - Page 2 For more information, consult the product page at www.amx.com for data sheets and the NMX-ENC H.264 Encoder Instruction Manual. © 2016 Harman. All rights reserved. AMX, AV FOR AN IT WORLD, and HARMAN, and their respective logos are registered trademarks of HARMAN. 93-3201-01 REV: G Oracle, Java and any other company or brand name referenced may be trademarks/registered trademarks of their respective companies.
Need help?
Do you have a question about the NMX-ENC-1105 and is the answer not in the manual?
Questions and answers