Table of Contents
Advertisement
Quick Links
Advertisement
Table of Contents

Related Manuals for AMX DUX-SCL


Summary of Contents for AMX DUX-SCL
- Page 1 USER MANUAL DUX-SCL HDMI SCALER...
-
Page 2: Table Of Contents
Table of Contents IMPORTANT SAFETY INSTRUCTIONS ..............03 INTRODUCTION .....................04 PACKING LIST .......................05 SPECIFICATIONS ....................06 PANEL OVERVIEW ....................08 SCALER SWITCH ....................10 INSTALL HARDWARE ....................11 RS232 CONTROL ....................12 TROUBLESHOOTING .....................13 APPENDIX: API COMMAND ...................14 USER MANUAL - DUX-SCL HDMI SCALER... -
Page 3: Important Safety Instructions
Only use attachments/accesso- Refer all servicing to qualified ries specified by the manufac- service personnel. turer. USER MANUAL - DUX-SCL HDMI SCALER... -
Page 4: Introduction
HDMI Matrix switchers, etc., where HDMI is used. DUX-SCL accepts input resolutions from 800 x 600 to 1920 x 1200 (VESA) and 480p to 2160p (SMPTE) and supports output resolution 1280 x 768, 1280 x 800, 1920 x 1200, 3840 x 2160 and Auto Scaler (VESA) and 1280 x 720P, 1920 x 1080P (SMPTE). -
Page 5: Packing List
PACKING LIST 1 x DUX-SCL 1 x Power Adapter (12 VDC, 1.5A) 1 x Phoenix Male Connector (3.5 mm, 3-pin) 2 x Mounting Brackets 1 x User Manual USER MANUAL - DUX-SCL HDMI SCALER... -
Page 6: Specifications
4 = @ 29.97 Hz, 5 = @ 30 Hz, 6 = @ 50 Hz, 7 = @ 59.94 Hz, 8 = @ 60 Hz; 100 Ω Video Impedance Maximum Pixel Clock 594 MHz Control Control Method RS232 USER MANUAL - DUX-SCL HDMI SCALER... - Page 7 Human-body model: ESD Protection • ±8 kV (Air-gap discharge) • ±4 kV (Contact discharge) Dimension (W × H × D) 110 mm × 25 mm × 150.1 mm Weight 0.5 kg Certification CE, FCC USER MANUAL - DUX-SCL HDMI SCALER...
-
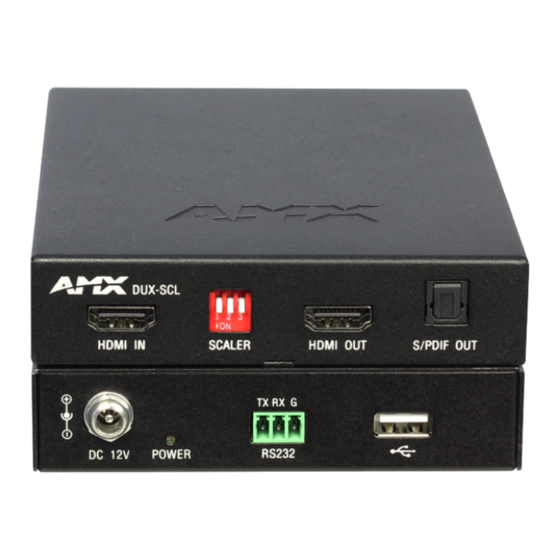
Page 8: Panel Overview
HDMI IN Connects to an HDMI source device. SCALER SWITCH Adjusts the Output scaling. HDMI OUT Connects to an HDMI display device. S/PDIF OUT Connects to an audio system for digital audio signal output. USER MANUAL - DUX-SCL HDMI SCALER... - Page 9 Rear Panel Item Name Description DC 12V Connects the Power Adapter provided. On: DUX-SCL is powered on. POWER LED Off: DUX-SCL is powered off. RS232 For RS232 serial communication or firmware upgrading. USB Connector Connects to a flash drive for upgrading.
-
Page 10: Scaler Switch
DUX-SCL installs a “SCALER” Switch for manual adjustment of the scaling output. By default, the SCALER Switch is in “Auto Scaler” position (all switches are set to 000 or upward). Users are allowed to set DUX-SCL to desired scaling output resolution by using the SCALER Switch. -
Page 11: Install Hardware
1. Connect DUX-SCL’s HDMI IN to an HDMI input source (e.g. DVD player, game console, satellite/cable TV, media server, etc.). 2. Connect DUX-SCL’s HDMI OUT to an HDMI output display (e.g. TV screen) or an HDMI Matrix (e.g. DUX-8C). 3. If audio output is needed, connect DUX-SCL’s S/PDIF to an audio system. -
Page 12: Rs232 Control
Connect a control PC to the RS232 port on the rear panel, configure the RS232 interface of DUX-SCL and the control PC correctly, then you can send API commands to the device over a professional serial interface software to start controlling or firmware upgrading. -
Page 13: Troubleshooting
• Check that your display device is switched to the correct source input mode. • Check that no compatibility issue exists between DUX-SCL and the display. If so, replace the display with other models. • Check that the SCALER Switch is set to the right position. For more information, please see SCALER SWITCH. -
Page 14: Appendix: Api Command
Description: Description: CECAUTO_DELAY is short for CEC Define Delay 5 minutes to control auto Power Delay Timing the sink power off when no active D#: #={0~30min} signal USER MANUAL - DUX-SCL HDMI SCALER... - Page 15 Command: Command: ~VER! ~VER! Return: Return: To determine the system’s Applica- ~VER!( ^^^ ) ~VER!( 1.0 ) tion Code version Description: Description: Determine the system’s Applica- The system’s version is 1.0 tion Code version USER MANUAL - DUX-SCL HDMI SCALER...
- Page 16 Description: To verify UART end char # : # = {1~4} UART end char is null 1 : NULL 2 : 0X0D 3 : 0X0A 4 : 0X0D 0X0A Description: Get UART end char USER MANUAL - DUX-SCL HDMI SCALER...
- Page 17 Command: Command: CDFG#T CDFG1T Return: Return: To config UART Auto Power Enable/ CDFG#T CDFG1T Disable Description: Description: DFG# : # = {0, 1} Config UART Auto Power Enable 0 : Disable 1 : Enable USER MANUAL - DUX-SCL HDMI SCALER...
- Page 18 To set Input EDID 4 : 1920x1080@60_2ch 5 : 1280x800@60_2ch 6 : 1280x720@60_2ch 7 : 1024x768@60_2ch 8 : 3840x2160@60_6ch 9 : 3840x2160@30_6ch 10 : 1920x1200@60_6ch 11 : 1920x1080@60_6ch 12: 1280x800@60_6ch 13: 1280x720@60_6ch 14: 1024x768@60_6ch 15: copy USER MANUAL - DUX-SCL HDMI SCALER...
- Page 19 DUX-SCL 4:4:4 HDMI scaling receiver up to DUX-SRX 4K@60Hz 4:4:4 HDMI 1.4 & VGA over HDBT DUX-SRX TX up to 100m HDMI 1.4 & VGA over HDBT DUX-SRX-WP wall-plate TX up to 100 m USER MANUAL - DUX-SCL HDMI SCALER...
- Page 20 © 2017 Harman. All rights reserved. ENZO, NetLinx, AMX, AV FOR AN IT WORLD, HARMAN, and their respective logos are registered trademarks of HARMAN. Oracle, Java and any other company or brand name referenced may be trademarks/registered trademarks of their respective companies.
Need help?
Do you have a question about the DUX-SCL and is the answer not in the manual?
Questions and answers