Table of Contents
Advertisement
Quick Links
4247-X0
03plus
a
and Setup
CAUT
TION
Hazard
dous voltages a
or sock
kets of the powe
Carefu
ully follow all cl
the ma
aterials and solu
High te
emperature; sw
least 2
20 minutes for
handlin
ng.
If the s
second tractor u
gear p
protector cover i
printer
r or insert any ob
This p
printer has an
printer
r is installed on
stand
or surface mu
21kg (4
46lb) and with s
Unpa
cking Your
Printer
The foll
lowing items
are incl
uded in the
carton:
- Ribbo
on Cartridge
- Powe
r Cord
- CD fo
r drivers and
User's
s Guides
- Quick
Setup Guide
Contac
t your point of p
purchase seller
Attentio
on! Always retai
n the original pr
shipme
ent of the printer
r.
Unpa
cking the pr
rinter
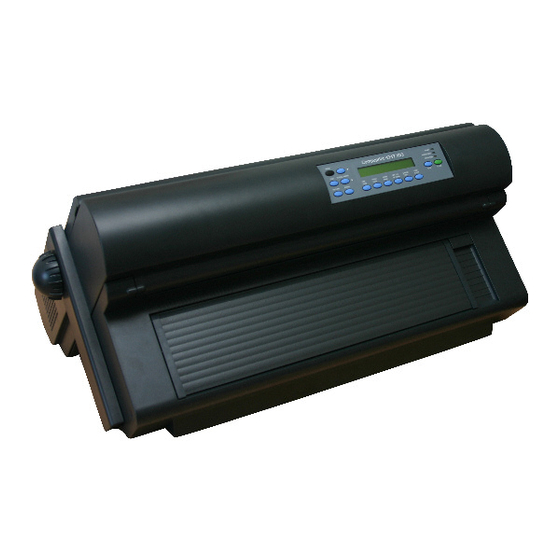
Locat
ting Printer
Parts
Front
t View
Choo
sing a suita
able location
Conside
er
the
follow
wing
points
when y
you choose the
location for
your pr
inter:
-The di
stance between
n the printer
and the
e host compute
er must not
exceed
the length of t
he interface
cable.
-The lo
ocation must
be sturdy,
horizon
ntal and stable.
-Your p
printer must not
be exposed
to direc
ct sunlight, ext
treme heat,
cold,
dust
or
hum
midity
(see
"Printer
r
Specification
ns"
in
MAN1
10293R01
Qu
ick Install
ation
p Guide
are present. Do
not touch the p
er receptacle.
eaning instruc
tions, using o
utions recomme
ended.
witch off the pr
inter and allow
parts in this ar
rea to cool befo
unit is not install
ed, make sure
s closed. Do no
ot touch Inside
bject into the ge
ears.
optional printe
r pedestal. If
any other stan
nd or surface, t
ust support the
printer weight
stand the print a
action vibration.
if any items are
missing.
rinter packaging
g in case of any
Rear View
R
n
stacked on th
s
e floor or on
surface below
s
the base of t
printer. For s
p
successful form
p
parking, the in
nput forms sta
m
must always b
e lower than t
base of the prin
b
ter.
Area outside the
A
e printer:
W
Width: 20cm (7
7.9in.) each side
D
Depth:100cm 3
39.4in.) each sid
H
Height:80cm (3
31.5in.)
the
Us
ser's Guide you
Ro
om). – You nee
co
ompatible with
pr
rinter's power co
-F
For best continuo
sta
acking, the form
pins
only
N
ominal AC i
Nominal Voltage
N
w at
100–240Vac
fore
R
Removing th
1.
Open the tracto
the
shipping locks.
the
2.
Open the upper
head, remove it
the
this
t of
In
nstalling the
We recommend t
W
ins
stall the ribbon c
1.
Remove the rib
guide, snap ar
pins.
2.T
Turn the ribbon
any slack in th
place of ribbon
3.
Open the top co
cover.
4.
Slide the print h
5.A
Align the cartrid
right cartridge s
6.
Position the ribb
perpendicular to
7.T
Turn the ribbon
8.
Position the sn
assembly. Pus
until it snaps int
9.A
Align the ribbon
cartridge with t
cartridge down
10
0.Turn the ribbo
take up any sla
and forth to en
ribbon.
11
1.If the ribbon
installed the rib
a.The left and r
into the cartridg
b.There are not
c.The ribbon is
d.The ribbon m
the direction
the ribbon ca
purchase if yo
12
2.Close the top
a
the
ms
ack
the
e
de
1
u find on the CD
D-
ed a power outle
et
the plug of th
he
ord.
ous forms
ms should be
input power
r requiremen
e
Voltage R
Range
Amp
90–264
4Vac
3.8
e Shipment
Locks
or area cover an
nd make sure th
Store the lock s
swith the packin
r printer cover. I
If there is a wire
t.
Ribbon Ca
rtridge
that you use an
n approved origi
cartridge, follow
w these steps:
bon cartridge fro
rom the package
rm, ribbon adva
ance knob, an
advance knob
in the direction
e ribbon. If the
e ribbon does n
purchase to rep
place the ribbon
over using the s
small handles o
head to the cent
ter of the printer
dge pins with the
e locking groove
supports.
bon guide over t
the print head,
o the print head
d.
advance knob
to take up any s
nap arm with th
he small lever
h the snap arm
m down onto th
to place.
n mounting pins
on the left and
the slots in the
e cartridge supp
into place.
n advance knob
b again in the di
ack in the ribbo
on, as you slide
nsure that the rib
bbon guide runs
is not running
g freely, or to
bon cartridge co
orrectly, ensure
ight ribbon mou
unting pins are s
ge supports.
t wists or folds in
n the ribbon.
not catching on
n the print head.
oves when you
turn the ribbon
of the arrow. If
the ribbon does
artridge. Contact
ct your place of r
ou believe that t
the ribbon is fau
printer cover.
nts
ps/Watts
Ph
hase/Hz
8–1.6A
S
Single
50
0-60Hz
at you remove a
all
ng material.
e tie around the
print
nal ribbon cartr
ridge. To
e. Locate the rib
bbon
d the ribbon m
mounting
of the arrow to
take up
not move, conta
act your
n cartridge.
one it her side o
of the top
r.
es on the left an
nd
holding it
slack in the ribb
bon.
up onto the rib
bbon lift
he ribbon lift as
ssembly
right side of the
e ribbon
ports. Snap the
e ribbon
irection of the a
rrow to
the print head b
back
s freely along th
he
ensure that yo
ou have
e that:
securely snappe
ed
.
advance knob
in
s not move, repl
lace
ribbon cartridge
e
ulty.
4247X03Plu
us‐QSG
Advertisement
Table of Contents

Related Manuals for Compuprint 4247-X03Plus


Summary of Contents for Compuprint 4247-X03Plus
-
Page 1: Rear View
4247-X0 03plus ick Install ation ser's Guide you u find on the CD om). – You nee ed a power outle and Setup p Guide ompatible with the plug of th rinter's power co ord. For best continuo ous forms ... -
Page 2: Host Computer Connection
up position. 9.Close the Push tractors cover. The ribbon must be 10.Press the STOP key to take the printer Not Ready. between the print 11.Press the LOAD/EJECT key to load the paper into the printer. head noose and the 12.Press the START key to put the printer Ready. - Page 3 Press SET TOP OF FO ORM to set the to p of form position continu uous paper sources o only. CANCEL PRINT When this key is pressed while the printer is active and on line, , the attachm ment sends a “cance el request”...
-
Page 4: Status Code And Messages Displays
When a problem with the printer occurs, the printer displays a status 055 MACHINE CHECKXYZ code and message. The message on the display identifies the SEE USER'S GUIDE problem and gives a recommended action. Status Code and Messages Displays 056 MACHINE CHECKXYZ SEE USER'S GUIDE Find the code listed in numeric order on the following pages and perform the steps to fix the problem. -
Page 5: Print Quality And Ribbon Problems
Paper must be loaded for this adjustment to be effective. Solution: See the procedure for adjusting the AFTA through the operator panel (see “Printer www.compuprint.com adjustments” in the User’s Guide). 3. Poor quality multiple-part forms.
Need help?
Do you have a question about the 4247-X03Plus and is the answer not in the manual?
Questions and answers