Table of Contents
Advertisement
Quick Links
Advertisement
Table of Contents

Related Manuals for AIC Mensa


Summary of Contents for AIC Mensa
- Page 1 Mensa Server Motherboard User's Manual UM_Mensa_v1_081518...
-
Page 2: Table Of Contents
Table of Contents Safety Instructions ������������������������������������������������������������������������������������������������������� i About This Manual ����������������������������������������������������������������������������������������������������� ii Chapter 1� Product Features ����������������������������������������������������������������������������������� 1 1.1 Components ....................... 1 1.2 Specifications ....................2 1.3 Feature ....................... 3 Chapter 2� Hardware Setup ������������������������������������������������������������������������������������� 4 2.1 Central Processing Unit Setup ................4 2.1.1 Processor Installation .................... - Page 3 4.4.5 S5 RTC Wake Settings ....................22 4.4.6 Serial Port Console Redirection .................. 22 4.4.7 COM1 Console Redirection settings ................22 4.4.8 Legacy Console Redirction Settings ................22 4.4.9 Serial port for Out-of-Band Management/Windows Emergency Services (EMS) ..23 Console Redirection Settings ..................23 4.4.10 PCI Subsystem Settings ....................
- Page 4 4.7.3 BMC Network Configuration ..................35 4.8 Security ......................36 4.8.1 Security ........................36 4.9 Boot ......................... 38 4.9.1 Boot ..........................38 4.9.2 Delete Boot Option ....................38 4.10 Save and Exit ....................39 4.10.1 Save and Exit ......................39 Chapter 5.
- Page 5 Document Release History Release Date Version Update Content August, 2018 User's Manual release to public Contents...
- Page 6 Copyright © 2018 AIC, Inc. All Rights Reserved. This document contains proprietary information about AIC products and is not to be disclosed or used except in accordance with applicable agreements.
-
Page 7: Safety Instructions
Safety Instructions When installing, operating, or performing maintenance on this equipment, the following safety precautions should always be taken into account in order to reduce the risk of fire, electric shock, and personal injury. Carefully read the safety instructions below before using this product. •... -
Page 8: About This Manual
This document pellucidly presents a brief overview of the product design, device installation, and firmware settings for the Mensa motherboard. For the latest version of this user's manual, please refer to the AIC website: http:// www.aicipc.com/tw/productdetail/51087. -
Page 9: Chapter 1� Product Features
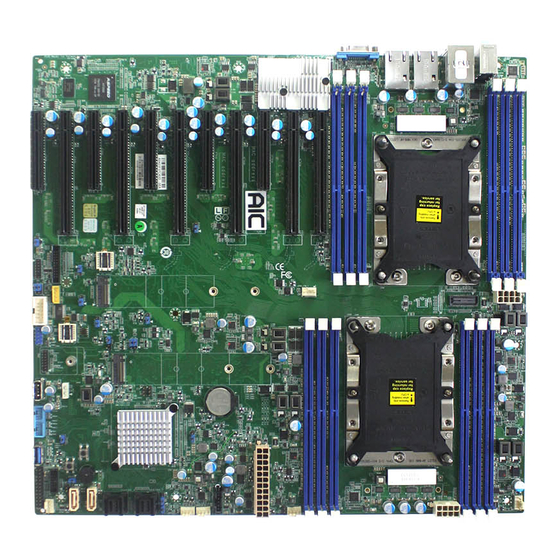
Chapter 1� Product Features Chapter 1. Product Features This section describes the hardware specifications and features of the Mensa motherboard. The fundamental components of the Mensa severboard are provided below. 1�1 Components Mensa Serverboard VGA Port 2 x 10GBase-T RJ-45 2 x USB 3.0 + RJ45... -
Page 10: Specifications
• 1 x external VGA port • Serial console redirection Serial Port• 2 x internal COM pin-headers • BIOS Recovery Mode • 2 x NGFF (M.2) supports PCI-E Gen3 x2 /SATA • SRIOV Others• 1 x TPM header Mensa User's Manual... - Page 11 Featured with ground breaking technologies including Intel® Next Generation Microarchitecture and Instruction Set (AVX-512, VMD, QAT - optional by PCH SKU), Speed Shift Technology, UPI link speeds up to 10.4GT/s, the Mensa server board enable next generation server solutions with an incredible leap in performance.
-
Page 12: Chapter 2� Hardware Setup
CAUTION! When unpacking a processor, hold the processor only by its edges to avoid touching the contacts. Standard Processor Assembly: A standard processor assembly is comprised of PHM(Processor Heatsink Module) components and processor socket assembly. Mensa User's Manual... - Page 13 The server board includes two processor sockets (LGA-3647), supports one or two of the Intel® Xeon® Processor Scalable Family and has a Thermal Design Power (TDP) of up to 165W on selected models. PHM (Processor Heatsink Module) Component: Mensa User's Manual...
- Page 14 Failure t o tighten the heat sink screws i n the specified order may cause damage t o the processor socket assembly. Heat s ink screws should b e tightened t o 12 In-Lbs T orque o n indicated order on the top of the heat sink label. Mensa User's Manual...
-
Page 15: System Memory Setup
Step 1 Unlock the dimm socket by pressing the retaining clips outward. Step 2 Insert the memory module into the slot. Make sure that the dimm notch is accurately positioned. DIMM notch Step 3 Close the retaining clips to complete installation. Mensa User's Manual... -
Page 16: Dimm Location
Chapter 2. Hardware Setup 2�2�2 DIMM Location The DIMMs are displayed on the Mensa board as DIMM F1, DIMM E1, DIMM D1, DIMM A1, DIMM B1, DIMM C1, DIMM C0, DIMM B0, and DIMM A0. To ensure satisfactory performance, you need to: ... -
Page 17: Dimm Slot Installation Order
CPU 0 DIMM_A1 DIMM_D0 DIMM_B1 DIMM_E0 DIMME_C1 DIMM_F0 CPU 1 CPU0 DIMM_F1 DIMM_C0 DIMM_E1 DIMM_B0 DIMM_D1 DIMM_C0 DIMM_D1 DIMM_A0 DIMM_A1 DIMM_B0 8 DIMM DIMM_B1 DIMM_A0 CPU 1 CPU 0 DIMM_C1 DIMM_D0 DIMM_A1 DIMM_D0 DIMM_B1 DIMM_E0 DIMME_C1 DIMM_F0 Mensa User's Manual... - Page 18 DIMM_B1 DIMM_E0 DIMME_C1 DIMM_F0 CPU 1 CPU0 DIMM_F1 DIMM_C0 DIMM_E1 DIMM_B0 DIMM_A1 DIMM_C0 DIMM_D1 DIMM_A0 DIMM_B1 DIMM_B0 DIMM_C1 DIMM_A0 CPU 1 CPU 0 12 DIMM DIMM_D1 DIMM_D0 DIMM_E1 DIMM_E0 DIMM_A1 DIMM_D0 DIMM_B1 DIMM_E0 DIMM_F1 DIMM_F0 DIMME_C1 DIMM_F0 Mensa User's Manual...
-
Page 19: Chapter 3� Motherboard Settings
Chapter 3� Motherboard Settings Chapter 3. Motherboard Settings This section provides illustrations that display the internal jumpers, connectors, and system LED indicators on the Mensa motherboard. The motherboard layout and essential connectors are listed below for your reference. 3�1 Motherboard Block Diagram... -
Page 20: Motherboard Content List
38 LAN ( RJ-45) J183 18 Intruder Jumper J202 39 LAN ( RJ-45) J184 Dedicated IPMI port + USB3_IPMI_ 19 SSGPIO Header SSATA_SGPIO1 40 USB3.0x2 LAN1 Audio Phone System FAN SYS_FAN_4 Jack_13P_ Connectors VERTICAL_D3 Front Panel SSI_FP Connector Mensa User's Manual... -
Page 21: Motherboard Connector And Jumper Location
DIMM A1 DIMM B1 DIMM C1 DIMM D0 DIMM E0 PCIe 11 DIMM F0 PCIe 10 PCIe 9 PCIe 8 Battery PCIe 7 PCIe 6 PCIe 5 PCIe 4 PCIe 3 BIOS_SPI Socket PCIe 2 PCIe 1 Mensa User's Manual... -
Page 22: Connector And Jumper
J119: Flash Descriptor Security Override Header FP_PWR_BTN_N 1 2 FP_PWR_BTN_N OPEN 1 2 MFG_MODE_N 3 4 GND J202: Chassis Intrusion Header Pin1-2 closed: Enable security measures defined in the Flash Descriptor-Normal (Default) 1 2 INTRUDER Pin2-3 closed: Disable Flash Descriptor Security (override) Mensa User's Manual... - Page 23 3 4 HD_VGA_R 7 14 P1_TX_P 5 6 HD_VGA_G P0_N 8 13 GND 7 8 HD_VGA_B P0_P 9 12 P1_N OC_N 10 11 P1_P TYPEA_USB2: Vertical Type-A USB2.0 Connector USB_VCC_TYPE_A 1 2 USB_N2_TYPE_A1_ USB_P2_TYPE_A1_ 3 4 GND Mensa User's Manual...
-
Page 24: System Led Indicator
DIMM A1 DIMM B1 DIMM C1 DIMM D0 DIMM E0 PCIe 11 DIMM F0 PCIe 10 PCIe 9 PCIe 8 Battery PCIe 7 PCIe 6 PCIe 5 PCIe 4 PCIe 3 BIOS_SPI Socket PCIe 2 PCIe 1 Mensa User's Manual... - Page 25 The LED blinks per second to Blinking Green indicate that the BMC controller is working normally. The green LED lights up when the Green power of PCH is normal. Signal + VCC3_AUX Rear ID LED ID_LED State Description Mensa User's Manual...
-
Page 26: Chapter 4. Bios Configuration Settings
Change values. < F7 > Discard Change and Exit. < F9 > Load Optimal Default for all values. < F10 > Save changes and exit. < F12 > Print Screen. < Esc > Exit the current menu screen. Mensa User's Manual... -
Page 27: Bios Menu
NOTE: The following pages provide the details of BIOS menu. Please be noticed that the BIOS menu are continually changing due to the BIOS updating. The BIOS menu provided are the most updated ones when this manual is written. Mensa User's Manual... - Page 28 Chapter 4. BIOS Configuration Settings 4�3 Main 4�3�1 Main Main Option Key: Option Key Descriptuon System time Configures current time. System date Configures current date. Mensa User's Manual...
-
Page 29: Advanced
4�4�2 Intel® Virtual RAID on CPU Intel® Virtual RAID on CPU All Intel VMD controllers 4�4�3 Trusted Computing Trusted Computing Security Device Support Enable Disable 4�4�4 APCI Settings ACPI Settings Enable ACPI Auto Enable Disable Configuration Enable Hibernation Enable Disable Mensa User's Manual... -
Page 30: S5 Rtc Wake Settings
Resolution 100x31 Enable Disable Legacy OS Redirection 80x24 80x25 Resolution VT100 LINUX XTERMR6 Putty KeyPad ESCN VT400 Redirection after BIOS Always Enable BootLoader POST 4�4�8 Legacy Console Redirction Settings Legacy Console Redirection Settings Legacy Serial Redirection COM1 Port Mensa User's Manual... -
Page 31: Serial Port For Out-Of-Band Management/Windows Emergency Services (Ems)
4.4.11 Network Stack Configuration Network Stack Configuration Enable Enable Ipv4 PXE Support Disable Enable Ipv4 HTTP Support Disable Enable Ipv6 PXE Network Stack Disable Support Disable Enable Ipv6 HTTP Support Disable PXE boot wait time Media detect count Mensa User's Manual... -
Page 32: S5 Rtc Wake Setting
Disable Spectrum Chassis Intrusion detect Enable Disable NMI Button Enable Disable 4�4�15 Option ROM Dispatch Policy Option ROM Dispatch Policy Onboard LAN1 (X550) Enable Disable Onboard LAN2 (X550) Enable Disable PCIE_1 Empty ~ Enable Disable PCIE_11 Empty Mensa User's Manual... -
Page 33: Nvdimm Adr Configuration
IO=2E8h, IRQ=3, 4, 5, 6, 7, 9, 10, 11, 12; 4.4.19 Hardware Health Configuration Hardware Health Configuration Auto Fan Control Enable Disable BMC Alert Beep PMBus Support Enable Disable 4�4�20 Sensor Data Register Monitoring Sensor Data Register Monitoring Read only. Mensa User's Manual... -
Page 34: Platform Configuration
4.5 Platform Configuration 4.5.1 Platform Configuration Platform Option Key: Option Key Description PCH Configuration Displays and provides option to change the PCH Settings. Miscellaneous Configuration Configures active video type. Server ME Configuration Configures Server ME Technology Parameters. Mensa User's Manual... - Page 35 PCH sSATA Hot Plug Enable Disable Configuration Configure as eSATA Enable Disable Spin Up Device Enable Disable sSATA Device Type Hard Disk Drive Solid State Drive XHCI Idle L1 Enable Disable Configuration Azalia Azalia Enable Disable Configuration Mensa User's Manual...
- Page 36 25 uS 50 uS PCH DFX ADR timer expire time Configuration 100 uS 0 us ADR timer multiplier 4.5.3 Miscellaneous Configuration Miscellaneous Configuration Active Video Onboard Device Offboard Device 4.5.4 Server ME Configuration Server ME Configuration Read only. Mensa User's Manual...
-
Page 37: Socket Configuration
Displays and provides option to change the UPI Settings. Memory Configuration Displays and provides option to change the Memory Settings. IIO Configuration Displays and provides option to change the IIO Settings. Advanced Power Management Displays and provides option to change the Power Management Configuration Settings. Mensa User's Manual... - Page 38 4.6.4 UPI Configuration UPI Configuration UPI Status Read only. Link Speed Mode Slow Fast 9.6GB/s 10.4GB/s Link Frequency Select UPI General Auto Use Per Link Setting Configuration Link L0p Enable Enable Disable Auto Link L1 Enable Enable Disable Auto Mensa User's Manual...
-
Page 39: Memory Configuration
PcieBr2D00F0 – Enable Port 2A PCI-E Port Link Disable Auto Socket 0 Gen 1 (2.5 GT/s) PcieBr3D00F0 – Link Speed Gen 2 (5 GT/s) Port 3A Gen 3 (8 GT/s) 128B PCIE Port Max Payload 256B Size Auto Mensa User's Manual... - Page 40 PCIE Port Max Payload 256B Socket 1 Size Auto PcieBr2D00F0 – Port 3A Auto PCI-E ASPM Support L1 Only Disable Enable L0s Support Disable Transparent Bridge Non-Transparent Bridge NTB to NTB PCIe Port Definition NTB to RP Mensa User's Manual...
-
Page 41: Advanced Management Power Configuration
CPU C State Control Enhanced Halt State Enable Disable (C1E) OS ACPI Cx ACPI C2 ACPI C3 C1 state C2 state Package C State Package C State C6 (non Retention) state Control C6 (Retention) state No Limit Mensa User's Manual Auto... -
Page 42: Server Management
15 minutes 20 minutes OS Wtd Timer Policy Do Nothing Reset Power Down Power Cycle BMC Logo Enable Disable System Event Log Press <Enter> to change the SEL event log configuration. BMC network Configure BMC network parameters. configuration Mensa User's Manual... - Page 43 Configure IPV4 Support Management Port 1 Unspecified Static Configuration Address Source DynamicBmcDhcp DynamicBmcNonDhcp Server Management Enable Disable Port 2 Configure IPV6 Support Server Management Port 1 IPV6 Support Enable Disable Server Management Port 2 IPV6 Support Enable Disable Mensa User's Manual...
-
Page 44: Security
Set user password in the Create New Password window. After you key in User Password the password, the Confirm New Password window will pop out to ask for confirmation. Security Frozen Mode Enable Disable Mensa User's Manual... - Page 45 Enable Disable Secure Boot Mode Standard Custom Provision Factory Default keys Install Factory Default Keys Enroll Efi Image Save All Secure Boot Variables Key Management Platform Key (PK) Key Exchange Keys Authorized Signatures Forbidden Signatures Authorized TimeStamps Mensa User's Manual...
-
Page 46: Boot
New UEFI OS Boot Default Place First Place Last Option Policy Wait for ‘ESC’ If Error Enable Disable Endless Boot Enable Disable 4�9�2 Delete Boot Option Delete Boot Option Select one to Delete Boot Option #1 Device Name Mensa User's Manual... -
Page 47: Save And Exit
Restore/Load Default values for all the setup options. Save as User Defaults Save the changes done so far as User Defaults. Restore User Defaults Restore the User Defaults to all the setup options. Boot Override Read only. Mensa User's Manual... -
Page 48: Chapter 5. Bmc Configuration Settings
NOTE: • The default user name and password are in lower-case characters. • Users who login with the root user name and password will have full adminstrative power. The root password can be changed after login. Mensa User's Manual... -
Page 49: Web Gui
The Set Front Panel Enables page allows you to lock or unlock the Enables Local Panel. Maintenance This group of pages allows you to do maintenance tasks on the device. Sign out The Sign out page allows you to log out of the web GUI. Mensa User's Manual... - Page 50 Click to reload the current page. Sign out: Click to log out of the GUI Root-administrator Profile: Click to enter the User Management Configuration dialog box in figure xx. Help Click to view more details on field descriptions. Mensa User's Manual...
- Page 51 Click Dashboard on the menu bar to view the overall information of the server. 5�2�4 Sensor The Sensor page displays the status and records on related sensors. Click a record to view detailed information on a particular sensor. Mensa User's Manual...
- Page 52 Sofware version. Click System Inventory on the menu bar to open. 5�2�6 FRU Information The FRU Information page displays Basic Information, Chassis Information, Board Information and Product Information of the FRU device. Click FRU Information on the menu bar to view the details of the selected device. Mensa User's Manual...
- Page 53 5�2�7 Logs and Reports The System Inventory page displays IPMI Event Log and Video Log. Click Logs and Reports from the menu bar→ select Event Log or Video Log to view the contents. Event Log Video Log Mensa User's Manual...
- Page 54 The Settings page displays the configuration settings for Date & Time, External User Services, KVM Mouse Setting, Log Settings, Media Redirection Settings, Network Settings, PAM Order Settings, Platform Event Filter, Services, SMTP Settings, SSL Settings, System Firewall, User Management, and Video Recording. Mensa User's Manual...
- Page 55 System Firewall Existing Existing Existing Add New Add New Firewall Firewall Port IP Rules IP rule Port Rule Settings Settings Rules User Management Auto Video Settings Video Recording Video Trigger Video Remote Pre-Event Video Settings Settings Recordings Mensa User's Manual...
- Page 56 Chapter 5. BMC Configuration Settings 5�2�9 Remote Control The Remote Control page displays the configuration for power control and remote KVM. Click Java Console to start the JViewer video redirection. Mensa User's Manual...
- Page 57 Chapter 5. BMC Configuration Settings Click Launch KVM to open the Remote KVM page. Mensa User's Manual...
- Page 58 1. Click Start KVM to start the H5Viewer video redirection. 2. Click Browse to select CD Image. 3. Click Start Media to redirect the selected CD image file to the Host. 4. To stop the recording, click Stop Record. Mensa User's Manual...
- Page 59 Keyboard/ This option allows you to encrypt keyboard inputs and mouse Mouse movements sent between the connections Encryption List of Host Physical Keyboard languages supported in H5Viewer. Keyboard 1. English US Keyboard Layout 2. German Mensa User's Manual 3. Japanese...
- Page 60 To power on the server. Power Cycle To first power off, and then reboot the system (cold boot). Active Users Read only. Displays active user and their system IP address. Help Read only. Displays information about H5viewer Mensa User's Manual...
- Page 61 Power Cycle: This option will first power off, and then reboot the system (cold boot). Hard Reset: This option will reboot the system without powering off (warm boot). ACPI Shutdown: This option to initiate operating system shutdown prior to the shutdown. Perform Action: Click this option to perform the selected operation. Mensa User's Manual...
-
Page 62: Chassis Identify Control
Click Chassis Identify Control from the menu bar. Select Off/On to control UID LED. 5�2�12 Set Front Panel Enables The Set Front Panel Enables page allows you to lock or unlock the Local Panel. Click Set Front Panel Enables from the menu bar. Mensa User's Manual... - Page 63 Chapter 5. BMC Configuration Settings 5�2�13 Maintenance This Maintenance page displays the configuration settings for Backup Configuration, Firmware Image Location, Firmware Information, BIOS Information, Fimware Update, Preserve Configuration, Restore Configuration, Restore Configuration, and Restore Factory Defaults. Mensa User's Manual...
-
Page 64: Maintenance
2. Click OK to upload the new configuration file and restore. Configuration 1. Click the configuration items on the list to preserve the settings during Restore Factory restore factory default configuration. Defaults 2. Click Restore Factory Defaults to restore the factory defaults of the device firmware. Mensa User's Manual... -
Page 65: Sign Out
To log out of the BMC: Method 1: Click Sign out from the menu bar. The Logout dialog box will pop out. Method 2: Click the root quick button on the top right corner of the screen. Mensa User's Manual... -
Page 66: Chapter 6� Technical Support
Chapter 6� Technical Support www.aicipc.com Taiwain, Global Headquarters South California, United States Address: 21808 Garcia Lane Address: No� 152, Section 4, Linghang N� Rd, Dayuan District, City of Industry, CA 91789, Taoyuan City 337, Taiwan United States Tel: +886-3-433-9188 Toll free: +7-4997019998 Fax: +886-3-287=1818 Tel: +1-909-895-8989 Sales Email: sales@aicipc�com�tw...
Need help?
Do you have a question about the Mensa and is the answer not in the manual?
Questions and answers