Table of Contents
Advertisement
Quick Links
Advertisement
Table of Contents

Related Manuals for Salus iT500BM


Summary of Contents for Salus iT500BM
- Page 1 Internet Thermostat I N S TA L L E R M A N U A L...
- Page 2 1. Product compliance & safety information These instructions are applicable to the SALUS Controls model stated on the front cover of this manual only, and must not be used with any other make or model. This accessory must be fitted by a competent person, and installation must comply with the guidance provided in the current IEE Wiring Regulations and current Building Regulations.
- Page 3 Installing the RF boiler control takes minutes. Once installed, you will benefit from all the control features of the Salus room thermostat. INTEGRAL RF BOILER CONTROL The Integral RF boiler control is the RF receiving unit for your RF room thermostat.
- Page 4 For ECOTEC models prior to April 2012, use as supplied. 1. Switch off the boiler at its main supply. 2. Remove cover panel or existing control. 3. Insert the integral boiler control ensuring correct location of the rear connection pins. 04 iT500BM Installer Manual...
- Page 5 To ensure the boiler control is connected properly, please now move the switch to . The boiler should now go on and the LED on the your boiler control should illuminate. Now move the switch back to AUTO iT500BM Installer Manual 05...
- Page 6 Installing the RF boiler control takes minutes. Once installed, you will benefit from all the control features of the Salus thermostat. INTEGRAL RF BOILER CONTROL The Integral RF boiler control is the RF receiving unit for your thermostat.
- Page 7 Remember to ensure allow access to the main control panel. the block is fully connected. 2. Remove cover panel A upwards to remove. 3. Pull top tab B upwards, then outwards to remove blanking plate or existing control. iT500BM Installer Manual 07...
- Page 8 Now locate the boiler control’ s four hooks then press in and down. Replace cover panel A. Replace the front fascia and boiler’ s outer casing. Before switching the boiler on at its mains supply, ensure the module switch is in the OFF position 08 iT500BM Installer Manual...
- Page 9 To ensure the boiler control is connected properly, please now move the switch to . The boiler should now fire and the LED on the your boiler control should illuminate. Now move the switch back to AUTO iT500BM Installer Manual 09...
- Page 10 Installing the RF boiler control takes minutes. Once installed, you will benefit from all the control features of the Salus thermostat. INTEGRAL RF BOILER CONTROL The Integral RF boiler control is the RF receiving unit for your thermostat.
- Page 11 6. Replace the front panel ensuring a good seal is made. 7. Power up the boiler and check the correct operation. Connections: 1 - Neutral input 2 - Live input 3 - Common input 4 - Normally open output iT500BM Installer Manual 11...
- Page 12 For best results mount the iT500 1.5m from ground level. Once clipped into place, ensure the unit is securely seated on the bracket. 12 iT500BM Installer Manual...
- Page 13 4. Desk mount option iT500 For the desk mounted option, simply clip the clear stand supplied separately into the back of the unit. iT500BM Installer Manual 13...
- Page 14 5. Connecting the Gateway to your existing router Flashing red light on setup. Constant green light when the iT500 is connected to the SALUS Controls Server. 14 iT500BM Installer Manual...
- Page 15 With the unit face down, insert the first Insert the second battery supplied into the left battery supplied into the right hand side hand side of the base of the iT500 Thermostat. of the base of the iT500 Thermostat. iT500BM Installer Manual 15...
- Page 16 Ensure the batteries are fitted securely Replace the battery cover to the in the base of the iT500 Thermostat. base of the iT500 Thermostat. Why not make a note of your STA number here for future reference. S T A 16 iT500BM Installer Manual...
- Page 17 OTA* Revision number The globe icon will appear when the unit automatically connects to the internet via the SALUS iTG500 Gateway. This should take approximately 20 seconds. * Over The Air operated software iT500 Software revision iT500BM Installer Manual 17...
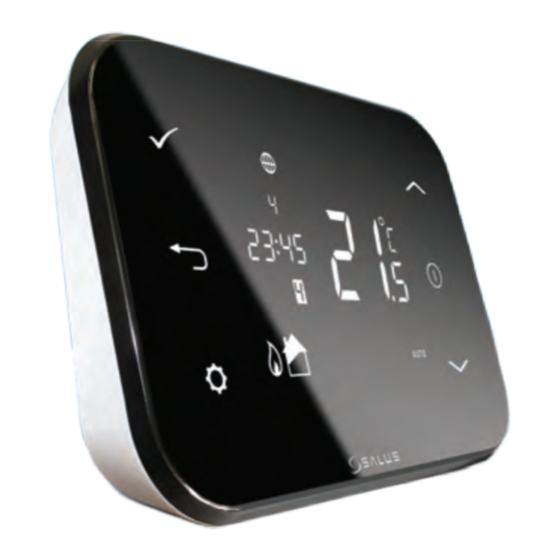
- Page 18 Indicates touch lock is activated Battery status Indicates battery is low Holiday indicator Indicates holiday operation mode is selected Internet indicator Indicates connection to iTG500 and SALUS server AUTO indicator Automatic program mode OFF indicator Off mode Setting indicator Manual override or settings mode...
- Page 19 * If the iT500 is to be used in the UK, then there is no need to enter system configuration setup, please proceed to bottom of page 17. At any time press and hold for 5 seconds to return to the home screen. iT500BM Installer Manual 19...
- Page 20 System configuration - iT500 time zone* and DST Select for heating application Centigrade to Fahrenheit GMT Time setting** 20 iT500BM Installer Manual...
- Page 21 GERMANY BELGIUM CYPRUS BELARUS* ICELAND* CZECH DENMARK GREECE FINLAND SPAIN SWEDEN ROMANIA MOLDOVA FRANCE NORWAY RUSSIA LATVIA ITALY MALTA UKRAINE SWITZERLAND CROATIA SERBIA BOSNIA SLOVENIA The countries marked with * do not observe Daylight Saving Time iT500BM Installer Manual 21...
- Page 22 With DST (daylight saving time) ON will automatically change your time from summer to winter. On is default 10. Pairing the iT500 with boiler modules 22 iT500BM Installer Manual...
- Page 23 Gently press and hold the SYNC button with a blunt module is in the AUTO object. After 3 seconds the Boiler Control LED will flash once every second to indicate it is ready to pair and ready to receive a signal from the thermostat*. iT500BM Installer Manual 23...
- Page 24 B. Mode Switch ON – Boiler will be on continuous AUTO – will follow instructions from the thermostat OFF – Boiler is off C. SYNC Button - This is used only for pairing the RF communications. 24 iT500BM Installer Manual...
- Page 25 Gently press and hold the SYNC button with a blunt module is in the AUTO object. After 3 seconds the Boiler Control LED will flash once every second to indicate it is ready to pair and ready to receive a signal from the thermostat*. iT500BM Installer Manual 25...
- Page 26 B. Mode Switch ON – Boiler will be on continuous AUTO – will follow time and temperature program in the transmitter OFF – Boiler is off. C. SYNC Button - This is used only for pairing the RF communications. 26 iT500BM Installer Manual...
- Page 27 Gently press and hold the SYNC button with a blunt module is in the AUTO object. After 3 seconds the Boiler Control LED will flash once every second to indicate it is ready to pair and ready to receive a signal from the thermostat*. iT500BM Installer Manual 27...
- Page 28 10. Pairing your RXBC605 When the RXBC605 Receiver and the iT500 Thermostat have paired then the LED on the RXBC605 will go out. Press return to the home screen. 28 iT500BM Installer Manual...
- Page 29 11. Registering and operating your iT500 online © Salus Controls 2012 Privacy Policy Disclaimer Site Map Go to the SALUS controls website. www.salus-controls.com and select your relevant country © Salus Controls 2012 Privacy Policy Disclaimer Site Map Click on the register iT500 icon on the left hand side of your country’ s website...
- Page 30 11. Registering and operating your iT500 online © Salus Controls 2012 Privacy Policy Disclaimer Site Map Click on REGISTER © Salus Controls 2012 Privacy Policy Disclaimer Site Map Fill in the online form and click REGISTER 30 iT500BM Installer Manual...
- Page 31 The above screen will show and a confirmation email will be sent to you You will receive a confirmation email. Click on the link to complete your registration © Salus Controls 2012 Privacy Policy Disclaimer Site Map Now use your username and password to log in iT500BM Installer Manual 31...
- Page 32 © Salus Controls 2012 Privacy Policy Disclaimer Site Map Your iT500 will appear as above and is now ready to be controlled or viewed via your PC or Smartphone. Just click on the iT500 icon on your PC 32 iT500BM Installer Manual...
- Page 33 App Store and click download. The App will automatically download to your Smartphone, and once downloaded you can begin controlling your iT500 Thermostat. www.salus-controls.com Go to the salus-controls.com website. Click on the relevant App Store Icon. Find the SALUS iT500 App and click download. iT500BM Installer Manual 33...
- Page 34 “DOWNSTAIRS” for example. Smartphone. Click on and enter a new name. For full information on PC and Smartphone operation please refer to the user manual. If you forget your password, follow the on screen instructions. 34 iT500BM Installer Manual...
- Page 35 14. Warranty SALUS Controls warrants that this product will be free from any defect in materials or workmanship, and shall perform in accordance with its specification, for a period of two years from the date of installation. SALUS Controls sole liability for breach of this warranty will be (at its option) to repair or replace the defective product.
- Page 36 TECHNICAL: T: +44 (0) 1226 323961 E: tech@salus-tech.com www.salus-controls.com SALUS Controls is a member of the Computime Group Maintaining a policy of continuous product development SALUS Controls plc reserve the right to change specification, design and materials of products listed in this brochure without prior notice.
Need help?
Do you have a question about the iT500BM and is the answer not in the manual?
Questions and answers