Salus iT500 Installation Manual
Hide thumbs
Also See for iT500:
- Instruction manual (74 pages) ,
- Full user manual (52 pages) ,
- User manual (29 pages)
Advertisement
Quick Links
iT500 Internet Thermostat
Installation Manual
DYSTRYBUTOR OF SALUS CONTROLS:
Importer:
QL CONTROLS Sp. z o.o., Sp. k.
SALUS Controls plc
Rolna 4,
Salus House, Dodworth Business Park
43-262 Kobielice,
Whinby Road, Barnsley S75 3SP,
Poland
United Kingdom
www.salus-controls.eu
SALUS Controls is a member of the Computime Group
Maintaining a policy of continuous product development SALUS Controls plc reserve the right to
change specification, design and materials of products listed in this brochure without prior notice.
Introduction
The iT500 controls your heating and hot water from anywhere via your smartphone or laptop. Your pc and laptop
connects to the system using existing broadband connection. The system is wireless so it' s easy to instal.
FEATURES:
• Access and control your heating and hot water via the internet
• Compatible with your PC or smartphone - they connect to the system using your existing broadband connection
• Touch sensor panel
• The internal system uses 868 MHz for robust communication
• 3 system configurations:
- One central heating zone only
- Two central heating zones (optional iT300 remote sensor required for second zone)
- One central heating zone plus hot water
• ECO & HOLIDAY mode
• Free iT500 Plus app to download
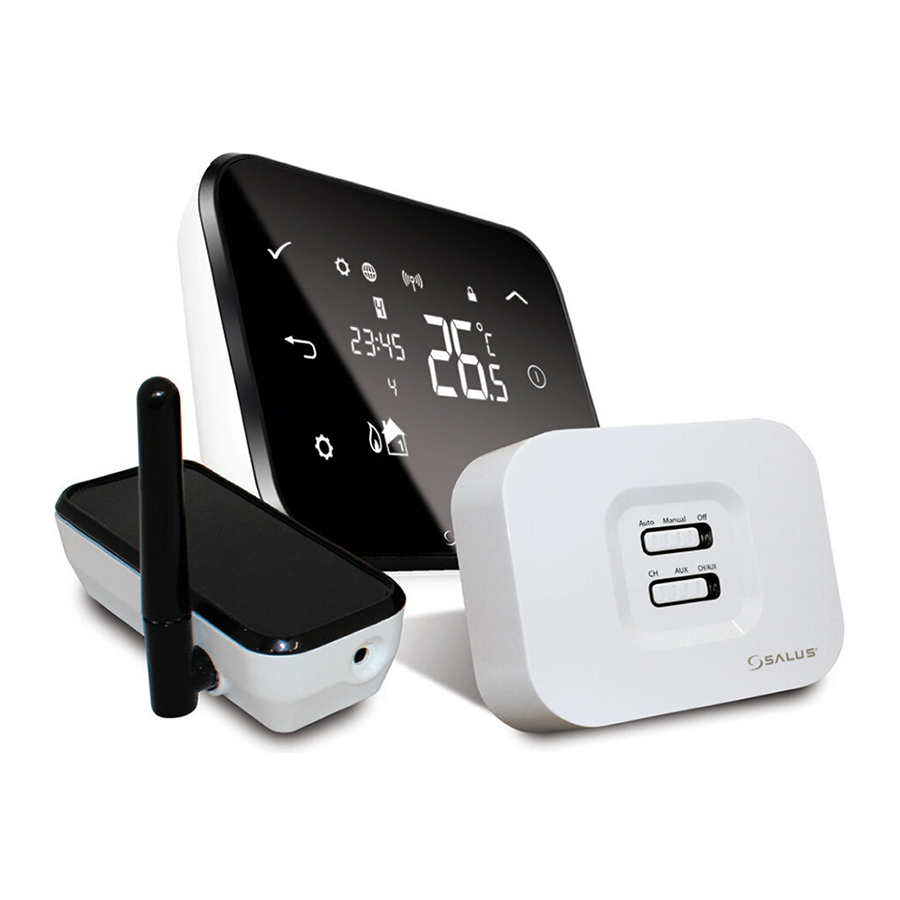
Box contains:
- iT500TR thermostat
- iT500RX receiver (a wireless receiver that will connect to your boiler.
It is suitable for combination and system boiler).
- iTG500 Internet gateway - connects via a short cable to your broadband internet router.
The gateway enables internet access and control of your system.
Product compliance
This product complies with the following EU Directives: Electromagnetic Compatibility 2014/30/EU,
Low Voltage Directive 2014/35/EU, Directive 2014/53/EU and 2011/65/EU. Full information is available
on the website www.saluslegal.com
Safety information
Use in accordance with national and EU regulations. Use the device only as intended, keeping it in a dry condition.
The product is for indoor use only. Installation must be carried out by a qualified person in accordance with national
and EU regulations.
Technical specification
Supply:
iT500 - 2 x AA Batteries
iT300 - 2 x AAA Batteries
iT500RX - 230 V AC 50Hz
Rating Max:
CH1: 16 A resistive, 5 A inductive
CH2: 5 A resistive, 3 A inductive
Temperature range:
5°C - 35°C (in step 0,5°C)
Frost protection temperature:
5°C - 9°C (in step 0,5°C)
Hysteresis:
1°C
Storage temperature:
-20°C to 60°C
Protection degree IP:
IP 30
Connecting the gateway to your existing router
Flashing red light on setup
3
Constant green
light when iT500
is connected to the
SALUS Controls Server.
Inserting the batteries in the iT500 Thermostat
1
2
3
Remove the battery cover from
Make a note of the serial number
With the unit face down, insert
the base of the iT500 Thermostat.
printed inside the base of the
the first battery supplied into
iT500 Thermostat.
the right hand side of the base
of the iT500 Thermostat.
You can make a note of your STA number here for future reference:
S T A
5
6
4
Insert the second battery supplied
Ensure the batteries are fitted
Replace the battery cover to
into the left hand side of the base
securely in the base of the
the base of the iT500 Thermostat.
of the iT500 Thermostat.
iT500 Thermostat.
iT500 Plus application
Download the iT500 Plus app, create an account
iT500 Plus
and register your device. Follow the on screen
instructions to complete all the steps.
Features available only on the App:
• HOLIDAY mode
• Antifrost temperature changing
• Energy saving mode (set the lowest schedule temp.)
• Simplified schedule setup
You can add a few iT500 thermostat to one account.
Easy to use interface.
Simple to modify heating schedules.
With walk through tutorials
Choose from ALL, 5/2
on how to use the App.
or INDIVIDUAL days.
LCD icon description
1.
Settings indicator
1
2
3
4
5
2.
Internet indicator
3.
RF signal indicator
4.
Low battery status
5.
Holiday indicator
6.
Button lock indicator
23
7.
Temperature unit
8.
Temperature indicator
22
9.
Hot water heating in continuous mode
10.
Hot water override
21
11.
Automatic mode
12.
Antifrost mode
13.
Hot water heating
14.
Hot water indicator
15.
Cooling mode indicator (zone 2)
16.
Zone 2 indicator
20
19
18
17
16
15
14
13
17.
Heat mode indicator (zone 2)
18.
Cooling mode indicator (zone 1)
19.
Zone 1 indicator
20.
Heat mode indicator (zone 1)
21.
Program number indicator
22.
Clock display
23.
Day of the week
Button functions
- Confirm
- Increase
- Return
- Display ON (display highlighting)
- Settings / zone changing
- Decrease
Installation of wall bracket docking (optional)
For best results mount iT500 1.5m from ground level.
1
2
3
Attach the wall mounting bracket
After first ensuring that the
Once clipped into place, ensure
to a suitable wall using the fittings
bracket is secure, clip the iT500
the unit is securely seated on the
supplied and the built in level.
into place by aligning the recess
bracket.
on the back of the unit to the
bracket and clipping into place.
Desk mount option iT500
For the desk mounted option, simply clip the clear stand supplied separately
into the back of the unit.
iT500RX receiver switch functions
1
2
3
1.
AUTO - receiver operate in automatic mode
(works according to thermostat or app)
2.
MANUAL - receiver operate according to the switch
located below
3.
OFF - receiver is disabled
4.
CH - in manual mode, zone 1 are turned ON
5.
AUX - in manual mode, zone 2 are turned ON
6.
CH/AUX - in manual mode, zone 1 and zone 2
(or HW) are turned ON
4
5
6
iT500RX terminals description
Terminal
Function
name
L,N
230V AC power supply
NC
Normally closed terminal
CH (zone 1)
NO
Normally open terminal
COM
Common Terminal
NC
Normally closed terminal
AUX (zone 2)
NO
Normally open terminal
or
COM
Common Terminal
Wiring diagrams for single heating zone
6
230 V AC
230 V AC
L
L
230 V AC
COM
L
COM
COM
L
COM
L
7
COM
L
16(5)A
AC
5(3)A
16(5)A
AC
5(3)A
8
230 V
230 V
9
AC
16(5)A
10
230 V
11
NC
NO
N
NC
NO
NC
NO
N
NC
NO
12
M
NC
NO
N
or
M
or
N
N
M
or
230 V AC
N
230 V AC
L
L
COM
L
COM
230 V AC
COM
L
COM
L
COM
L
AC
5(3)A
16(5)A
16(5)A
AC
5(3)A
230 V
230 V
16(5)A
AC
230 V
NC
NO
N
NC
NO
NC
NO
N
NC
NO
N
N
NC
NO
N
N
Wiring diagram for 2 heating zones
230 V AC
230 V AC
L
L
COM
L
COM
230 V AC
COM
L
COM
L
COM
L
AC
5(3)A
16(5)A
16(5)A
AC
5(3)A
230 V
230 V
16(5)A
AC
230 V
NC
NO
N
NC
NO
NC
NO
N
NC
NO
M
NC
NO
N
or
or
M
or
or
N
N
M
or
N
Installation of iT500RX receiver
Note: Always shut off the AC mains supply before installing or working on any components.
1
2
L
L
COM
L
COM
COM
L
COM
L
COM
L
COM
AC
5(3)A
16(5)A
AC
5(3)A
16(5)A
230 V
230 V
Loosen the screws at the bottom
Fit the back of the receiver unit to
16(5)A
AC
5(3)A
of the receiver unit and unclip the
the wall using the fittings supplied.
230 V
front of the unit.
Then wire up the receiver using
proper diagram.
NC
NO
N
NC
NO
NC
NO
N
NC
NO
Fitting the wall bracket and mounting the iT300
NC
NO
N
NC
NO
N
Note: iT300 purchased separately. Can only be used if your system supports second central heating zone.
N
1
2
N
Insert the 2x AAA batteries supplied
Attach the wall mounting bracket
in the battery case under the cover
to a suitable wall using the fittings
on the back of iT300 unit.
supplied.
COM
5(3)A
NC
NO
COM
5(3)A
NC
NO
+
COM
5(3)A
NC
M
NO
M
M
or
3
Clip the front of the unit back and
securely screw the front
of the receiver in place.
3
Align the grooves on the back
of the iT300 unit and slide onto
the bracket.
Advertisement

Related Manuals for Salus iT500


Summary of Contents for Salus iT500
- Page 1 After first ensuring that the Once clipped into place, ensure The iT500 controls your heating and hot water from anywhere via your smartphone or laptop. Your pc and laptop to a suitable wall using the fittings bracket is secure, clip the iT500 the unit is securely seated on the connects to the system using existing broadband connection.
- Page 2 After powering up iT500 for the first time the display will go through the following sequence. When connected to the internet, the iT500 will set time and date automatically. However this can also be set This menu should only be entered by the installer as changes can have a detrimental effect on your heating system.
Need help?
Do you have a question about the iT500 and is the answer not in the manual?
Questions and answers