Table of Contents
Advertisement
Quick Links
NOTES
© Electromatic Equipment Co., Inc.
-20-
TABLE OF CONTENTS
1.0
....................................................
2.0
..............................................................
3.0
......................................................
4.0
...............................................................
5.0
...........................................................
6.0
...........................................................
7.0
.....................................................
8.0
9.0
................................................................
10.0
11.0
............................................................... 11
12.0
Reset to factory calibration
................................................... 12
13.0
Conditioning of the sensor
.................................................... 12
14.0
Care instructions
................................................................
15.0
Changing the batteries
........................................................
16.0
Exemprion from liability
.......................................................
17.0
Optional accessories
..........................................................
18.0
Technical data
...................................................................
19.0
Common reasons for incorrect measurements
20.0
Warranty
..........................................................................
© Electromatic Equipment Co., Inc.
2
2
3
4
4
5
6
..............................................
7
8
.................
9
13
13
14
14
15
.........................
16
17
-1-
Advertisement
Table of Contents

Related Manuals for Check-line RH6


Summary of Contents for Check-line RH6
-
Page 1: Table Of Contents
NOTES TABLE OF CONTENTS Positioning the instrument ……………………………………………. Calibration curves …………………………………………………….. Description of definitons ……………………………………………… Application range ……………………………………………………… Design of the device ………………………………………………….. Menu level overview ………………………………………………….. Operating the instrument …………………………………………….. Transfer saved data to the PC ………………………………………. Print saved data ………………………………………………………. -
Page 2: Positioning The Instrument
Insert the sword-sensor into the stack for only approx. 10 cm, and push it a few more centimetres into the stack every 10 seconds. Let your RH6 adequately adjust to the material (at least 5 minutes) before you start to measure, particularly when the material pile was stored at a different temperature than the device. -
Page 3: Description Of Definitons
NOTES DESCRIPTION OF DEFINITIONS Relative air humidity: indicates the relation between the current water vapour pressure and the maximal possible water vapour pressure (called saturation vapour pressure). The relative humidity shows the degree the air is saturated with water vapour. For example: 50% relative humidity indicates that at the current temperature and the current pressure the air is saturated with water vapour for half of its value, 100 % relative... -
Page 4: Application Range
APPLICATION RANGE 20.0 WARRANTY Within the normal application range (normal range) the accuracy of the device is as Electromatic Equipment Co., Inc. (Electromatic) warrants to the original purchaser indicated. A long-term application beyond the normal application range (max. that this product is of merchantable quality and confirms in kind and quality with the range), particularly at an air humidity of more than 80%, can lead to higher descriptions and specifications thereof. -
Page 5: Menu Level Overview
19.0 COMMON REASONS FOR INCORRECT MEASUREMENTS MENU LEVEL OVERVIEW • Keypad symbols Sunlight or other sources of heat or cold that doesn´t correspond to the surrounding temperature Type selection menu Measuring window: • Dripping or sprayed water Rolling Menu Power ON / OFF •... -
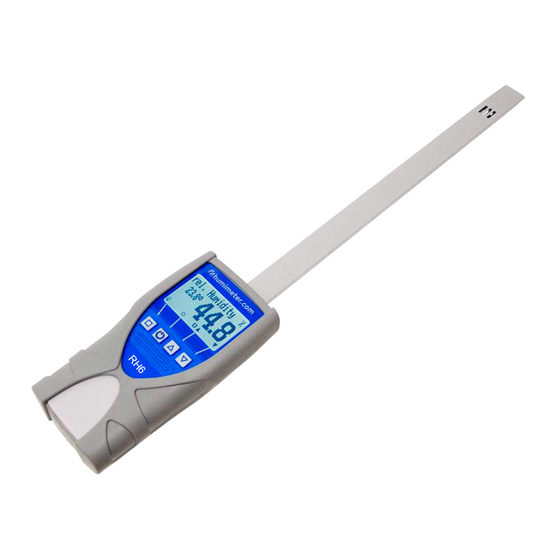
Page 6: Operating The Instrument
OPERATING THE INSTRUMENT 18.0 TECHNICAL DATA Switching on: Press for 3 seconds. Measurement Meas. Range / Resolution / Accuracy rel. humidity 0 to 100% rh / 0,1% Changing the calibration curve: calibration 10 to 90% / ±1,5% rh (at 25° C) Setting the time: 2 times - Options –... -
Page 7: Transfer Saved Data To The Pc
If the battery symbol appears in the measuring window resp. if a critical charge of battery is shown in the status, The data transfer can be started on your RH6 or on the the batteries have to be changed IMMEDIATELY. If you do... -
Page 8: Print Saved Data
First of all remove the rubber protection cover. For that, hold the rubber protection measuring series or all saved measuring series (logs). cover at the upper side and pull it over. If your RH6 is provided with an USB port, Confirm by pressing again. -
Page 9: Single-Point Adjustment With 50% Humidity Standard
12.0 RESET TO FACTORY CALIBRATION 10.0 SINGLE-POINT ADJUSTMENT WITH 50% HUMIDITY STANDARD 1. Press the button two times to reach the menu point Options. For the adjustment the appropriate calibration equipment as well as calibration ampoules resp. humidity standards of 50 % r.h. are required. 2. -
Page 10: Offset Adjustment
6. Fit the metal ring on the third gasket. 1. Leave the measuring device in the calibration equipment, and switch it on. 7. Take the upper part with the RH6 and attach these carefully at the bottom part of the calibration device. - Page 11 PAPER MOISTURE METER Distributed by: ABQ Industrial LP USA Tel: +1 (281) 516-9292 / (888) 275-5772 eFax: +1 (866) 234-0451 OPERATING INSTRUCTIONS Web: https://www.abqindustrial.net E-mail: info@abqindustrial.net...
Need help?
Do you have a question about the RH6 and is the answer not in the manual?
Questions and answers