Advertisement
Quick Links
Download this manual
See also:
Manual
Vehicle DVR System
W iF i / G P S / 3G (opt ional)
8CH DVR
8CH
960x480
30 FPS
960H
Product Appearance
1
2
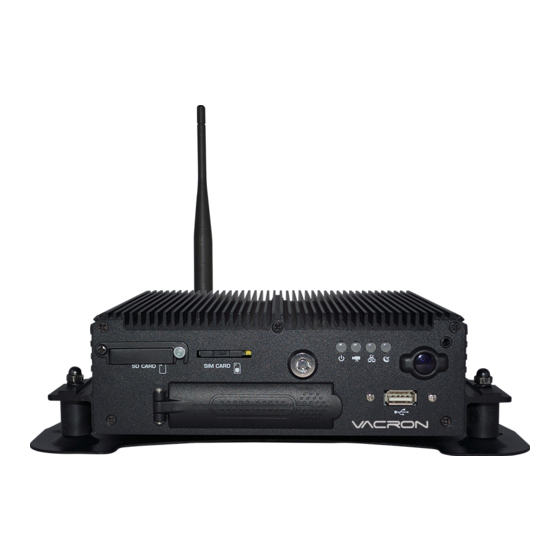
FRONT PANEL
1. SD Card Slot
2. Sim card slot
3. HD slot lock
4. Power light
11
12
13
14
18
19
REAR PANEL
16. Hollow connection
11. RS-485 Connection
12. Network Connection
17. Power Connection
13. Audio output
18. GND
14. Video output
19. Audio input
15. Hollow connection Video
20. G-Mouse connection
recorder connection 1-4 CH
21. 3G antenna connection
22. WiFi antenna connection
GPS / 3G / WiFi optonal
TS
TRANSPORT SUPPORT
W iF i / G PS / 3G ( o pt io nal)
GUI
TV OUT
DC 8~36V
optional
5
7
3
4
6
8
9
10
5. Record light
8. Infrared Receiver
6. Network light
9. HD slot
7. GPS light
10. USB Slot
15
16
17
20
21
22
1 set of video/ audio output
4 set of alarm input
1. DC12V Out
2/3. Signal & DC grounding
4. DC8~36V vehicle power (+)
5. ACC control
6. GNDP vehicle power (-)
Accessories
This product contains accessories as below:
Storage devices such as hard drives, memory cards are not supplied,
please contact Transport Support - www.transportsupport.co.uk
Standard
Main Device / Power Cable 6P+5A / ALARM Cable / IR Extension
Cord /16P Female-MINI x2 / IR Remote Control/Network Cable /
Software Disc / RS-485 Cable(2 pin)
Optional
3G Module / WiFi Antenna / G-Mouse
Safety Precautions
Take and review some test video footage initially to make sure the images have been recorded
correctly. Please note that the manufacturer, its subsidiaries and a liates, and its
distributors are not liable for consequential damages arising from any malfunction
of this device or accessories, including memory devices that results in the failure of an image
to be recorded or to be recorded in a way that is unreadable.
Before using the product, please ensure that you read the safety precautions described
below. Always ensure that the product is used correctly.
• Please keep device away from children.
• Use only recommended power sources.
• Do not attempt to disassemble, alter or apply heat to the product.
• Avoid dropping or subjecting the product to severe impacts.
• To avoid the risk of injury, do not touch the interior of the product if it has been dropped
or otherwise damaged.
• Stop using the product immediately if it emits smoke, a strange smell, or otherwise
behaves abnormally.
• Do not use organic solvents such as alcohol, benzene, or thinner to clean the product.
• Do not let the product come into contact with water (e.g. sea water) or other liquids.
• Do not allow liquids or foreign objects to enter the DVR.
• Do not place the DVR near or in direct ame.
• Do not handle the power cord with wet hands.
• Do not use the equipment in a manner that exceeds the rated capacity of the electrical
outlet or wiring accessories. Do not use if the power cord or plug are damaged, or not
fully plugged into the outlet.
• Do not allow direct or metal objects (such as pins or keys) to contact the terminals or
plug.
• Avoid using, placing or storing the product in the humid or dusty areas.
-20~65°C
(vehicle inside)
Before using 3G products, please ensure that you read the safety noti cations
described below.
• Company and user shall not modify certi ed low power radio frequency device the
frequency, increase the power and change the characteristics and functions.
• Use low power radio frequency device shall not a ect ight safety and interfere with
legal communications; if radio interference happenes the use of the device should be immediately
suspended.
Power On / Power O
Power On
Put 2.5" HDD (upto 1TB) into HDD slot and close the HDD slot door and lock.
then turn on the power to the DVR, it will take approximately 30 seconds to start.
When the LED's on the front panel start ashing, recording is in progress.
Power O
Turn o the power; please wait for 10 seconds until the super capacitor has
discharged and fully powered down. Then take the HDD out and playback the
recorded les in the PC Software.
Light Indicators - Front Panel of the DVR
● Power Light (Green LED)
Light O : means no power/power o . Light On: means power supply normal and DVR is on.
● Recording Light (Red LED)
Light O : means not-recording. Light Flashing: means DVR is recording.
● Network Light (Blue LED)
Light O : means network disconnected. Light On: means network connected.
● GPS Light(Orange Light)
Light O : means GPS is not ready. Light On: means GPS is locked on position.
IMPORTANT! When the RED light is flashing quickly, it means a Forced recording is being
caused by manual activation or by a shock detected by the G-Sensor.
Remark: While using playback function on the DVR, it cannot record live images.
IR Remote controller
1CH Screen
Display
Mute
Arrow
Playback/
Play
Pause
Force Recording Button
4CH Screen Display
Menu
Remote Control Precautions
Con rm
?
Remote control inspection
ˇ Check the batteries positive and
Backward
negative polarity.
ˇ Check the battery has charge.
Stop/Left
ˇ Check the sensor of remote control
if be obscured.
ˇ Check if there are fluorescent
lamps are used nearby.
Advertisement

Subscribe to Our Youtube Channel
Related Manuals for Vacron VVH-MD82D


Summary of Contents for Vacron VVH-MD82D
-
Page 1: Ir Remote Controller
Accessories Vehicle DVR System This product contains accessories as below: Storage devices such as hard drives, memory cards are not supplied, TRANSPORT SUPPORT please contact Transport Support - www.transportsupport.co.uk W iF i / G P S / 3G (opt ional) Standard Main Device / Power Cable 6P+5A / ALARM Cable / IR Extension 8CH DVR... - Page 2 System Interface and Operation TRANSPORT SUPPORT Date/Time Version Function Icon • GPS Setting A. Icon Description Select to show speed and speed unit setting on live view display or Not. • : Recording • Plate Number Setting • : GPS Connecting Input range:A~Z and 0~9.
Need help?
Do you have a question about the VVH-MD82D and is the answer not in the manual?
Questions and answers