Table of Contents
Advertisement
Quick Links
Included:
• Safety Instructions ST-CO
• OMNEO Software Suite CD
• OMI Quick Start Guide
• OMI Documentation Resource Disk
• 2 - Screw Panhead, M2.5 x 10.0
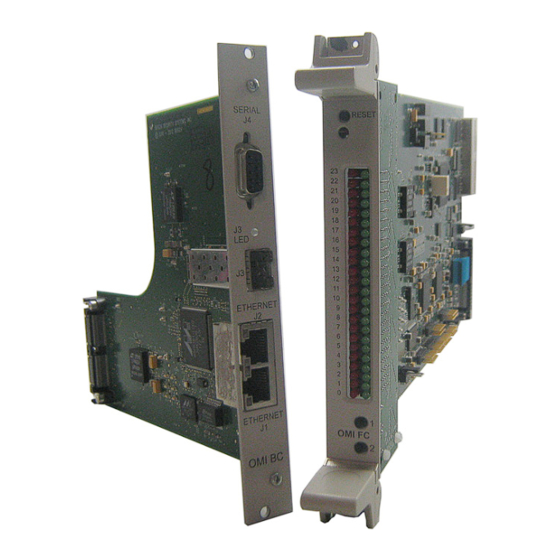
• Back Card Assy., OMI
• Front Card, 64 CH, OMI
or
Front Card, 48 CH, OMI
or
Front Card, 32 CH, OMI
or
Front Card, 16 CH, OMI
Requirements:
You must have the following:
• Screwdriver
• MCII-e version 2.9
F01U273977 Rev 02
ADAM-M Frame Installation
Important: Up to four (4) OMI card sets can be used in
an ADAM M frame at a time.
To install the OMI card into the ADAM-M frame, do
the following:
1.
Using the Installation CD, follow the instructions
in the readme.txt file to install all the required
software needed for OMNEO functionality.
Gently insert the OMI front card into the
2.
appropriate ADAM M slot.
NOTE: Take care to insert the card properly, as shown.
3.
Using the card ejectors tighten down the front card
by pushing it into the slot.
Quick Start Guide
OMI - OMNEO Matrix Interface
4.
On the back of the ADAM-M frame, carefully insert
the OMI back card, taking care to align it with the
OMI front card, as shown above.
Ensure the OMI back card is seated properly
5.
against the OMI front card and is sitting firmly in
the frame.
Using the supplied screws, tighten the OMI back
6.
card to the frame.
7.
Ensure the card ejectors are tightened to the
chassis on the OMI front card.
03/2013
Advertisement
Table of Contents

Related Manuals for RTS OMI


Summary of Contents for RTS OMI
-
Page 1: Quick Start Guide
Quick Start Guide OMI - OMNEO Matrix Interface ADAM-M Frame Installation On the back of the ADAM-M frame, carefully insert the OMI back card, taking care to align it with the Important: Up to four (4) OMI card sets can be used in OMI front card, as shown above. an ADAM M frame at a time. To install the OMI card into the ADAM-M frame, do the following: Using the Installation CD, follow the instructions in the readme.txt file to install all the required software needed for OMNEO functionality. Gently insert the OMI front card into the appropriate ADAM M slot. Ensure the OMI back card is seated properly against the OMI front card and is sitting firmly in the frame. - Page 2 OMI - OMNEO Matrix Interface ADAM Frame Installation Using the card ejectors. tighten down the front Ensure the card ejectors are tightened to the chassis on the OMI front card. card. Important: Up to eight (8) OMI card sets can be used On the back of the ADAM frame, carefully insert in an ADAM frame at a time. the OMI back card, aligning it with the OMI front card. To install the OMI card into the ADAM frame, do the following: Gently insert the OMI front card into the appropriate ADAM slot. Ensure the OMI back card is seated properly against the OMI front card and is sitting firmly in the frame. Using the supplied screws, tighten the OMI back card to the frame.
- Page 3 OMI - OMNEO Matrix Interface Cabling Configuration System Drawing DB-9 Connector Pinouts Consult the OMI Technical Manual (P/N F.01U.261.047) Single subnet system with less than 128 OMNEO RS-232 Mode for specific instructions to complete the following steps. nodes: Pin 1 ................N/A To configure the OMI card in AZedit, do the following: Pin 2 ............. RS232-TXD Output Pin 3 ............RS232-RXD Input Step 1: Download the License File for more channels, if applicable. Pin 4 ................N/A Pin 5 .................Ground Step 2: Assign ports to the card using the Port Pin 6 ................N/A Allocation table. Pin 7 ................N/A Step 3: Set up the network configuration.
Need help?
Do you have a question about the OMI and is the answer not in the manual?
Questions and answers