BIONIME Rightest GM550 Getting Started Manual
Hide thumbs
Also See for Rightest GM550:
- User manual (71 pages) ,
- User manual (71 pages) ,
- User manual (30 pages)
Advertisement
Quick Links
Download this manual
See also:
User Manual
GM550 GETTING STARTED GUIDE
Test Strip Port
Insert test strip here
until you hear a
click.
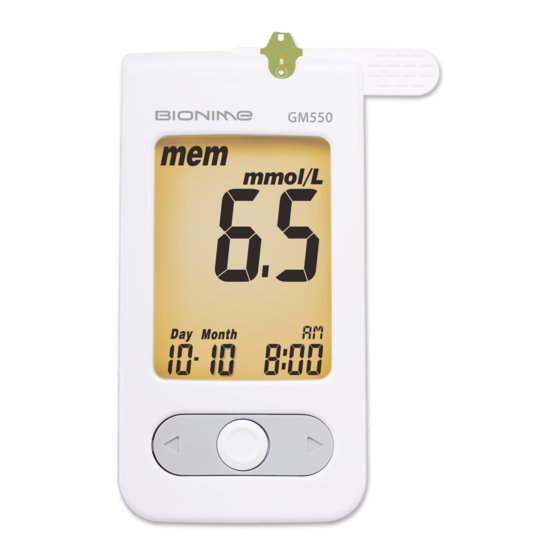
Display Window
Show your test
Main Button (
result, messages
For operating the
and relative
meter, please
information.
check details in
following sections.
Left Button (
)
Right Button (
For operating the
For operating the
meter, please check
meter, please check
details in following
details in following
sections.
sections.
Front View of Meter
Sample Entry
Test strips
View Window
Protective cover
Test Strips
Test strips vial
1
Batteries Installation
1) Turn the meter over. Press and push battery cover to open.
2) Install the battery. Be sure to put battery in correct direction.
3) Slide the battery cover back until it snaps into place.
1
Battery Cover
Slide cover to
change batteries.
)
)
Back View of Meter
Depth adjustable cap
Release button
Lancet carrier
Safe switch
Lancing Device
Lancet
2
( For self-testing )
2
Setting Up Your Meter - Setting the Date, Time and Unit
1) Press and release main button "
2) Press and hold main button "
into setting mode, the meter will turn off first. Please keep pressing it until you go into the setting
mode. The year will flash.
3) Press left button "
4) Press main button "
Product
name
Meter Serial
Number
5) Repeat steps 3 and 4 to change the date, time format, hour, minute, volume, and measurement
unit. After pressing the main button to confirm the measurement unit setting, your set-up has
been finished.
Hub
Plunger
NOTE
-
Suggest not to use this meter close to source of strong electromagnetic radiation, to avoid
interference with proper operation.
-
Suggest to keep meter free of dust, water or any liquid.
3
Preparing the Lancing Device
1) Hold the depth adjustable cap in one hand and hold the hub in the other hand. Bend the cap
towards the down side. When a gap appears between the cap and hub, pull them off in opposite
directions.
2) Pull off the depth adjustable cap.
3) Insert a new disposable lancet firmly into lancet carrier.
3
" to turn on the Meter.
" for 7 seconds until you go into the setting mode. Before you go
" or right button "
" to change the year.
" to confirm the year and move to month setting.
1
2
3
Advertisement

Related Manuals for BIONIME Rightest GM550


Summary of Contents for BIONIME Rightest GM550
- Page 1 GM550 GETTING STARTED GUIDE ( For self-testing ) Setting Up Your Meter - Setting the Date, Time and Unit Test Strip Port Insert test strip here 1) Press and release main button " " to turn on the Meter. until you hear a Battery Cover click.
- Page 2 Blood sample size above 3.0µL might contaminate the meter. Not enough blood (<1.0µL) might cause inaccurate result. Sample Size Example 1.0µ 1.5µ 2.0µ 3.0µ µL BIONIME CORPORATION 694, Renhua Road, Dali Dist., Bionime GmbH Taichung City 412, Taiwan Tramstrasse 16 Tel: 886-4-24951268 Fax: 886-4-24952568 9442 Berneck Email: info@bionime.com...
Need help?
Do you have a question about the Rightest GM550 and is the answer not in the manual?
Questions and answers