Sign In
Upload
Download
Table of Contents
Contents
Add to my manuals
Delete from my manuals
Share
URL of this page:
HTML Link:
Bookmark this page
Add
Manual will be automatically added to "My Manuals"
Print this page
×
Bookmark added
×
Added to my manuals
Manuals
Brands
Anviz Manuals
IP Access Controllers
EP10
User manual
Anviz EP10 User Manual
Ep series fingerprint time and attendance system
Hide thumbs
1
2
3
Table Of Contents
4
5
6
7
8
9
10
11
12
13
14
15
16
17
18
19
20
21
22
23
24
25
26
27
28
29
30
31
32
33
34
35
36
37
38
39
40
41
42
43
44
45
46
47
48
49
50
51
52
53
54
55
56
57
58
59
60
61
62
63
64
65
66
67
68
69
70
71
72
73
74
75
76
77
78
79
80
81
82
83
84
85
86
87
88
89
90
91
92
93
94
95
96
97
98
99
100
101
102
103
104
105
106
107
108
109
110
111
112
113
114
115
116
117
page
of
117
Go
/
117
Contents
Table of Contents
Bookmarks
Table of Contents
Table of Contents
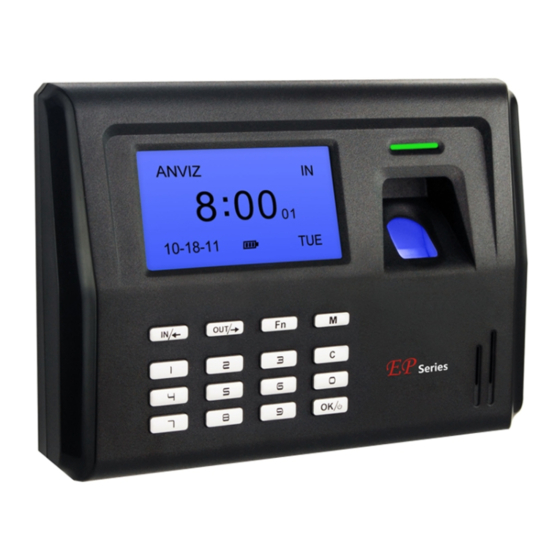
1 Product Introduction
Product Features
Parameter
2 Operation Guide
Keypad Introduction
Time Attendance Status
User
User Enroll
User Deletion
Verify Mode
Admin Setup
Admin Clear
Setup
Device ID
Time
Language
Net (Optional)
Precision
Volume
Auto off
Auto Update
Log Alert
Re-Verify
Hardware Test
USB Flash
New Record Backup
All Records Backup
User Backup
User Recovery
System Info
T&A Status Setting
Shut down
3 System Installation
Operation Environment
Uninstall the Software
4 Background Management
Log in System
System
Parameters Settings
Administrators
Administrator's Password Set
Modified Record Log
Managing Log
Set Database Link
Exit System
HR Management
Department Management
Employees Maintenance
Attendance Management
Holiday List
Timetable and Shift
Employee Scheduling
Attendance Records
Attendance Calculating and Report
Deal with Exceptions
Away on Business/ Leave
Append Record
Append Record Collectively
Dealing with Collectively Late / Leaving
Data Maintenance
Import Employee List
Import Attendance Record
Clear Obsolete Data
Compress Database
Backup Database
Initialize System
External Program Management
Connect to Time Attendance Machine
5 Data Communication
T&A Machine Management
Add Unit
Modify Unit
Delete Unit
Right Key Menu
Synchronize Time
Initialize Unit
Terminal Parameter Settings
Download New Record
Download All Record
Clear Record
Backup Employee
Resume Employee
Record Supervision
Activate Realtime
Prohibit Real-Time
Employees Management
Add Employee
Modify Employee
Delete Employee
Transfer Department
Set Privilege
Copy Privilege
Download FP
Upload Employee & FP
Delete from Unit
Employee Checking
Department Management
Record Management
Record Search
Export Record
System Settings
Basic Parameter Settings
T&A Status Setting
Timing Downloading Record
Management PWD Setting
Database Linking Setting
Exit System
User Interface Configuration
Interface Skin Color
Change the Software Language
Set Quick Access Button
U Disk Management Program
Read the Data from the U Disk
Modify the Data in the U Disk
Export Data from the Database
Fqa
6 Fqa
Fingerprint Has Enrolled but Often Gets Failure in Identification
The Machine Cannot Connect with PC
No Records Found Though Employee Have Clocked In/Out
Clock's Time Works Fine, but FP Scanner Is Off, Employee Cannot Attendance107
We Do Not Use the ID + Fingerprint Mode to Verify
The Unit Beeps Automatically When no One Punches In/Out
7 Appendix
Interface Illustration
Illustration for Pressing Fingerprint
Advertisement
Quick Links
1
Product Features
Download this manual
Fingerprint Time and Attendance System
User Guide
(V1.2)
ANVIZ Shanghai
Subject to change without notice.
1
Table of
Contents
Previous
Page
Next
Page
1
2
3
4
5
Advertisement
Table of Contents
Need help?
Do you have a question about the EP10 and is the answer not in the manual?
Ask a question
Questions and answers
Related Manuals for Anviz EP10
IP Access Controllers Anviz EP30 User Manual
Ep series fingerprint time and attendance system (117 pages)
IP Access Controllers Anviz EP300 User Manual
Ep series fingerprint time and attendance system (117 pages)
IP Access Controllers Anviz OA200 User Manual
Multifunctional standalone t&a and access control system (93 pages)
IP Access Controllers Anviz VP30 Owner's Manual
Card access control (112 pages)
IP Access Controllers Anviz T5Pro User Manual
Fingerprint & rfid (97 pages)
IP Access Controllers Anviz T5 User Manual
(21 pages)
IP Access Controllers Anviz P7 User Manual
Poe-touch fingerprint and rfid access control (93 pages)
IP Access Controllers Anviz VF30 Operation Manual
Professional access control (2 pages)
IP Access Controllers Anviz VF30 User Manual
Professional access control reader (2 pages)
IP Access Controllers Anviz M-Bio Quick Manual
Portable bluetooth enabled fingerprint & rfid device (12 pages)
IP Access Controllers Anviz W 1 Quick Manual
Color screen fingerprint & card time attendance and access control (11 pages)
IP Access Controllers Anviz W3 User Manual
Smart face recognition terminal (28 pages)
IP Access Controllers Anviz CX2 User Manual
Fingerprint and card time clock (13 pages)
IP Access Controllers Anviz T50 User Manual
(11 pages)
IP Access Controllers Anviz FacePass 7 Pro Quick Manual
Smart face recognition and infrared thermal temperature detection terminal (13 pages)
IP Access Controllers Anviz M7 PALM User Manual
Poe outdoor standalone access control terminal (16 pages)
This manual is also suitable for:
Ep300
Ep20
Ep30
Table of Contents
Print
Rename the bookmark
Delete bookmark?
Delete from my manuals?
Login
Sign In
OR
Sign in with Facebook
Sign in with Google
Upload manual
Upload from disk
Upload from URL


Need help?
Do you have a question about the EP10 and is the answer not in the manual?
Questions and answers