Advertisement
Available languages
Available languages
Quick Links
ASWC
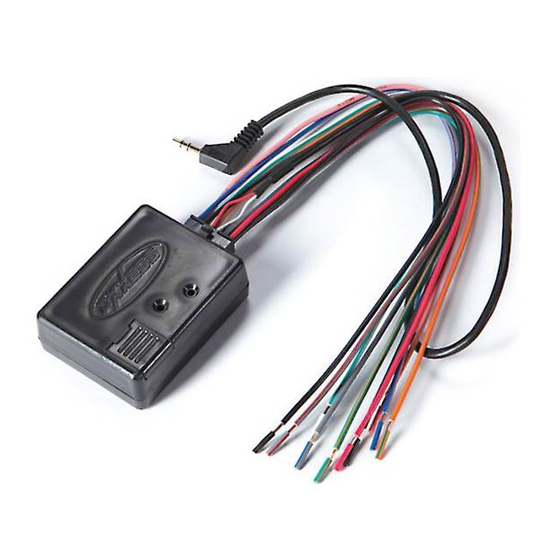
Axxess Steering Wheel Control Interface
Installation Manual
The ASWC is a universal steering wheel control interface that can be used
on most any vehicle with steering wheel controls. Designed to be used
with today's top aftermarket radio manufactures like Pioneer, Sony, Alpine,
Kenwood, Eclipse, JVC, and others, the ASWC is all you'll need to retain
the OEM steering wheel controls. The ASWC has the ability to auto-detect
many vehicle makes and aftermarket radios and it will preset the steering
wheel controls to the aftermarket radio automatically so no programming is
required. If desired the ASWC can be manually programmed so the user
can make the steering wheel controls function they way they want them
to, only limited by the functions of the aftermarket radio. The ASWC also
has a non-volatile memory which means the ASWC will remember the
programming even if the ASWC is disconnected from the vehicle.
The ASWC is also updatable using the Axxess website (www.axxessinter-
face.com) and the USB-CAB update cable. If there is an update made to
the ASWC there is no need to send inventory back, or ask for the latest
version, you can update it yourself and save time and money.
US Pat. No. 8014920
axxessinterface.com
460 Walker Street • Holly Hill, FL 32117-2699
800.221.0932
Advertisement

Subscribe to Our Youtube Channel
Related Manuals for Axxess Automobile Parts


Summary of Contents for Axxess Automobile Parts
- Page 1 ASWC will remember the programming even if the ASWC is disconnected from the vehicle. The ASWC is also updatable using the Axxess website (www.axxessinter- face.com) and the USB-CAB update cable. If there is an update made to the ASWC there is no need to send inventory back, or ask for the latest version, you can update it yourself and save time and money.
- Page 2 What’s included in the package? A) ASWC Interface B) 12 pin harness with male 3.5mm connector C) Female 3.5mm connector with Brown and Brown/White wires...
- Page 3 2) Make sure the radio you are installing is compatible with a steering wheel control interface (Check in owners manual). 3) Go to the Axxess website (www.axxessinterface.com) for a detailed information sheet on what color(s) the steering wheel control wires will be in your vehicle, the location, what wire(s) to use on the ASWC, and what, if any, programming is required.
- Page 4 3) The slide cover for the USB update port – open this up to reveal the USB update port. Using the USB-CAB update cable and the Axxess website you can make sure you always have the latest, updated inventory.
- Page 5 Below are the wire colors of the ASWC. Please go to the Axxess website (www.axxessinterface.com) for detailed information on your specific vehicle and what color wire(s) to use on the ASWC. Pin 1 – Pink Pin 2 – White/Green Pin 3 – Orange/Green Pin 4 –...
- Page 6 3) Locate the correct SWC wire(s) in the vehicles radio or secondary harness as described in the vehicle information sheet found in the Axxess website. Connect the correct wire color(s) from the ASWC to the vehicles steering wheel control wire(s) in the vehicle.
- Page 7 Auto Detect Mode: The ASWC has the ability to auto detect certain vehicles and to know what aftermarket radio it is connected to. The vehicle info sheet from the Axxess website (www.axxessinterface.com) will show if your vehicle would be auto detected and what action, if any, is required by you for this process to take place.
- Page 8 Like we said before, only one of these actions will need to be done depend- ing on your vehicle for the auto detect feature to work. Please refer to the vehicle info sheet in the Axxess website. These are the steps for the Auto Detect Mode: 1) Complete connections to the vehicle and the aftermarket radio.
- Page 9 * If the ASWC was installed in a vehicle before: 2) Turn the ignition on, the led will flash slowly. 3) Hold down the reset button for more then 2 seconds but less then 10 seconds, the led will start flashing rapidly. 4) Perform action required for your particular vehicle as noted in the vehicle info sheet.
- Page 10 1) Verify that you have 12 volt accessory and a good ground to the ASWC. 2) Verify with the vehicle information sheet on the Axxess website that you connected the correct steering wheel control wires in the vehicle to the correct wire(s) on the ASWC.
- Page 11 1st led flash is pin #2 (White/Green) on the ASWC 2nd led flash is pin #3 (Orange/Green) on the ASWC 3rd led flash is pin #4 (Green/Orange) on the ASWC 4th led flash is pin #5 (Gray/Red) on the ASWC 5th led flash is pin #8 (Black/Green) on the ASWC 6th led flash is pin #11 (Gray/Blue) on the ASWC 7th led flash is pin #1 (Pink) on the ASWC...
- Page 12 Manual Programming/SWC Button Reassignment: If your vehicle is not listed for auto detection by the ASWC on the Axxess website most vehicles can still be manually programmed to the ASWC by following these steps: * Note: Not every radio will have all the possible swc commands on the steering wheel.
- Page 13 5) Now press and hold the Volume Down button until the led goes solid red. Release the Volume Down button and the led goes off. Volume Down has now been programmed. 6) At this point press and hold the next button on the steering wheel that corresponds with the programming list (see below).
- Page 14 7) You can end this half of the programming in 2 ways: 1) After the last button is programmed on your steering wheel (you do not have to go through the whole list), hold down the Volume Up button for at least 10 seconds.
- Page 15 7th led flash is for Alpine* 8th led flash is for Visteon 9th led flash is for Valor 10th led flash is for Clarion 5V * Note: If the ASWC flashes 7 times and you do not have an Alpine radio connected to it that means that the ASWC did not see any radio connected.
- Page 16 5) Here is the chart to show how many presses of the Volume Up button is needed for which radio you are trying to program: 1st led flash is for Eclipse 2nd led flash is for Kenwood** 3rd led flash is for Clarion 4th led flash is for Sony and Dual 5th led flash is for JVC 6th led flash is for Pioneer and Jensen...
- Page 17 within the first 20 seconds of turning the ignition key on. If you wait longer then the 20 seconds you will have to turn the ignition off then back on again. •Within the first 20 seconds if any button other then Volume Up or Volume Down is pushed, the remapping process will stop.
- Page 18 10. Band 11. Play/Enter 12. PTT (Push To Talk) 13. On Hook 14. Off Hook 15. Fan Up 16. Fan Down 17. Temp Up 18. Temp Down * Note: Remember not all radios will have all these commands. Please refer to the radios’ owners manual for specific commands recognized by the radio.
- Page 19 2) The led will turn on then release the Volume Down button and the led will turn off. 3) The original steering wheel control settings will be restored.
- Page 20 NOWLEDGE IS Enhance your installation and fabrication skills by enrolling in the most recognized and respected mobile electronics school in our industry. Log onto www.installerinstitute.com or call 800-354-6782 for more information and take steps toward a better tomorrow. Metra recommends MECP certified technicians.
-
Page 21: Manual De Instalación
ASWC recordará la programación aun en caso de que se desconecte del vehículo. El ASWC también puede actualizarse mediante el sitio web de Axxess (www.axxessinterface.com) y mediante el cable de actualización USB- CAB. Si se actualizó el ASWC, no es necesario devolver el inventario ni pedir la última versión;... - Page 22 ¿Qué incluye el paquete? A) Interfaz ASWC B) Arnés de 12 clavijas con conector macho de 3.5 mm C) Conector hembra de 3.5 mm con cables de color marrón y marrón/ blanco...
- Page 23 2) Asegúrese de que el radio que está instalando sea compatible con una interfaz de control de volante (Revise el manual del propietario). 3) Visite el sitio web de Axxess (www.axxessinterface.com) para obtener una hoja de información detallada acerca del color (de los colores) de los cables de los controles del volante que encontrará...
- Page 24 3) Cubierta deslizable para el puerto de actualización USB: Abra esta cubierta hacia arriba para dejar al descubierto el puerto de actualización USB. Usando el cable de actualización USB-CAB y el sitio web de Axxess, puede asegurarse de contar siempre con el inventario más reciente y actualizado.
- Page 25 Debajo se detallan los colores de los cables del ASWC. Visite el sitio web de Axxess (www.axxessinterface.com) para obtener información detallada acerca de su vehículo específico y qué color de cable(s) debe usar en el ASWC. Clavija 1: rosa Clavija 2: blanco/verde...
-
Page 26: Instalación
Instalación Una vez que haya recopilado la información o impreso la hoja de infor- mación de su vehículo en particular desde el sitio web de Axxess (www. axxessinterface.com), ya está listo para instalar el ASWC. Empecemos: 1) Conecte el cable negro del ASWC (clavija 6) a tierra. Puede usar el mismo punto de conexión a tierra que el radio de posventa. - Page 27 El ASWC tiene la capacidad de detectar automáticamente determinados vehículos y de reconocer el radio de posventa al que está conectado. La hoja de información del vehículo del sitio web de Axxess (www.axxessin- terface.com) le mostrará si su vehículo podría ser detectado automática- mente y qué...
- Page 28 Consulte la hoja de información del vehículo en el sitio web de Axxess. Estos son los pasos que debe seguir para activar el modo de detección automática: 1) Termine de realizar las conexiones al vehículo y al radio de posventa.
- Page 29 * Si el ASWC fue instalado en un vehículo con anterioridad: 2) Encienda la ignición, el LED destellará lentamente. 3) Mantenga presionado el botón de reinicio durante más de 2 segundos, pero menos de 10 segundos, el LED comenzará a destellar rápidamente. 4) Realice la acción necesaria para su vehículo en particular, según se observa en la hoja de información del vehículo.
- Page 30 1) Verifique que tenga una conexión con un accesorio de 12 voltios y una buena conexión a tierra al ASWC. 2) Verifique en la hoja de información del vehículo en sitio web de Axxess que usted haya conectado los cables de los controles del volante cor rectos del vehículo al (a los) cable(s) correctos del ASWC.
- Page 31 El 1.° destello del LED es la clavija n.° 2 (blanco/verde) en el ASWC El 2.° destello del LED es la clavija n.° 3 (naranja/verde) en el ASWC El 3.° destello del LED es la clavija n.° 4 (verde/naranja) en el ASWC El 4.°...
- Page 32 Programación manual/Reasignación de botones SWC: Si su vehículo no está incluido en la lista de detección automática por parte del ASWC en el sitio web de Axxess, la mayoría de los vehículos de todos modos pueden programarse manualmente al ASWC siguiendo los pasos que se mencionan debajo: *Nota: No todos los radios contarán con todos los comandos SWC posibles...
- Page 33 5) Ahora presione y mantenga presionado el botón Bajar volumen (Volume Down) hasta que el LED pase a color rojo fijo. Suelte el botón Bajar volu- men (Volume Down) y el LED se apagará. La función de reducción de volumen acaba de ser programada. 6) En este momento, presione y mantenga presionado el siguiente botón del volante que corresponde a la lista de programación (vea la información que se presenta debajo).
- Page 34 7) Puede terminar esta mitad de la programación de 2 maneras: 1) Después de programar el último botón de su volante (no tiene que pasar por toda la lista), mantenga presionado el botón Subir volumen (Volume Up) durante, al menos, 10 segundos. El LED pasará a modo de parpadeo constante lento.
- Page 35 El 7.° destello del LED es para Alpine*. El 8.° destello del LED es para Visteon. El 9.° destello del LED es para Valor. El 10.° destello del LED es para Clarion 5V *Nota: Si el ASWC destella 7 veces y usted no tiene un radio Alpine co- nectado, significa que el ASWC no vio ningún radio conectado.
- Page 36 5) El cuadro que figura a continuación muestra cuántas veces es necesario presionar el botón Subir volumen (Volume Up) según el radio que esté intentando programar: El 1.° destello del LED es para Eclipse. El 2.° destello del LED es para Kenwood. El 3.°...
- Page 37 volante dentro de los primeros 20 segundos después de encender la llave de ignición. Si espera más de 20 segundos, tendrá que apagar la ignición y, luego, volver a encenderla. •Si dentro de los primeros 20 segundos presiona cualquier botón que no sea el botón de Subir volumen (Volume Up) o Bajar volumen (Volume Down), el remapeo se detendrá.
- Page 38 Band (Banda) Play/Enter (Reproducir/Intro) PTT (Push To Talk) (PTT [Pulsar para hablar]) On Hook (Colgado) Off Hook (Descolgado) Fan Up (Subir ventilador) Fan Down (Bajar ventilador) Temp Up (Subir temp.) Temp Down (Bajar temp.) *Nota: Recuerde que no todos los radios contarán con todos estos coman- dos.
- Page 39 2) El LED se encenderá; luego, suelte el botón Bajar volumen (Volume Down) y el LED se apagará. 3) Se restablecerán las configuraciones originales de los controles del volante.
- Page 40 Conocimiento es Poder Convierta su hobby en una carrera en Installer Institute, el líder educativo de la industria de dispositivos electrónicos portátiles. Regístrese en www.installerinstitute.com o llame al 800-354-6782 para obtener más información y empiece su nueva carrera hoy mismo. Metra recomienda técnicos con certi- ficación del Programa de Certificación en Electrónica Móvil (Mobile Electron-...
Need help?
Do you have a question about the Automobile Parts and is the answer not in the manual?
Questions and answers