
Related Manuals for Zebex Z-2130


Summary of Contents for Zebex Z-2130
- Page 1 Portable CCD Data Collector Z-2130 ( Version 1.1) User’s Manual ZEBEX INDUSTRIES INC. WWW.ZEBEX.COM...
-
Page 2: Revision History
ZEBEX INDUSTRIES INC. Revision History Changes to the original manual are listed below: Version Date Description of Version April. 07, 2011 Initial release January. 15, 2013 Added USB connection section August 3, 2017 Added battery information Data Collector Series User’s Manual Version 1.0... -
Page 3: Important Notice
All trademarks mentioned herein, registered or otherwise, are the properties of their various respective owners. Copyright © 2017. All rights reserved. Guidance for Printing This manual is in A5 size. Please double check your printer setting before printing it. Z-2130... -
Page 4: Battery Information
Battery Information Use only a ZEBEX approved batteries. Using any other type of battery and charging equipment may damage the device and invalidate the warranty. Store batteries at half of full charge in a dry, cool place, removed from the equipment to prevent loss of capacity, rusting of metallic parts and electrolyte leakage. -
Page 5: Battery Maintenance
3 months, you need to charge the battery before use. If the battery is not installed, recharge the battery every 6 months to prevent damage to the battery cells. The battery capacity is reduced at temperature extremes, high and low. Z-2130... -
Page 6: Table Of Contents
EYING IN VIA KEYPAD Scanning the Barcode Data................7 Keying in Data via keypad ................8 ..................9 ROGRAM NSTRUCTIONS Working with Menus ..................9 Menu Description .................... 9 Run Task......................10 Task Utility ..................... 11 Setup......................13 Upload......................20 Z-2130... -
Page 7: Introduction
’ ANUAL Introduction Upgraded for better performance, Z-2130 now includes a 32-bit CPU and a new scan engine. Built for mobility and durability, Z-2130 is the most smartly designed device for all data collecting applications. Features Convenient on-handed operation. -
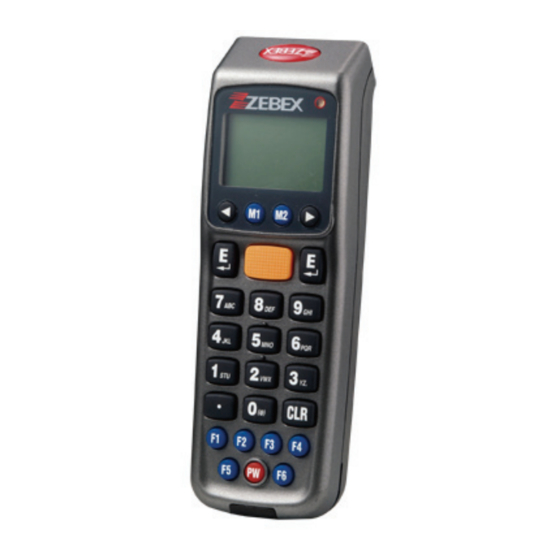
Page 8: Overview
A total of 26 keys are provided to the power and Keypad other function keys Communication Port Connect to communicate with PC Scan Window Emits a red beam for barcode reading Battery Lock Secures the battery compartment Battery Compartment Batteries are stored here Z-2130... -
Page 9: Getting Started
Slide the lock lever to unlock the battery lock as shown. Remove the battery cover from the data collector. Make sure the polarity is correct and insert the 3 rechargeable batteries. Put the battery cover back on and slide the lock lever back to secure it. Z-2130... -
Page 10: Charging The Battery
’ ANUAL Charging the Battery Place the Z-2130 on the cradle. LED on the data collector indicates the status of battery charge: Red for charging and Green for full. Connect the power adapter to the DB-9 (female) connector. Connect the power adapter to a wall outlet. -
Page 11: Connecting To Pc
The PC should auto-detect the device as a COM device and ask for the driver when connecting the first time. Please download and install the driver from ZEBEX website. The system should assign a COM port to the device after the driver installation. -
Page 12: Setting The Device On Pc
Get Device Time: Obtain device now date and time. Set Device Time: Set up device date and time. Note: For other settings please see the WinTaskGen User’s Manual for more details. Z-2130... -
Page 13: Using The Data Collector
The decoded message will then be displayed in the LCD. The scanned data will be stored as soon as the SCAN button is released, and the next barcode is ready to be scanned. Z-2130... -
Page 14: Keying In Data Via Keypad
Pressing M2 once more will turn “o” back into “5”. Keep pressing M2 until the desired character is approached. Press the symbols are available for data inputting as shown below on the table: Numeric Key Corresponding Characters Z-2130... -
Page 15: Program Instructions
1. View the file status. Task Utility 2. Format. 3. Delete Data. 4. Delete Task. Select this option for: 1. Basic Setup. Setup 2. System Setup. 3. Barcode Setup. Select this option to: 1. Upload Data. Upload 2. Delimiter Set 3. Upload Device. Z-2130... -
Page 16: Run Task
Press M2 to edit record. To edit data, use the arrow keys to move to the desired field and press F3 to insert or F4 to delete then use the keypad to enter the new data. Z-2130... -
Page 17: Task Utility
To set the Input Device, press the left or right arrow buttons to select from the following options and press Enter to confirm: Scan Only: Input by scanning barcodes only. Keyin + Scan: Input by key in and scanning barcodes. Keyin Only: Input by key in only. Z-2130... - Page 18 Yes. Add it: Add special characters to data. At the Delay(1/1000sec) screen, enter the time delay in milliseconds for scans. Maximum=32767. Select the Time stamp to use: None: No time stamp. Short: Short time stamp. Long: Long time stamp. Z-2130...
-
Page 19: Setup
Select “System Menu>3.Setup>1.Basic Setup>1.BackLit &. LCD” to enter the setup. Press the left or right arrow buttons to turn back light on or off. Press Enter to confirm. Use the left or right arrow buttons to adjust the value for LCD contrast and press Enter to confirm. Z-2130... -
Page 20: System Setup
Press M1 to exit when you are done. Baudrate options: 4800,9600,19200,38400,57600,115200. Parity Check: Even, Mark, None, Odd, Space. Data Bits options: 8,7. Stop Bits: None, One, OnePointFive, Two. Z-2130... - Page 21 Select “System Menu>3.Setup>2.System Setup>3.ID/PW/DateMode” to enter the setup. The following options appear: Device ID Select “System Menu>3.Setup>2.System Setup>3.ID/PW/DateMode>1.Device ID” to enter the setup. Device ID is displayed. Press Enter to input new or edit existing ID. A password maybe required to change the ID. Z-2130...
- Page 22 UPC-A Digits: 11, 12, 13. UPC-E Digits: 6, 7, 8. UPC-E to UPC-A: On, Off. UPC/EAN ADD 5: No Send, Send. UPC/EAN ADD 2: No Send, Send. Select the appropriate parameters and press Enter to setup the next symbology. Z-2130...
- Page 23 When ITF 25 is set to “ON”, pressing M2 will lead to more options: Codebar CDV: On, Off. ITF 25 CKD: Send, No Send. ITF 25 Length: Enter length 2 to 64 for the Min/Max length. Select the appropriate parameters and press Enter to setup the next symbology. Z-2130...
- Page 24 To turn this symbology on or off, use the left or right arrow buttons to change the value and press Enter to setup the next symbology. EAN-13 digits To set the digits, press the left or right arrow buttons to change the value to 12 or 13 and press Enter to setup the next symbology. Z-2130...
- Page 25 For example: the EAN 13 Barcode type ID code is “->10”, the Preamble “123”, and the Postamble “999”. Suppose a barcode representing “0028200106605” is scanned and decoded, and the data gets stored and uploaded, what is going to be displayed on the host screen will be “->101230028200106605999”. Z-2130...
-
Page 26: Upload
Select a parity characters as the Record Delimiter: None, , Space, CRLF, CR, and To decide whether the Upload Header is to be uploaded, press the left or right arrow buttons to change the value to On or Off. Press Enter to confirm. Z-2130... - Page 27 Select “System Menu>4.Upload>3.Upload Device” to enter the setup screen. Use the left or right arrow buttons to select the device for uploading: RS-232 or USB. Make sure the device is connected to the PC and press Enter to begin uploading. Z-2130...
Need help?
Do you have a question about the Z-2130 and is the answer not in the manual?
Questions and answers