Table of Contents
Advertisement
Advertisement
Table of Contents

Related Manuals for Clarke SE Ranges


Summary of Contents for Clarke SE Ranges
-
Page 1: Air Compressor
AIR COMPRESSOR AIR COMPRESSOR OPERATING & MAINTENANCE INSTRUCTIONS © 0307... -
Page 2: Table Of Contents
Thank you for purchasing this CLARKE Industrial Air Compressor. Before putting to use, please read this booklet thoroughly to ensure that installation is correctly carried out and the maintenance schedules correctly followed. This, in turn, will ensure the compressor will provide you with long and trouble free service. -
Page 3: Safety Precautions
SAFETY PRECAUTIONS Before using your compressor it is in your own interest to read and pay attention to the following safety rules: ♦ COMPRESSED AIR IS DANGEROUS - Never direct a jet of air at people or animals. ♦ Do not operate your air compressor with any guards removed. ♦... -
Page 4: Installation
INSTALLATION Before installing your machine, check that its air output is sufficient for the equipment to be used. The air output from the compressor must be more than the volume of air required. We recommend the following: Firm and level site, and the use of floor mountings for stationary compressors - anti-vibration pads. -
Page 5: Electrical Connections
L or coloured red. WARNING: This machine must be earthed. LUBRICATION:- Pump: Use Clarke compressor oil, as indicated on machine plate. Engine: (Petrol or diesel) refer to maker’s handbook. BEFORE STARTING COMPRESSOR, CHECK:- Compressor Pump Oil Level by - (a) Dipstick (to level marked) Fig.1... -
Page 6: To Start Compressor
NOTE: When starting compressors up to and including the 3HP models, an auto bleed valve will operate and air will be heard vent. This is quite normal and should not cause concern. The valve should close after several seconds. Should it fail to close, consult your Clarke dealer. -
Page 7: General Arrangement - Stationary
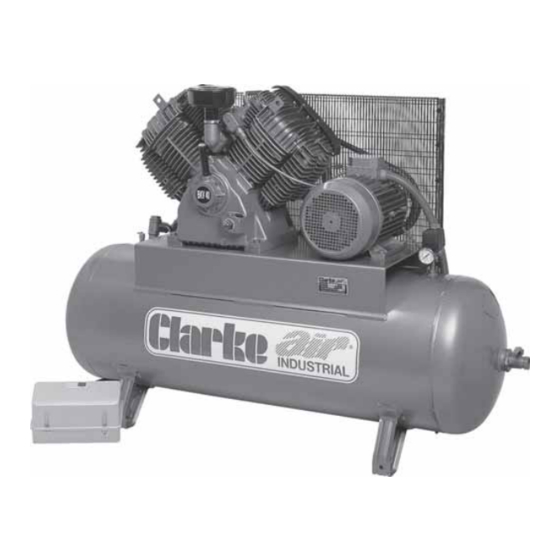
GENERAL ARRANGEMENT Fig.2 A. STATIONARY NB: Must be mounted on anti-vibration pads. 1. Air Compressor Pump 8. Drain Tap 16. Oil Level Sight Glass 2. Electric Motor Inspection Plug 17. – (or petrol/diesel engine) 10. Non-Return Valve 18. – 3. Belt & Pulley Guard 11. -
Page 8: General Arrangement - Portable
GENERAL ARRANGEMENT B. PORTABLE Fig.3 1. Air Compressor Pump 8. Drain Tap 16. Oil Level Sight Glass 2. Petrol/Diesel Engine 9. Inspection Plug 17. Air Filter/Regulator (or electric motor) 10. Auto Air Bleed (see Fig.7) 3. Belt & Pulley Guard 11. -
Page 9: Air Receiver Pressure Adjustments
AIR RECEIVER PRESSURE ADJUSTMENTS WARNING: THE SAFETY VALVE (ITEM 6, FIG. 2 & 3) FITTED TO THIS COMPRESSOR IS FACTORY SET AND MUST NOT BE ADJUSTED. If it is necessary to alter the pressure settings on the compressor please remember that increasing the pressure will NOT increase the volume of air supplied. - Page 10 To adjust pressure slacken lock nut (5).Turn pressure adjusting knob (4) clockwise to increase pressure,anti-clockwise to decrease. Tighten lock nut (5) when correct pressure isobtained. WARNING: Do not exceed the maximum working pressure of the machine, as marked on the CLARKE AIR specification plate.
-
Page 11: Outlet Pressure Adjustments
NOTE: Pressure Gauge (4). Pressure shown will differ by approximately 1 bar depending on whether the outlets are open/closed. STATIONARY COMPRESSORS These machines are not supplied with the facility to adjust outlet pressure. A comprehensive range of airline accessories is available from your local CLARKE stockist. -
Page 12: Trouble Shooting
TROUBLE SHOOTING CHART IMPORTANT! 1. Any remedial work that may be required must be carried out by aqualified electrician/engineer. 2. Switch off current before removing any parts from the compressor. 3. Empty Air Receiver of Air before dismantling any part of thecompressor unit’s pressure system. - Page 13 SYMPTOM PROBABLE CAUSES REMEDY Compressor unit will not Pressure switch defective. Have pressure switch stop automatically. changed by an electrician Pressure switch set at a Adjust pressure switch pressure higher than the or safety valve safety valve’s opening WARNING:DO NOT pressure.
- Page 14 SYMPTOM PROBABLE CAUSES REMEDY Unusual noise from Bolts loose. Tighten Bolts. compressor. V-Belt flywheel or cooling Find place of contact and coil touching belt guard remedy fault. Flywheel loose. Tighten flywheel. Unit installed on an Move unit to a more solid unsuitable base.
- Page 15 SYMPTOM PROBABLE CAUSES REMEDY Compressor unit starts Large amount of Drain off condensation and stops more condensation in air receiver. AT LEAST once a week. frequently than usual. Leaks in control unit or Locate leaks (by means of inspection cover. soapy water) and repair.
-
Page 16: Maintenance Chart
SYMPTOM PROBABLE CAUSES REMEDY Condensation at outlet Piping installation incorrect. Consult your local dealer. points. Compressor taking in air Obtain better fresh-air which is too warm. supply for compressor. Delivery temperature of air a) Use a larger air receiver. from air receiver too high. b) Insert an aftercooler. - Page 17 A Declaration of Conformity is provided for Engine Driven compressors, separately...
Need help?
Do you have a question about the SE Ranges and is the answer not in the manual?
Questions and answers