Table of Contents
Advertisement
Advertisement
Table of Contents

Related Manuals for Extech Instruments CG206


Summary of Contents for Extech Instruments CG206
- Page 1 USER GUIDE Coating Thickness Tester Model CG206 ...
-
Page 2: Probe Description
Introduction Thank you for selecting the Extech CG206 Coating Thickness Tester. The CG206 is a portable meter designed for non‐invasive coating thickness measurements with automatic recognition of the substrate material under test. The meter uses two measurement methods: magnetic induction (for ferrous metal substrates) and eddy current (for non‐ferrous metal substrates). The CG206 meter can connect to a PC via USB and transmit recorded data for further analysis and for generating report documentation. Proper use and care of this meter will provide many years of reliable service . Features Measured Coatings: Non‐magnetic coatings (e.g. paint, zinc) on steel; Insulated Coatings (e.g. paint, anodized coatings) on non‐ferrous metals Intuitive menu‐based programming Memory storage of up to 1500 readings in 30 groups (50 readings per group) Delete single readings or all groups easily Auto Power OFF with disable feature Data transfer to PC via USB User Zero Calibration ability Applications Corrosion protection Paint Shops and Electroplaters Chemical, Automobile, Shipbuilding, and Aircraft industries Laboratory, Workshop, and Field use Probe Description The CG206 probe is spring mounted in the sensor sleeve. This ensures safe and stable positioning of the probe and ensures constant contact pressure. A V‐groove in the sleeve of the probe facilitates reliable readings on small cylindrical parts. The ... -
Page 3: Meter Description
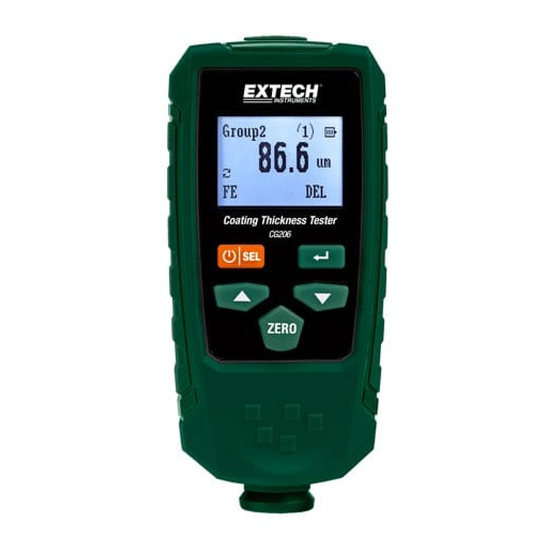
3. Up arrow 4. Zero Key 5. Micro USB connector 6. Back Key ( 7. Down arrow 8. Sensor Note: Battery compartment on rear of meter Display Description 1. Data record memory group number 2. Record Number in current memory group 3. Battery status icon 4. Measurement units: µm or mils 5. DEL (Delete): Press the back ( button to delete the previous reading 6. Metal type (FE=ferrous, NFE=non‐ferrous) 7. Automatic (Auto) metal detect mode CG206‐en‐GB_v1.0 6/16 ... -
Page 4: Operation
Operation Meter Power Install two ‘AAA’ 1.5 V batteries into the rear battery compartment. Press the power button to switch the meter ON. The display will switch ON. If the display does not switch ON, install or replace the batteries. When powering up, please keep the meter at least 10cm (4”) from metal objects. Replace the batteries when the battery status icon appears low, the meter will give inaccurate readings if the battery voltage falls very low. Measurements Before each measurement session please perform a Zero Calibration as described later in this User Guide. Practice with the film and zero reference metal substrates to learn how the meter operates before moving to a professional application. The heavier metal substrate is the ferrous (magnetic) zero substrate (Fe) and the lighter metal substrate (Al) is the non‐ferrous (non‐ magnetic) zero substrate. In Auto mode, the meter automatically senses ferrous and non‐ferrous substrates. 1. Place a reference film (250µm, for example) on the ferrous substrate (FE). 2. Power the meter on by pressing the power button. 3. Place the spring‐loaded meter sensor against the reference film. 4. The meter will emit an audible tone indicating that the measurement has been taken. 5. The LCD will show the reading at the center of the display area. 6. For a typical display see the Display description diagram. Automatic Power OFF In order to conserve battery life, the meter will automatically turn off after approximately 3 minutes. To defeat this feature, use the programming menu detailed in the next section (menu parameter AUTO POWER OFF under SET). CG206‐en‐GB_v1.0 6/16 ... -
Page 5: Programming Menu
Shows Memory Groups and the number of readings in each group (Group 0 has no memory) MEASURE MODE NFE, FE, Auto* Non‐Ferrous, Ferrous, or Auto (Automatic) Metal selection SET Unit settings µm* Micrometers mil Mils = mm * 2.54 / 100 Backlight Increase/decrease backlight using up/down arrows Auto Power OFF Enable* Allows Auto Power OFF Disable Defeats Auto Power OFF feature Contrast Increase/decrease contrast using up/down arrows Info Shows firmware version number and model number MEASURE VIEW View or delete stored data in all groups or selected groups CALIBRATION CAL Zero of FE Perform FE Zero Calibration (refer to Calibration section) CAL Zero of NFE Perform NFE Zero Calibration (refer to Calibration section) Delete Zero of FE Delete FE Zero Calibration data Delete Zero of NFE Delete NFE Zero Calibration data NOTE: Disable the Auto Power OFF feature before lengthy programming to avoid inconvenient automatic power down while programming. CG206‐en‐GB_v1.0 6/16 ... - Page 6 twice to return to the normal operating mode. MEASURE MODE 1. Press the LEFT button (SEL) to access the programming menu 2. Use the UP/DOWN buttons to scroll to the Measure Mode 3. Press the LEFT button (SELECT) to select the Measure Mode 4. Use the UP/DOWN buttons to scroll to Auto, FE, or NFE. Press the LEFT button (SELECT) to make a selection. AUTO mode ‐ the meter automatically recognizes the metal that is being measured. Ferrous (FE) Mode ‐ the Magnetic induction measurement mode is used. Non‐Ferrous (NFE) Mode ‐ the eddy current measurement mode is used. 5. Press the RIGHT button ( to return to the normal operating mode. SET Press the LEFT button (SEL) to access the menu. Use the UP/DOWN arrows to scroll to SET. Press the LEFT button (SELECT) to open the SET menu. Use the UP and DOWN buttons to scroll through the selections. Press the Left button (SELECT) to open the selected item. a. Units of measure selections Select µm or mil using the arrow buttons (µm = micrometers; mils). Press the LEFT button (SELECT) button to confirm and to return to the SET menu (otherwise press the right button ( to abort the edit and return to the SET menu). b. Backlight Use the UP and DOWN arrows to adjust the brightness of the backlight. Press the RIGHT button ( to confirm and return to the SET menu. CG206‐en‐GB_v1.0 6/16 ...
- Page 7 Press the LEFT button (SELECT) button to confirm and to return to the SET menu (otherwise press the right button ( to abort the edit and return to the SET menu). d. Contrast Use the UP and DOWN arrows to adjust the display contrast up or down. Press the LEFT button (OK) button to confirm and to return to the SET menu (otherwise press the right button ( to abort the edit and return to the SET menu). e. Info The model number and firmware version level are displayed. Press the right button ( to exit to the SET menu. MEASURE VIEW The Measure View menu allows for scrolling through the readings in all of the groups. Readings can be viewed or deleted in this mode. 1. Press the LEFT button (SEL) to access the main menu. 2. Use the DOWN ARROW button to scroll down to MEASURE VIEW. 3. Press LEFT (SELECT) to open the MEASURE VIEW parameter. 4. Use the UP/DOWN ARROW buttons to scroll through the groups of stored readings. 5. When a group is highlighted that contains stored readings, use the LEFT (SELECT) button to open the readings list. Now use the UP/DOWN arrows to view the readings. Press the LEFT button (Delete Group) to delete all readings in this Group or press the RIGHT button ( to return to the main Group list. 6. Highlight ‘Delete All’ and press the LEFT button (SELECT) to delete all of the readings in all groups. Otherwise press the RIGHT button ( to return to the previous menu. CG206‐en‐GB_v1.0 6/16 ...
- Page 8 CALIBRATION The Calibration menu allows the user to perform a Ferrous (Zero FE) or non‐ferrous (Zero NFE) ZERO Calibration. The Calibration menu also allows the user to delete ZERO calibration data for both ferrous (Zero F) and non‐ferrous (Zero N) modes. 1. Press the LEFT button (SEL) to access the main menu. 2. Use the DOWN button to scroll to CALIBRATION. 3. Press LEFT (SELECT) to open the CALIBRATION parameter. 4. To perform a ZERO Calibration, refer to Zero Calibration in the next section. 5. To delete ZERO Calibration data, scroll to DEL Zero of FE or DEL Zero of NFE and then press the LEFT button (SELECT). This executes the Zero delete function and returns the meter to the SET menu. 6. Press the RIGHT button ( to return to the normal operating mode. Reference Film Accuracy Verification The CG206 meter comes with a set of reference films to check the measurement accuracy of the meter. The base materials are Ferrous (Steel) and the Non‐Ferrous (Aluminum). Turn on the meter 1 meter away from any material. Set the Measure Mode to FE, NFE, or Auto. Perform a Zero calibration on the base material of your choice. Place a thickness film on the base and make a measurement. Refer to the accuracy specifications to validate the accuracy of the meter. CG206‐en‐GB_v1.0 6/16 ...
-
Page 9: Zero Calibration
ZERO Calibration The customer should perform a Zero Calibration before any measurements are taken. Preparing for ZERO Calibration Clean the probe tip and the substrate (grease, oil, metal scraps. The slightest impurity will affect measurement and will distort readings. Switch the meter ON at a 10 cm (4”) minimum distance from any metal. Set the meter to the correct substrate type, FE or NFE. The meter is now ready for calibration. Zero Calibration ZERO Calibration from the Programming Mode From the normal measurement mode, press the LEFT button (SEL) to access the menu. Use the UP/DOWN button to scroll to CALIBRATION mode. Press LEFT (SELECT) to open the CALIBRATION parameter. Scroll to ‘CAL ZERO OF FE’ or ‘CAL ZERO OF NFE’ Press the LEFT button (SELECT) and ‘FE CAL’ or ‘NFE CAL’ should be displayed on the LCD’s lower level. Press the sensor against the FE or NFE zero reference substrate and wait for the beep. Press the LEFT button (OK) to accept the calibration value or press the RIGHT button (CANCEL) to abort the calibration. If the meter did not read 0.0 you can try again or “Set” the Zero reference by pressing and holding the ZERO button until the meter beeps. When the Zero calibration is complete, the meter is ready to make measurements. Note that the user can delete ZERO Calibration data by selecting ‘Del ZERO of FE’ or ‘Del ZERO of NFE’ from the CALIBRATION mode in the Programming menu. ZERO Calibration – Relative Mode This mode can be used to set a zero point on reference substrate or on a known thickness of material. For a relative measurement, any thickness greater or lesser will be referenced to this set value. Press the sensor against the FE or NFE zero reference substrate or on a known thickness value of material. Press and hold the ZERO button until it beeps to set the relative zero calibration to 0.0. CG206‐en‐GB_v1.0 6/16 ... - Page 10 Record Readings in Memory Groups The CG206 offers 30 memory storage groups, Group ‘0’ through ‘30’. Group ‘0’ does not allow data to be stored; it is simply a group that can be selected if readings are to be taken without being stored. From the Normal measurement mode, Use the UP/DOWN arrow keys to scroll to a particular group. When a reading is taken it is automatically stored in the selected group. Each Group can store up to 50 readings (for a total of 1500 for the 30 groups). To delete all groups, or an individual group, use the MEASURE VIEW mode as explained in the programming menu section of this User Guide. In GROUP mode, if the storage capacity is exceeded. The meter will display (50) in the upper right corner and will beep twice. SOFTWARE This meter is capable of storing data and can download that data to a PC through the supplied Windows© compatible software and micro‐USB cable. Refer to the Software Help guide supplied with the software on how to install and operate the software. Check the software download page of the website www.extech.com for the latest version of the PC software and its operating system compatibility. CG206‐en‐GB_v1.0 6/16 ...
-
Page 11: Error Messages
The following error messages will appear on the meter’s LCD if a problem arises. Err1 Magnetic induction probe (FE) error Err2 Eddy current probe (NFE) error Err3 Both probes ‐ Eddy current and Magnetic induction errors Err4 Magnetic induction probe (FE) fault Err5 Eddy current probe (NFE) fault Please contact Extech Instruments if a problem exists. Maintenance Cleaning and Storage Periodically wipe the meter housing with a damp cloth and mild detergent; do not use abrasives or solvents. If the meter is not to be used for 60 days or more, remove the batteries and store them separately. Battery Replacement/Installation instructions 1. Open the rear battery door 2. Replace/install the two 1.5V ‘AAA’ batteries observing proper polarity 3. Secure the battery compartment Never dispose of used batteries or rechargeable batteries in household waste. As consumers, users are legally required to take used batteries to appropriate collection sites, the retail store where the batteries were purchased, or wherever batteries are sold. Disposal: Do not dispose of this instrument in household waste. The user is obligated to take end‐of‐life devices to a designated collection point for the disposal of electrical and electronic equipment. CG206‐en‐GB_v1.0 6/16 ... -
Page 12: Specifications
1000μm ~1350μm: (0.01mm) 0~10mils: (0.01mils) 0~10mils: (0.01mils) 10mils~53.1mil:s (0.1mils) 10mils~53.1mils: (0.1mils) Min. curvature radius 59.06mils (1.5mm) 118.1mils (3mm) Diameter of Min. area 275.6mils (7mm) 196.9mils (5mm) Basic critical thickness 19.69mils (0.5mm) 11.81mils (0.3mm) Industrial standards Conforms to GB/T 4956‐1985, GB/T 4957‐1985, JB/T 8393‐1996, JJG 889‐95, and JJG 818‐93 Operating Temperature 0°C~40°C (32°F~104°F) Operating Relative 20%~90% Relative Humidity Humidity (R.H.) Power 2 x AAA batteries with Auto Power OFF after 3 minutes Dimensions 120 x 62 x 32 mm (4.7 x 2.4 x 1.25”) Weight 175g (6.17 oz.) Accuracy note: Accuracy statement applies to use on a flat surface, with a zero calibration performed and with the meter stabilized at ambient temperature. The accuracy of the reference films or any reference standards should be added to measurement results. Copyright © 2016 FLIR Systems, Inc. All rights reserved including the right of reproduction in whole or in part in any form www.extech.com CG206‐en‐GB_v1.0 6/16 ...
Need help?
Do you have a question about the CG206 and is the answer not in the manual?
Questions and answers