Table of Contents
Advertisement
Advertisement
Table of Contents

Related Manuals for Teac CR-H225


Summary of Contents for Teac CR-H225
- Page 1 9A10355400 CR-H225 CD/Receiver OWNER’S MANUAL...
-
Page 2: Table Of Contents
Contents Thanks you for choosing TEAC. Read this manual carefully to get the best performance from this unit. Before Use ....... . 3 Compact Disc . -
Page 3: Before Use
Before Use Read this before operation Maintenance < As the unit may become warm during operation, If the surface of the unit gets dirty, wipe with a soft always leave sufficient space around the unit for cloth or use diluted neutral cleaning liquid. Be sure to ventilation. -
Page 4: Compact Disc
If you use such discs in this radiators or heat-generating electrical devices. unit, TEAC Corporation and its subsidiaries cannot be responsible for any consequences or guarantee < Printable CD-R and CD-RW discs aren’t the quality of reproduction. -
Page 5: Mp3 And Wma
How to Reset the Settings MP3 and WMA to the Factory Defaults < This unit can play MP3 and WMA files recorded on If the power supply is interrupted for 14 days or a CD-R, CD-RW or USB storage device. longer, all the settings kept in memory (such as preset stations and timer settings) will be erased. -
Page 6: Connections
Connections Speaker Connections Caution: < To avoid damaging the speakers by a sudden high-level signal, be sure to switch the power off before connecting the speakers. < Check the impedance of your speakers. Connect speaker with an impedance of 6 ohms or more. <... - Page 7 VCR, DVD, etc. MD, CD-R, etc. Cassette Deck LINE DIGITAL IN LINE LINE LINE LINE (OPTICAL) TAPE/AUX jacks AC Power Cord Make sure to connect: Plug this AC power cord into an AC wall socket. white plug q white jack (L: left channel) red plug q red jack (R: right channel) <...
-
Page 8: Connecting Antennas (Am/Fm)
Connecting Antennas (AM/FM) AM Indoor Loop Antenna FM Indoor Antenna The high-performance AM loop antenna provided Connect the lead-type FM antenna to the FM 75Ω with this unit is sufficient for good reception in socket, extend the lead and tune the tuner to your most areas. -
Page 9: Remote Control Unit
Remote Control Unit The provided Remote Control Unit allows the unit to Precautions concerning batteries be operated from a distance. < Be sure to insert the batteries with correct positive When operating the remote control unit, point it ‘+’ and negative ‘_’ polarities. towards the REMOTE SENSOR on the front panel of the unit. -
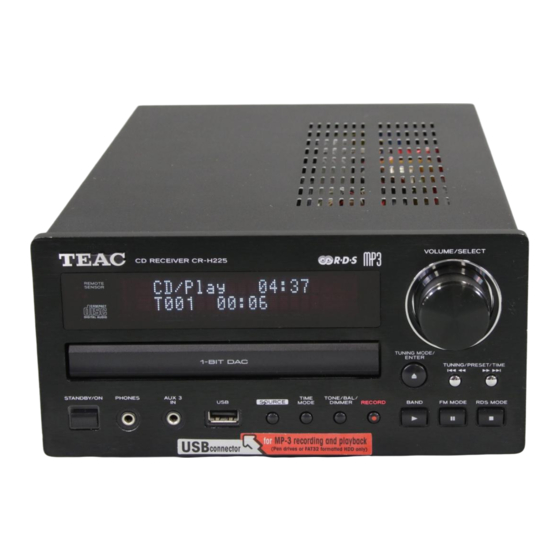
Page 10: Names Of Each Control 1
Names of Each Control 1 Remote Sensor VOLUME, SELECT When operating the remote control unit, point it Turn this knob to adjust the volume. towards the remote sensor. Turn this knob to adjust the tone, balance and dimmer together with the TONE/BAL/DIMMER button. - Page 11 STANDBY/ON STOP (H), INFO, RDS MODE, CLEAR Press this button to turn the unit on or standby. In CD mode or USB mode, use this button to stop The standby indicator surrounding the STANBY/ON playback. button lights when the unit is in the standby mode. In FM mode, this button is used to select the RDS When the unit is turned on, it goes off.
- Page 12 Names of Each Control 2 ENTER (TUNER) This button is not available for this unit. SEARCH (m/,) During playback of CD or USB, use these buttons to search the part you want to listen to. SHUFFLE In CD mode or USB mode, use this button to enter the shuffle playback mode.
- Page 13 CLEAR RECORD Use this button to clear a program. Use this button to start normal recording. In the USB mode, use this button to delete This function is not available in USB mode. recorded files. DISPLAY SLEEP During MP3/WMA playback, use this button to Use this button to set the sleep timer.
-
Page 14: Basic Operation
Basic Operation How to select SOURCE Dimmer Every time the SOURCE button is pressed, the Press the DIMMER button to dim the display. mode is changed as follows: Press the button again to cancel the dimmer function. TAPE AUX 1 AUX 2 TUNER AUX 3... - Page 15 How to adjust TONE/BALANCE/DIMMER Bass control This control is used for adjusting the level of the low frequency sound range. Press the TONE/BAL/DIMMER button. Each time the TONE/BAL/DIMMER button is pressed, the mode is changed as follows: Treble control This control is used for adjusting the level of the high frequency sound range.
-
Page 16: Listening To Cd/Mp3/Wma (Discs)
Listening to CD/MP3/WMA (discs) Press the OPEN/CLOSE button (L) to close the tray. (Audio CD) The total number of the tracks and total play time of the disc is displayed. Press the SOURCE button repeatedly to select ‘CD’. ‘No Disc’ will be displayed if no disc is set. (MP3/WMA disc) The total number of files of the disc is displayed. -
Page 17: Listening To A Usb Device
Listening to a USB device Search You can play MP3/WMA files by connecting various You can select a desired directory and an MP3 or external USB storage devices such as USB flash WMA file during playback or when stopped. memory. Press the FOLDER buttons (b/5) to select a Select USB function by pressing the SOURCE directory. -
Page 18: Basic Playback
Basic Playback To stop playback Search for a part of a track/file Press the STOP button (H) to stop playback. During playback, hold down the . m or ,/ button and release it when the part you want to listen to is found. On the remote control use them or , button. -
Page 19: Repeat Playback
Repeat Playback Every time the REPEAT 1/ALL button is pressed, Repeat A-B the mode is changed as follows: This function allows repeat playback of any desired portion of the disc. Repeat 1 Designate the point at which repeat playback RPT Folder should start by pressing the A-B button. -
Page 20: Programmed Playback
Programmed Playback CLEAR PROGRAM < This function allows you to program up to 32 tracks Press the PLAY button (y ) to start or files for playback in any desired order. programmed playback. Press the PROGRAM button in the stop mode. <... -
Page 21: Shuffle Playback
Shuffle Playback To delete a track/file from the program In the stop mode, press the PROGRAM button repeatedly until the program number to be deleted appears on the display, then press the CLEAR button. The selected track/file is deleted from the program. -
Page 22: Display
Display Time Display During MP3/WMA playback, press the DISPLAY When playing back an audio CD, each time the TIME button repeatedly to change what information is button is pressed the display changes as follows: displayed. Default display (scrolling): Song Title elapsed time of the current track Artist Name Album Name... -
Page 23: Before Recording
Before Recording Setting the Record Mode This unit can record musics from CDs, cassette tapes and radio, on USB memory devices, as MP3 or WMA files. CAUTION < Do not disconnect the USB storage device during recording. Do not disconnect the power cord during recording. It may cause damage to the products. -
Page 24: Recording To Usb
Recording to USB Delete a file from USB You can record a source of CD, MP3/WMA disc, In the stop mode, press the FOLDER buttons cassette tape, radio broadcast and external device to (b/5) to select a directory. the external USB storage device as MP3/WMA files. Connect the external USB storage device to the USB port on the front panel of the unit. -
Page 25: Listening To Fm/Am
Listening to FM/AM Selecting stations which cannot be tuned automatically (Manual tune) Select ‘Manual tune’ in step Repeatedly press the TUNING/PRESET/TIME button until the station you want to listen to is found. Or hold down the TUNING/PRESET/TIME button until the station you want to listen to is found and release the button. -
Page 26: Preset Tuning
Preset Tuning You can also use the numeric buttons. < When you use the numeric buttons, press the input selector button of the remote control first. You can store up to 30 FM, 30 AM stations. For instance, to select preset number 25, first press the TUNER button, and then press ‘2’... -
Page 27: How To Select Preset Stations
How to select preset stations < Preset channels can also be selected by the PRESET (b /5 ) buttons or the numeric buttons of the remote control. Select AM or FM by pressing the BAND button. < When you use the numeric buttons, press the input selector button of the remote control first. -
Page 28: Rds
The Radio Data System (RDS) is a broadcasting service RDS Radio text which allows stations to send additional information When you select RDS Radio text, ‘RDS Radio text’ along with the regular radio programme signal. will blink for about 3 seconds and then the news of stations composed of up to 64 symbols will be RDS works on the FM waveband in Europe only. -
Page 29: Pty Search
PTY Search You can search for stations by programme type. Press the TUNING/PRESET/TIME button. Select FM by pressing the BAND button. Search starts. < When the programme that you have selected is Press the INFO/RDS MODE button for more found, searching stops and the programme type than 3 seconds. -
Page 30: Pty (Programme Type)
PTY (Programme Type) News: brief announcements, events, public opinion, Religion: religious programs reports, actual situations. Phone In: program in which the public expresses its view Current Affairs: a kind of suggestion including practical by phone. announcements other than news, documents, discussion, analysis and so on. -
Page 31: Setting The Clock
Setting the Clock TUNING/PRESET/ TIME ENTER TIME MODE Press the TIME MODE button. Press the ENTER button. Every time the TIME MODE button is pressed, the The ‘minute’ value blinks. mode is changed as follows. Current time On time Press the TUNING/PRESET/TIME buttons to set the current minute. -
Page 32: Setting The Timer
Setting the Timer Press the TIMER button on the remote control. TUNING/PRESET/ TIME ENTER STANDBY/ON TIME MODE The timer indicator ‘ ’ lights on the display. < Adjust the clock before setting the timer. < When no action is taken for 1 minute, the timer Prepare for timer operation. -
Page 33: Sleep Timer
(normal display) must adjust the volume of the mini-player or you may The sleep timer is off. hear no sound from your CR-H225. < The display is dimmed when you set the sleep timer. < If you want to check the remaining time, press the SLEEP button once. -
Page 34: Troubleshooting
Troubleshooting In case of trouble with the unit, please take the time to look through this chart and see if you can solve the problem yourself before you call your dealer or TEAC service center. Amplifier CD Player No power Cannot play. -
Page 35: Specifications
Specifications AMPLIFIER Section Standard Accessories Output Power ..25 W/ch (6 ohms, 0.5 %,1 kHz) Remote Control Unit (RC-1038) x 1 Input Sensitivity ... . . 400 mV/47 kohms Batteries (AAA) x 2 Frequency Response AM Loop Antenna x 1... - Page 36 TEAC ITALIANA S.p.A. Via C. Cantù 9/A, 20092 Cinisello Balsamo, Milano, Italy Phone: 02-66010500 TEAC AUSTRALIA PTY., LTD. 280 William Street, Melbourne VIC 3000, Australia Phone: (03) 9672-2400 A.B.N. 80 005 408 462 This appliance has a serial number located on the rear panel. Please record the model number and serial number and retain them for your records.
Need help?
Do you have a question about the CR-H225 and is the answer not in the manual?
Questions and answers