OWC Data Doubler Installation Manual
Hide thumbs
Also See for Data Doubler:
- Quick start manual (4 pages) ,
- User manual (12 pages) ,
- Assembly manual & user manual (18 pages)
Table of Contents
Advertisement
Quick Links
Download this manual
See also:
User Manual
Advertisement
Table of Contents

Subscribe to Our Youtube Channel
Related Manuals for OWC Data Doubler


Summary of Contents for OWC Data Doubler
- Page 1 D A T A D O U B L E R Installation Guide...
-
Page 2: Table Of Contents
2.2.8 - Early / Mid 2009 17” MacBook Pro (5,2) 2.2.9 - Mid-2010 17” MacBook Pro (6,1) and Early / Late 2011 17” MacBook Pro (8,3) Support Resources ............77 3.1 Troubleshooting 3.2 Contacting Technical Support OWC Data Doubler OWC Data Doubler Table of Contents... -
Page 3: Introduction
• MacBook Pro 15” (Late 2008, Mid 2009, Mid 2010, Early 2011, Late 2011, Mid 2012) • MacBook Pro 17” (Early 2009, Mid 2009, Early 2010, Early 2011, Late 2011) • The Data Doubler works with 2.5 inch SATA drives (7mm or 9.5mm drive height) 1.2 Package Contents 5-Piece Toolkit... - Page 4 We recommend proper grounding by using a grounding strap. Make sure to work in a clean, static- free area, and avoid wearing clothing that retains static charges. For more information please visit: www.owcdigital.com/support/anti-static OWC Data Doubler Introduction...
-
Page 5: Installation
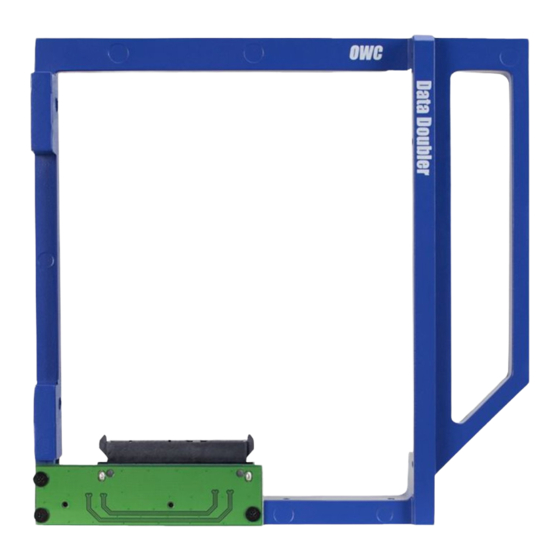
2. Use the two large, round-head Phillips screws from the kit to affix the drive to the side of the Data Doubler bracket (screw hole locations shown in red). The OWC Data Doubler and SATA drive are now ready for installation. -
Page 6: Installation By Laptop Type
1. Use the release lever (highlighted below in red) to release the battery cover, then remove it (bottom photo). Recommended: Use the pull-tab on the battery to remove it from the laptop, then set it aside. OWC Data Doubler Installation... - Page 7 There are two snap clips holding the cover in place; they will release when you lift the cover. Set the bottom cover aside. You do not need to remove the SATA drive. Proceed to Step 6. OWC Data Doubler Installation...
- Page 8 Set the cover aside. Recommended: before continuing, use the nylon pry tool to gently lift the battery connector (highlighted in yellow) from the logic board. OWC Data Doubler Installation...
- Page 9 6. You should see the optical drive (indicated by the red arrow). This drive needs to be removed before you can install the OWC Data Doubler. 7. Rotate the laptop so the optical drive is oriented in the same manner as the drive shown below.
- Page 10 8. Beginning on the right side of the optical drive, remove the two Phillips screws that are highlighted in the photos below. Note: These screws are not used when reassembling the laptop; store them in a safe place in case you need them later. OWC Data Doubler Installation...
- Page 11 Caution: this cable is easily damaged. 10. Next, remove the Phillips screw that was obscured by the ribbon cable and set it aside; this screw is used during the reassembly process. OWC Data Doubler Installation...
- Page 12 Loosen the two Phillips screws that secure the housing (shown below in red) then gently lift it out of the chassis and set it aside. The screws are used during the reassembly process. OWC Data Doubler Installation...
- Page 13 Caution: avoid snagging or pulling the cables that were disconnected in earlier steps. They can tear easily if they become caught on the corners of the drive as you lift it out of the chassis. OWC Data Doubler Installation...
- Page 14 OWC Data Doubler as shown in the photo from Step 16 (highlighted in yellow). Important: make sure the silver bracket is oriented the same way on the Data Doubler as it was on the optical drive. OWC Data Doubler Installation...
- Page 15 19. Take the two of the longer Phillips screws included in the Data Doubler Kit and affix them in the same location (shown below in red) where you removed the two shorter screws in Step 8.
- Page 16 When you’re finished you should see a setup similar to the one below. Note: this photo shows an earlier Data Doubler model with black aluminum. 24. Carefully replace the bottom cover, snapping it back into place. If your laptop has a removable battery, affix the eight screws that you removed from the cover in Step 2.
-
Page 17: Late 2009 13" Macbook (6,1) And Mid-2010 13" Macbook
Set the cover and screws aside. The optical drive (indicated by the red arrow) needs to be removed. Recommended: before moving to the next step, use the nylon pry tool to gently lift the battery connector (highlighted in yellow) from the logic board. OWC Data Doubler Installation... - Page 18 4. Along the left edge of the optical drive, remove the black screw that is used to secure the optical drive bracket to the chassis (shown below in red). This screw will be used during the reassembly process. OWC Data Doubler Installation...
- Page 19 It is partially concealed by a black plastic tab that is part of the battery. Note: This screw will not be used during the reassembly process; store it in a safe place in case you need it later. OWC Data Doubler Installation...
- Page 20 8. Along the bottom-left of the chassis there are four additional screws that need to be removed. Again the two smaller screws are Phillips screws and the two larger screws are Torx T8. Set the screws aside. OWC Data Doubler Installation...
- Page 21 10. On the right side of the optical drive there is a small black Phillips screw (shown below in red) that holds a small plastic housing to the optical drive. Remove the screw. This screw will be used during reassembly. OWC Data Doubler Installation...
- Page 22 The screw on the far left is longer than the middle screw; each needs to be placed in the same location later. 12. Lift up on the optical drive from the area near the ribbon cable and gently remove it from the optical bay. OWC Data Doubler Installation...
- Page 23 OWC Data Doubler as shown in the photo from Step 15 (highlighted in yellow). Important: make sure the silver bracket is oriented the same way on the Data Doubler as it was on the optical drive. OWC Data Doubler Installation...
- Page 24 17. Begin the reassembly process by placing the Data Doubler under the black plastic bracket first, then into the optical bay. Be careful not to damage any of the cables or connectors. Press down on the ribbon cable's connector to secure it to the logic board again.
- Page 25 If you disconnected your battery in Step 2, disconnect it now. 24. Reattach the bottom cover to the chassis and affix the eight Phillips screws that were removed in Step 1. The installation process is complete. Proceed to Section 3.1 for additional support information. OWC Data Doubler Installation...
-
Page 26: Mid-2010 13" Macbook Pro
2. Once the screws are removed, place your fingers on the bottom cover near the black vent, then lift the cover. There are two snap clips attached to the cover that will release when you do this. Set the cover aside. Continue to the next step. OWC Data Doubler Installation... - Page 27 3. You should see the optical drive (indicated below). This drive needs to be removed before you can install the OWC Data Doubler. Recommended: before moving to the next step, use the nylon pry tool to gently lift the battery connector (highlighted in yellow) from the logic board.
- Page 28 Note: the two screws removed in this step will not be used when reassembling the laptop; store them in a safe place in case you need them later. OWC Data Doubler Installation...
- Page 29 They are about halfway between the fan and the battery (highlighted below in red). 7. Gently lift each cable using the nylon pry tool, in order to disconnect each one from the logic board. Caution: these cables are easily damaged. OWC Data Doubler Installation...
- Page 30 Loosen the two Phillips screws that secure the housing (shown below in red) and gently lift it out of the chassis. You do not need to detach it completely. These screws will be used during reassembly. OWC Data Doubler Installation...
- Page 31 They can tear easily if they catch on the corners of the drive as you lift it out of the chassis. Continue to the next page. OWC Data Doubler Installation...
- Page 32 OWC Data Doubler as shown in the photo from Step 14 (highlighted in yellow). Important: make sure the silver bracket is oriented the same way on the Data Doubler as it was on the optical drive. OWC Data Doubler Installation...
- Page 33 Next Affix the screw you removed in Step 8. 18. Take two longer Phillips screws from the Data Doubler Kit and affix them in the locations shown below (the original screws were removed in Step 5).
- Page 34 20. Carefully replace the bottom cover, snapping it back into place. Affix the 10 Phillips screws that were removed in Step 1; make sure the three longest screws are inserted in their original locations. The installation process is complete. Proceed to Section 3.1 for additional support information. OWC Data Doubler Installation...
-
Page 35: Early / Late 2011 13" Macbook Pro (8,1) And Mid-2012 13" Macbook Pro
2. Once the screws are removed, place your fingers on the bottom cover near the black vent, then lift the cover. There are two snap clips attached to the cover that will release when you do this. Set the cover aside. Continue to the next page. OWC Data Doubler Installation... - Page 36 3. You should see the optical drive (indicated below). This drive needs to be removed before you can install the OWC Data Doubler. Recommended: before moving to the next step, use the nylon pry tool to gently lift the battery connector (highlighted in yellow) from the logic board.
- Page 37 For the connector highlighted in blue, use the nylon pry tool to gently lift the corner of the connector from the logic board (try lifting the corner nearest the screw). Caution: the cables shown in this step are damaged easily. OWC Data Doubler Installation...
- Page 38 The left-most screw is shorter than the other two and will need to be affixed in the same location later. All three screws will be used again during the reassembly process. OWC Data Doubler Installation...
- Page 39 (along the same edge of the drive and on the opposite end as the screw removed in Step 9). Remove this screw and store it in a safe location; it will not be used during the reassembly process. OWC Data Doubler Installation...
- Page 40 12. Place the optical drive and the assembled Data Doubler bracket in front of you, as shown below. Note: the cable and optical drive bracket from your laptop may look slightly different.
- Page 41 Step 14 (highlighted in yellow). Important: make sure the silver bracket is oriented the same way on the Data Doubler as it was on the optical drive. Continue to the next page. OWC Data Doubler...
- Page 42 16. Carefully place the assembled Data Doubler and attached drive into the optical bay, being careful not to damage any cables or connectors. Next, take two longer Phillips screws from the Kit and affix them in the same location where you removed two shorter screws in Steps 9 and 10.
- Page 43 1. Use the release lever (highlighted below in red) to release the battery cover, then remove it (bottom photo). Recommended: Use the pull-tab on the battery to remove it from the laptop, then set it aside. OWC Data Doubler Installation...
- Page 44 There are two snap clips holding the cover in place; they will release when you lift the cover. Set the bottom cover aside. You do not need to remove the SATA drive. Proceed to Step 5. OWC Data Doubler Installation...
- Page 45 Next use the nylon pry tool to gently push the connector towards the battery bay and out of its slot. OWC Data Doubler Installation...
- Page 46 6. You should see the optical drive (indicated below). This drive needs to be removed before you can install the OWC Data Doubler. 7. Rotate the laptop so the optical drive is oriented in the same manner as the drive shown below.
- Page 47 10. There is a ribbon cable that connects the optical drive to the logic board (connection point shown in blue above). This cable will be either orange or black. Use the nylon pry tool to gently disconnect the cable's connector from the logic board. Caution: this cable is easily damaged. OWC Data Doubler Installation...
- Page 48 Work from left to the right to avoid disconnecting the wire from a connector (highlighted in green). If you do disconnect the wire, you can reconnect it during the reassembly process. OWC Data Doubler Installation...
- Page 49 They can tear easily if they catch on the corners of the drive, as you lift it out of the chassis. Continue to the next page. OWC Data Doubler Installation...
- Page 50 OWC Data Doubler as shown in the photo from Step 16 (highlighted in yellow). Important: make sure the silver bracket is oriented the same way on the Data Doubler as it was on the optical drive. OWC Data Doubler Installation...
- Page 51 18. Place the assembled Data Doubler into the optical bay, being careful not to damage any cables or connectors. Next, take two longer Phillips screws from the Kit and affix them in the same screw holes (highlighted in red below) where you removed two shorter screws in Step 11.
-
Page 52: Mid-2010 15" Macbook Pro
Next use the nylon pry tool to gently push the connector towards the battery bay and out of its slot. OWC Data Doubler Installation... - Page 53 3. You should see the optical drive (indicated below). This drive needs to be removed before you can install the OWC Data Doubler. 4. Rotate the laptop so the optical drive is oriented in the same manner as the drive shown below.
- Page 54 7. Beneath the lower cable that is highlighted in red in Step 5, there is a silver bracket with a black Phillips screw affixed to it (highlighted in blue). Remove the screw and set it aside. It will be used during the reassembly process. OWC Data Doubler Installation...
- Page 55 9. Remove the Phillips screw near the lower right corner of the optical drive. Note: You will not reuse this screw during reassembly; store it in a safe place in case you need it later. OWC Data Doubler Installation...
- Page 56 Caution: avoid snagging or pulling the cables that were disconnected in earlier steps. They can tear easily if they catch on the corners of the drive, as you lift it out of the chassis. OWC Data Doubler Installation...
- Page 57 OWC Data Doubler as shown in the photo from Step 14 (highlighted in yellow). Important: make sure the silver bracket is oriented the same way on the Data Doubler as it was on the optical drive. OWC Data Doubler Installation...
- Page 58 16. Carefully place the Data Doubler into the optical bay; Be careful not to damage any loose cables or connectors. Next, take two of the longer Phillips screws from the kit and affix them in the same locations (highlighted in red below) where you removed the shorter screws in Steps 9 and 10.
-
Page 59: Early / Late 15" Macbook Pro (8,2) And Mid-2012 15" Macbook Pro
2. Once the screws are removed, place your fingers along the bottom cover near the black vent, then lift the bottom cover. There are two snap clips attached to the cover that will release when you do this. Set the cover aside. Continue to the next page. OWC Data Doubler Installation... - Page 60 3. You should see the optical drive (indicated below). This drive needs to be removed before you can install the OWC Data Doubler. Recommended: before moving to the next step, use the nylon pry tool to gently lift the battery connector (highlighted in yellow) from the logic board.
- Page 61 7. Note that the cable that you disconnected in Step 5 is partly obscuring a silver bracket held in place by a black Phillips screw. Remove the screw and set it aside; you will need it during the reassembly process. OWC Data Doubler Installation...
- Page 62 9. Remove the Phillips screw in the lower right of the optical drive. Note: You will not use this screw during reassembly; store it in a safe place in case you need it later. OWC Data Doubler Installation...
- Page 63 12. Place the optical drive you removed from your laptop and the hard drive that you already installed into the OWC Data Doubler bracket on the table in front of you, as shown below.
- Page 64 14. Plug the cable into the Data Doubler’s green circuit board. The location of the installed cable is highlighted in red below. 15. Remove the silver bracket that is attached to the back of the optical drive (highlighted in yellow in Step 12) by removing the two Phillips screws.
- Page 65 20. Carefully replace the bottom cover, snapping it back into place. Affix the 10 Phillips screws that were removed earlier. Make sure the three long screws are placed back in their original locations from Step 1. The installation process is complete. Proceed to Section 3.1 for additional support information. OWC Data Doubler Installation...
-
Page 66: Early / Mid 2009 17" Macbook Pro
Recommended: before moving to the next step, gently pull on the plastic tab attached to the battery connector and dislodge it from the logic board. OWC Data Doubler Installation... - Page 67 5. Next, remove the screw that was hidden under the bracket (shown below in red). Note: This screw will not be used during reassembly; store it in a safe place in case you need it later. OWC Data Doubler Installation...
- Page 68 7. Once the bracket is disconnected, notice that the black cable bundle that runs along the body of the optical drive — it is attached via an adhesive. Gently lift and remove this cable bundle from the body of the optical drive. Continue to the next page. OWC Data Doubler Installation...
- Page 69 The cable connects the optical drive to the logic board. Use the nylon pry tool to gently lift the ribbon cable’s connector off the logic board. Caution: this cable is easily damaged. OWC Data Doubler Installation...
- Page 70 They can tear easily if they catch on the corners of the drive as you lift it out of the chassis. Note: the appearance of your drive and optical bay may vary slightly. OWC Data Doubler Installation...
- Page 71 OWC Data Doubler as shown in the photo from Step 15 (highlighted in yellow). Important: make sure the silver bracket is oriented the same way on the Data Doubler as it was on the optical drive. OWC Data Doubler Installation...
- Page 72 17. Place the assembled Data Doubler into the optical bay. Be careful not to damage any loose cables or connectors. Next, take one of the longer screws from the kit and replace the screw that was removed in Step 5 (shown below in red).
- Page 73 The optical drive is indicated below by the white arrow; it needs to be removed. Recommended: before moving to the next step, gently pull the plastic tab attached to the battery connector (shown in yellow) and dislodge it from the logic board. OWC Data Doubler Installation...
- Page 74 5. Use the nylon pry tool to gently lift the orange ribbon cable (highlighted in blue) from the logic board. Caution: this cable is easily damaged. OWC Data Doubler Installation...
- Page 75 Phillips screw that secures the optical drive to the chassis. You do not need to disconnect any of the cables. If one comes loose carefully reattach it now or during reassembly. OWC Data Doubler Installation...
- Page 76 11. Lift up the edge of the optical drive nearest the ribbon cables and gently remove it from the optical bay. Be careful not to damage any of the cables or connectors. OWC Data Doubler Installation...
- Page 77 OWC Data Doubler as shown in the photo from Step 14 (highlighted in yellow). Important: make sure the silver bracket is oriented the same way on the Data Doubler as it was on the optical drive. OWC Data Doubler Installation...
- Page 78 16. Carefully place the assembled Data Doubler into the optical bay. Be careful not to damage the cables or connectors. Next, take two of the longer screws from the kit and affix them in the same screw holes where shorter screws were removed in Steps 9 and 10 (locations shown below in red).
-
Page 79: Support Resources
Mac before using it. Choose System Preferences > Date & Time, make the desired settings, then restart. If you're having trouble installing the Data Doubler, re-examine each step. The most common cause of installation-related issues can be traced to a missing step or screw. - Page 80 The material in this document is for information purposes only and subject to change without notice. While reasonable efforts have been made in the preparation of this document to assure its accuracy, OWC, its parent, partners, affiliates, officers, employees, and agents assume no liability resulting from errors or omissions in this document, or from the use of the information contained herein.
Need help?
Do you have a question about the Data Doubler and is the answer not in the manual?
Questions and answers