OWC data doubler User Manual
Apple mac mini 2009
Hide thumbs
Also See for data doubler:
- Quick start manual (4 pages) ,
- Installation manual (80 pages) ,
- Assembly manual & user manual (18 pages)
Table of Contents
Advertisement
Quick Links
Download this manual
See also:
Installation Manual
Advertisement
Table of Contents

Related Manuals for OWC data doubler


Summary of Contents for OWC data doubler
- Page 1 D A T A D O U B L E R Apple Mac mini (2009)
-
Page 2: Table Of Contents
1.2 Package Contents 1.3 About This Manual Installation ......................2.1 Tools Used During Installation 2.2 Disassembling the Mac mini 2.3 Installing the Data Doubler Support Resources ..................3.1 Mac mini 2009 Drive Compatibility 3.2 Troubleshooting 3.3 About Data Backup 3.4 Contacting Technical Support... -
Page 3: Introduction
SATA 3.0Gb/s (‘3G’) drives recommended for best performance (see Section 3.1) 1.2 Package Contents Five-piece toolkit OWC Data Doubler kit (includes mounting screws) 1.3 About This Manual Images and descriptions may vary slightly between this manual and the unit shipped. -
Page 4: Installation
Mac mini and continue prying the clips until you get to the corner, then remove the putty knife and start again on the next side. Do this on all sides except the rear of the Mac mini. OWC DATA DOUBLER INSTALLATION... - Page 5 6. Turn the Mac mini so that the rear ports are to your right, as shown in the picture below. Use a Phillips screwdriver to remove the two screws circled in red. OWC DATA DOUBLER INSTALLATION...
- Page 6 Disconnect this ribbon cable from the connector that sits directly to the right of the screw, using either your fingernail, as shown, or the nylon pry tool. Once the cable is out of the way, remove the Phillips screw. OWC DATA DOUBLER INSTALLATION...
- Page 7 Step 7 for a side view); you can gently lift straight up to dislodge them. Note: the antenna cables can break if too much force is applied. Move the antennas out of the way, but keep them connected to their cables. OWC DATA DOUBLER INSTALLATION...
-
Page 8: Installing The Data Doubler
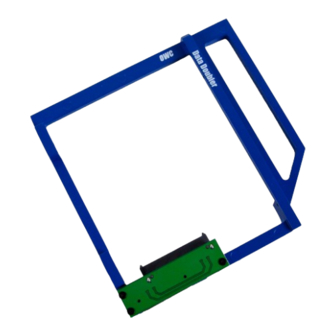
2.3 Installing the Data Doubler 1. Remove the Data Doubler from the box and plastic bag. Note that there is a clear plastic shield on the bottom of the Data Doubler. DO NOT remove this plastic shield. It is a part of the Data Doubler. - Page 9 5. When the Data Doubler is fully seated in the SATA connector, lower the corner of the Data Doubler to sit just behind the IR receiver, as shown at left. Re-attach the two antennas to their spring posts, as shown.
- Page 10 8. Turn the Mac mini so that the ports face to your left, as shown below. Install two Phillips screws into the holes circled in red. If the screw holes are not aligned with the Data Doubler, press down slightly on the front of the Data Doubler (the right edge in this picture), then install the screws.
-
Page 11: Support Resources
If the drive in the Data Doubler is not seen on the desktop on a Mac, check in the sidebar in a Finder window. Some versions of Mac OS X do not show hard drives on the desktop by default. - Page 12 The material in this document is for information purposes only and subject to change without notice. While reasonable efforts have been made in the preparation of this document to assure its accuracy, OWC, its parent, affiliates, officers, employees, and agents assume no liability resulting from errors or omissions in this document, or from the use of the information contained herein.
Need help?
Do you have a question about the data doubler and is the answer not in the manual?
Questions and answers