
Subscribe to Our Youtube Channel
Related Manuals for Clarke CMD300


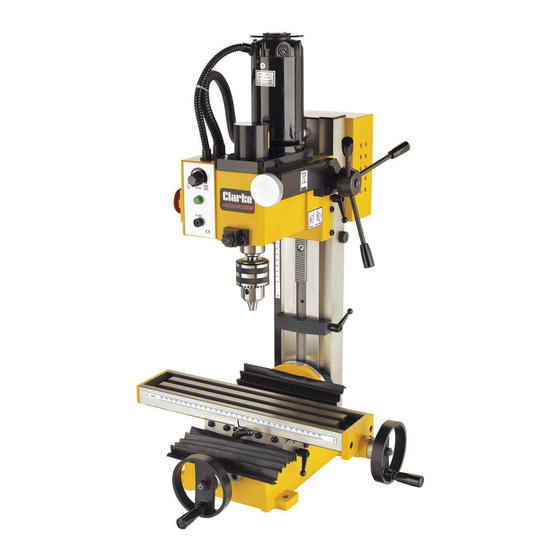
Summary of Contents for Clarke CMD300
- Page 1 © AH0209 MILLING/DRILLING MACHINE MILLING/DRILLING MACHINE MODEL No. CMD300 Part No. 7610860 OPERATING AND MAINTENANCE INSTRUCTIONS...
-
Page 2: Specifications
Spindle Speeds : ................... 0-2500 Please note that the details and specifications contained herein are correct at the time of going to print. However CLARKE International reserve the right to change specifications at any time without prior notice. Always consult the machines data plate. -
Page 3: Table Of Contents
CLARKE GUARANTEE his CLARKE product is guaranteed against faulty manufacture for a period of 12 months from the date of purchase. Please keep your receipt as proof of purchase. -
Page 4: Safety Precautions
General Safety Precautions WARNING: As with all machinery, there are certain hazards involved with their operation and use. Exercising respect and caution will considerably lessen the risk of personal injury. However, if normal safety precautions are overlooked or ignored, personal injury to the operator or damage to property, may result. 1. - Page 5 14. ALWAYS wear proper apparel. Loose clothing or jewellery may get caught in moving parts. Wear protective hair covering to contain long hair. 15. ALWAYS use recommended accessories, the use of improper accessories could be hazardous. 16. ALWAYS remove plug from electrical outlet when adjusting, changing parts, or working on the machine.
-
Page 6: Electrical Connections
Electrical Connections This product is provided with a standard 13 amp, 230 volt (50Hz), BS 1363 plug, for connection to a standard, domestic electrical supply. Should the plug need changing at any time, ensure that a plug of identical specification is used. WARNING ! THIS APPLIANCE MUST BE EARTHED This machine must be wired up in accordance with the following colour code: BLUE... -
Page 7: Installation
Installation IMPORTANT: Careful consideration is required when choosing the location for the machine, with regard to table movement, Mill/Drill Head movement and location of power supply. Additionally, the workbench should be firm, flat and level. Avoid installing in damp or very dusty locations and ensure that adequate light is provided. Your new machine is delivered fully assembled (except for handles which are contained in a bag of loose parts), and bolted to a board with four bolts. -
Page 8: Parts Identification
Parts Identification FIG-A FIG-B FIG-C... - Page 9 Remove all polystyrene packaging material, then, with assistance lift the machine on to a workbench. DO NOT attempt to do this single handedly. Unbolt the machine from the board - 4 nuts with countersunk screws and washers, and, with assistance, carefully slide or lift into position on your workbench. Before drilling the bench in order to secure the machine, ensure : •...
-
Page 10: Drilling
OPERATION Ensure the work area is clean and tidy and all tools and accessories etc., are removed and stored safely, before plugging the machine into the electric supply. Switch the power ON. At this point, the green indicator lamp on the switch panel on the front of the machine, will illuminate, indicating that power is being supplied to the machine. - Page 11 Alternatively, clamps may be used. A suitable vice, and a ‘T’ nut and clamp set designed specifically for this machine, are available from your Clarke dealer. Please refer to Accessories on page 22. The table, carrying the workpiece, is manoeuvred using the longitudinal and cross slide adjusting handles.
-
Page 12: Milling
10/11. Please note that a range of accessories, including collet sets and collet chuck sets which are used to secure the cutter, are available from your Clarke dealer - see Accessories on page s 20/21. Using the Micro Feed For Milling, the micro feed should always be used. - Page 13 knob whilst grasping the knurled rim of the scale and turning until the zero on the scale lines up with the pointer. Back off slightly and start the machine. Turn the adjuster once again until the zero mark lines up with the pointer and double check that the cutter is just touching the work - if not, make the necessary adjustment.
-
Page 14: Maintenance
Maintenance The amount of maintenance depends on the amount of use the machine gets. However, it is important to carry out routine maintenance to prevent premature wear and shortening the life of the machine. 1. Inspect and clean all non painted surfaces. Lubricate using a light machine oil. Do Not over lubricate. - Page 15 Parts Diagram...
- Page 16 Parts Diagram...
- Page 17 Parts Diagram PARTS & SERVICE TEL: 020 8988 7400 e-mail as follows: PARTS: Parts@clarkeinternational.com SERVICE: Service@clarkeinternational.com...
-
Page 18: Parts List & Diagrams
Parts List Item Description Part No Item Description Part No Base SGCMD300001 Spring washer 10 SGCMD300040 40-1 Washer 10 SGCMD3000401 X-axis feed screw SGCMD300002 Key 4xl6 SGCMD300003 Cap screw Ml0 x 30 SGCMD300041 Dial SGCMD300004 Pointer SGCMD300042 Hand wheel SGCMD300005 Set screw M6 x 22 SGCMD300043 Nut M8... - Page 19 Parts List Item Description Part No Item Description Part No Sleeve SGCMD300085 Cover SGCMD300126 Pin 3xl2 SGCMD300086 Motor SGCMD300127 Pin 3xl2 SGCMD300087 Motor gear SGCMD300128 Adjustable union SGCMD300088 Ring 9.0 SGCMD300129 Bracket SGCMD300089 Motor seat SGCMD300130 Screw M5x25 SGCMD300090 Screw M6 x 12 SGCMD300131 Dial SGCMD300091...
-
Page 20: Accessories
Accessories 1. Mill Chuck Set Part Number: 7610866 A set comprising 7 collets, a chuck and ‘C’spanner. Collet sizes: • 4 mm • 6 mm • 8 mm • 10 mm • 12 mm • 14 mm • 16 mm Insert the shank of the chuck into the Mill Head Spindle and screw on to the end of the draw bolt. - Page 21 3. Collet Set (MT3) Part Number: 7610864 A set of 7 Collets for use with the HSS End Mills: Insert the appropriate Collet into the spindle. Insert the draw bolt, provided, into the spindle, from the top and screw on to the Collet a few turns.
- Page 22 5. Indexable Carbide End Mill Part Number: 7910870 Simply insert the shank of the mill into the spindle and screw on to the Draw Bolt. Tighten using the Tommy Bar in the hole in the side of the head, into the spindle, and spanner on the Draw Bolt head.
Need help?
Do you have a question about the CMD300 and is the answer not in the manual?
Questions and answers