Keysight U1701B User's And Service Manual
Dual display handheld capacitance meter
Hide thumbs
Also See for U1701B:
- Quick start manual (11 pages) ,
- Operating instructions manual (127 pages)
Table of Contents
Advertisement
Advertisement
Table of Contents

Related Manuals for Keysight U1701B


Summary of Contents for Keysight U1701B
- Page 1 Keysight U1701B Dual Display Handheld Capacitance Meter User’s and Service Guide...
-
Page 2: Safety Information
Do not proceed beyond a WARNING acquires no greater than Limited Rights as defined in FAR 27.401 or DFAR notice until the indicated conditions are 227.7103-5 (c), as applicable in any fully understood and met. technical data. Keysight U1701B User’s and Service Guide... -
Page 3: Safety Symbols
Earth (ground) terminal manual for specific Warning or Caution information. Protective conductor terminal Caution, hot surface. Out position of a bi-stable push Frame or chassis terminal control. Equipotentiality In position of a bi-stable push control. Keysight U1701B User’s and Service Guide... -
Page 4: General Safety Information
Failure to comply with these precautions or with specific warnings elsewhere in this manual violates safety standards of design, manufacture and intended use of the instrument. Keysight Technologies assumes no liability for the customer’s failure to comply with these requirements. -
Page 5: Environment Conditions
Operating relative humidity decreasing linearly to 50% RH at 50 °C Storage humidity 0 – 80% R.H. non condensing Storage environment –20 °C to 60 °C Altitude 0 – 2000 m Pollution Degree Pollution Degree 2 Keysight U1701B User’s and Service Guide... - Page 6 The U1701B dual display handheld capacitance meter complies with the CAUTION following safety and EMC requirements: – IEC 61010-1:2001/EN 61010-1:2001 (2nd Edition) – CISPR 11:2003+A1:2004 – IEC 61000-4-2:1995+A1:1998 +A2:2000 – IEC 61000-4-3:2006 – IEC 61000-4-4:2004 – IEC 61000-4-5:2005 – IEC 61000-4-6:2003+A1:2004+A2:2006 –...
-
Page 7: Regulatory Markings
This instrument complies with the WEEE Directive (2002/96/EC) marking ICES/NMB-001 indicates that this ISM requirement. This affixed product label device complies with Canadian indicates that you must not discard this ICES-001. electrical/electronic product in domestic household waste. Keysight U1701B User’s and Service Guide... -
Page 8: Waste Electrical And Electronic Equipment (Weee) Directive 2002/96/Ec
To return this unwanted instrument, contact your nearest Keysight Service Center, or visit http://about.keysight.com/en/companyinfo/environment/takeback.shtml for more information. Sales and Technical Support To contact Keysight for sales and technical support, refer to the support links on the following Keysight websites: – www.keysight.com/find/handheldcr (product-specific information and support, software and documentation updates) –... -
Page 9: In This Guide
In This Guide… 1 Getting Started Chapter 1 introduces key features and steps to get started with the U1701B dual display handheld capacitance meter. This chapter also guides you through the basics of the front panel operations. 2 Features and Functions... - Page 10 THIS PAGE HAS BEEN INTENTIONALLY LEFT BLANK. Keysight U1701B User’s and Service Guide...
-
Page 11: Table Of Contents
........38 Communication (Optional Accessories) ......40 Keysight U1701B User’s and Service Guide... - Page 12 ........63 Specifications and Characteristics Keysight U1701B User’s and Service Guide...
- Page 13 The Keypad at a Glance The Input Terminal at a Glance This chapter introduces the key features and getting started tips of the U1701B dual display handheld capacitance meter. This chapter also guides you through the basics of the front panel operations.
-
Page 14: Getting Started
– Visible and audible tolerance mode assists you to sort the capacitor. – Comparison mode with 25 sets for High/Low limit setting, including the non-volatile memory available in the U1701B. This will save your settings even when the meter is powered off. -
Page 15: Checking The Shipping Contents
Checking the Shipping Contents Inspect and verify that you have received the following items for the standard purchase of the U1701B and/or optional accessories that you may have ordered. If any of the item listed below is missing, contact your nearest Keysight Technologies Sales Office. -
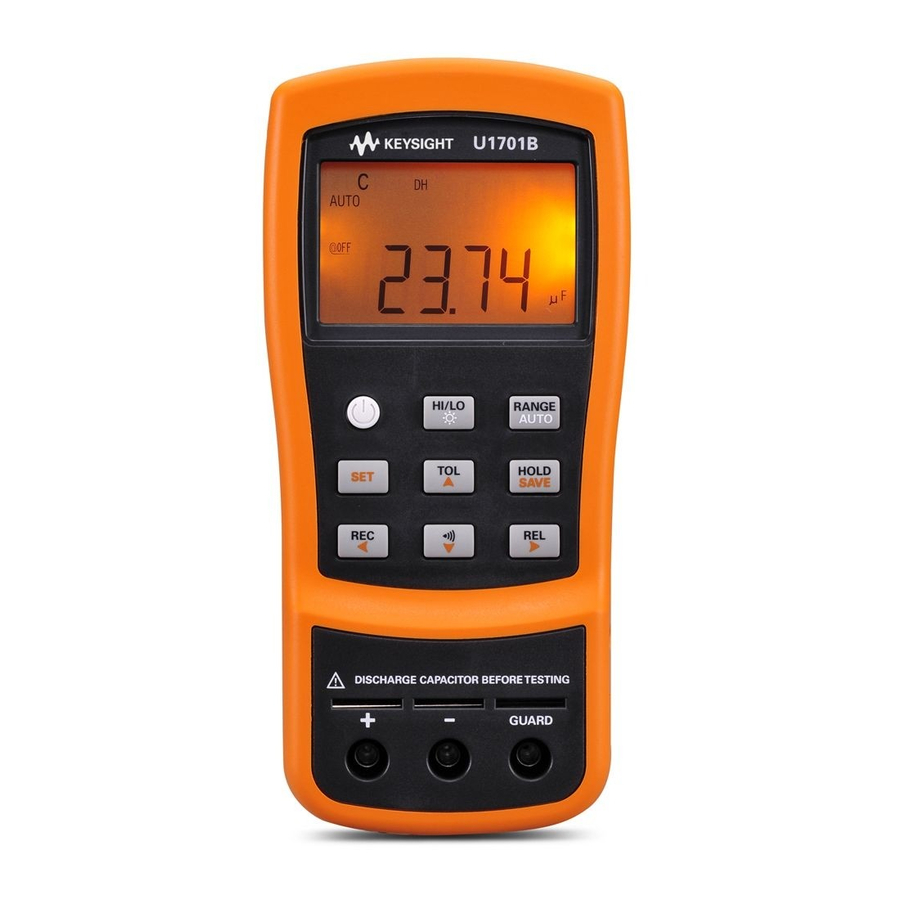
Page 16: The Front Panel At A Glance
Getting Started The Front Panel at a Glance Figure 1-1 Front panel of U1701B dual display handheld capacitance meter Panels Annunciator display Keypad Input terminals Keysight U1701B User’s and Service Guide... -
Page 17: Display Annunciators
To view the full display, press and hold then press to power-on the meter. Press any key to resume to normal functionality mode. Figure 1-2 Annunciator display of a U1701B dual display handheld capacitance meter Table 1-2 Descriptions of each annunciator No. Symbols... - Page 18 Audible alert for tolerance or compare mode Unit for tolerance display. Unit for Beeper Frequency as setup mode Primary display Capacitance unit pF: 1/1000,000,000,000 F nF: 1/1000,000,000 F F: 1/1000,000 F mF: 1/1000 F Remote control Keysight U1701B User’s and Service Guide...
-
Page 19: Special Indication Characters
Getting Started Special Indication Characters Descriptions Descriptions Reading out of the HI/LO The primary display shows HI limits limit setting Reading within the HI/LO The primary display shows LO limits limit setting Keysight U1701B User’s and Service Guide... -
Page 20: The Keypad At A Glance
Getting Started The Keypad at a Glance Figure 1-3 Keypad of a U1701B dual display handheld capacitance meter Table 1-3 Keypad descriptions and functions Keys Functions Power To turn ON/OFF the instrument Set high/low limits for compare mode Static recording mode... -
Page 21: The Input Terminal At A Glance
The Input Terminal at a Glance To avoid damaging this device, discharge the capacitor before testing. Be WARNING sure the polarity for capacitance measurement. Figure 1-4 Input terminals/sockets of U1701B dual display handheld capacitance meter Terminals Functions Positive terminal/ socket –... - Page 22 Getting Started THIS PAGE HAS BEEN INTENTIONALLY LEFT BLANK. Keysight U1701B User’s and Service Guide...
- Page 23 Keysight U1701B Dual Display Handheld Capacitance Meter User’s and Service Guide Features and Functions Static Recording Data Hold/Trigger Hold Relative (Zero) Range Mode Tolerance Mode Compare Mode Setting HI/LO limits Capacitance Measurement Communication (Optional Accessories) This chapters provides detailed information on the features and functions that are...
-
Page 24: Features And Functions
MIN or AVG for different ranges. 5 Press REC key for more than 1 s to exit recording mode. 6 The auto power-off feature will be disabled and the will be turned off as recording mode. Keysight U1701B User’s and Service Guide... - Page 25 Features and Functions Figure 2-1 Tolerance operation Keysight U1701B User’s and Service Guide...
-
Page 26: Data Hold/Trigger Hold
2 Press HOLD key again to trigger another new measuring value updated to display. The sign of DH will be flashed before the new updates. 3 Press HOLD key for more than 1 s to exit this mode. Figure 2-2 Data/Trigger Hold operation Keysight U1701B User’s and Service Guide... -
Page 27: Relative (Zero)
4 With small capacitance measurement, the display will show a non-zero value due to the presence of alligator clip leads. Use the relative function to Zero-Adjust the display. 5 Press and hold REL key for more than 1 s to quit relative mode. Keysight U1701B User’s and Service Guide... - Page 28 Features and Functions Figure 2-3 Relative (Zero) operation Keysight U1701B User’s and Service Guide...
-
Page 29: Range Mode
OL (overload) will be displayed. The meter will select a lower range when reading is less than about 9% of full scale. 4 Press RANGE key for more than 1 s to select auto-range. Keysight U1701B User’s and Service Guide... -
Page 30: Tolerance Mode
A single beep represents that the reading is within the selected tolerance. To exit tolerance mode, press and hold TOL key for more than 1 s NOTE Keysight U1701B User’s and Service Guide... - Page 31 Features and Functions Figure 2-4 Tolerance operation Keysight U1701B User’s and Service Guide...
-
Page 32: Compare Mode
25 sets of limit ranges. This meter has initial set for High and Low limits, see below table: High limit Low Limit 1000 1200 1080 1500 1350 1800 1620 2200 1980 2700 2430 3300 2970 3900 3510 4700 4230 5600 5040 6800 6120 8200 7380 10000 9000 Keysight U1701B User’s and Service Guide... - Page 33 HI/LO limits, the beeper will beep once and the secondary display will indicate Go. After 3 s, the meter will return to ready state. 5 Press and hold the key for more than 1 s to exit audible alert mode. Keysight U1701B User’s and Service Guide...
- Page 34 Features and Functions Figure 2-5 Set compare mode Keysight U1701B User’s and Service Guide...
- Page 35 Features and Functions Figure 2-6 shows you the display by compare mode for sorting: Figure 2-6 Sorting by compare mode Keysight U1701B User’s and Service Guide...
-
Page 36: Setting Hi/Lo Limits
3 SET: Select next compare setting. Press this key momentarily to cycle through #01 to #25 then return to #01 setting according to Hi/LO limit. 4 Press and hold the SET key for more than 1 second to exit the HI/LO limit setting mode. Keysight U1701B User’s and Service Guide... - Page 37 Features and Functions Figure 2-7 Setting High/ Low limits Keysight U1701B User’s and Service Guide...
-
Page 38: Capacitance Measurement
3 Insert the legs of the capacitor into + and – input sockets respectively. Ensure that the polarity of the capacitor’s leg are correct. 4 Remove your hands from capacitor to allows it to be tested. 5 Read the measurement on the display. Keysight U1701B User’s and Service Guide... - Page 39 Features and Functions Figure 2-8 Capacitance measurement Keysight U1701B User’s and Service Guide...
-
Page 40: Communication (Optional Accessories)
Refer to the following procedures to set up the communication between your meter and personal computer (PC). 1 Connect one side of the cable to the meter with the Keysight Logo facing up and connect the USB connector to the PC. -
Page 41: Default Setting Configurations
Keysight U1701B Dual Display Handheld Capacitance Meter User’s and Service Guide Default Setting Configurations Power-On Option Setting Factory Default Setting Baud Rate Setting Parity Check Setting Data Bit Setting Echo Setting Print Only Setting Beep Frequency Setting Keypad Lock Setting Auto Power-Off... -
Page 42: Power-On Option
To demonstrate the annunciators, press HOLD and turn on the meter simultaneously. All annunciators will be displayed. Press any key to exit demonstration mode. Default Factory HI/LO Setting To set the high and the low limits to manufacture's default values. Keysight U1701B User’s and Service Guide... -
Page 43: Selecting Setup Mode
3 Press SET key to select the digit to be adjusted, the selected digit will flash. 4 Press and hold SET key for more than 1 s to save your setting. 5 Press SET key for more than 1 s to exit setup mode. Keysight U1701B User’s and Service Guide... -
Page 44: Setting Factory Default
Bright level of backlight at OFF state: oFF~09 Bright level of backlight at ON state: oFF~09 dEFA Reset above item to factory original setting. Press SAVE key to implement the above settings. NOTE Keysight U1701B User’s and Service Guide... -
Page 45: Setting Baud Rate
The baud rate is selected for remote control. It can be set to 2400, 4800, 9600 or 19200. To select your desired rate, refer to Figure 3-1. Figure 3-1 Baud rate setup for remote control Keysight U1701B User’s and Service Guide... -
Page 46: Setting Parity Check
The parity check is selected for remote control. It can be set to none, even or odd bit. To select the parity, refer to Figure 3-2. Figure 3-2 Parity check setup for remote control Keysight U1701B User’s and Service Guide... -
Page 47: Setting Data Bit
The data bit is selected for remote control. It can be set to 8 bits or 7 bits. The stop bit is defined to 1 bit and cannot be changed. To select the data bit, refer to Figure 3-3. Figure 3-3 Data bit setup for remote control Keysight U1701B User’s and Service Guide... -
Page 48: Setting Echo
Default Setting Configurations Setting Echo When the meter is set to ECHO ON, the meter echoes (returns) all the characters what it receives. To enable the Echo, refer to Figure 3-4. Figure 3-4 Echo Setup Keysight U1701B User’s and Service Guide... -
Page 49: Setting Print Only
The remote indicator of the meter will be flashed during operation as Print-only ON. To enable the print-only, refer to Figure 3-5. Figure 3-5 Print-only Setup Keysight U1701B User’s and Service Guide... -
Page 50: Setting Beep Frequency
The driving frequency can be set to 4800, 2400, 1200, or 600. The beeper can be set to oFF if you want to keep it silent during operation. To select a preferred tone, refer to Figure 3-6. Figure 3-6 Driving frequency of Beeper setup Keysight U1701B User’s and Service Guide... -
Page 51: Setting Keypad Lock
The keypad can be disabled with the use of this option. When this setting is enabled, all the keys are disabled except for the power ON/OFF key. To enable or disable keypad lock, refer to Figure 3-7. Figure 3-7 Keypad lock Keysight U1701B User’s and Service Guide... -
Page 52: Setting Auto Power-Off
The timer for Auto Power-Off (APO) can be set ranging from 1 minute to 99 minutes, off means that the auto power-off function is disabled. To set timer, refer to Figure 3-8. Figure 3-8 Auto power saving setup Keysight U1701B User’s and Service Guide... - Page 53 When the meter will be used for longer period, you may disable the APO. The indicator will be turned off when APO is disabled. The meter will operate continuously when APO is disabled. Keysight U1701B User’s and Service Guide...
-
Page 54: Setting Backlight Display
The timer can be set ranging from 1 s to 99 s, oFF means that the backlight will not be automatically disabled. The backlight will be turned off automatically after a setting period. To set the timer, refer to Figure 3-9. Figure 3-9 Backlight timer setup Keysight U1701B User’s and Service Guide... -
Page 55: Setting Brightness Level Of The Backlight For Off State
Setting Brightness Level of the Backlight for OFF State This option is used to set the brightness level for the backlight during OFF state. The brightness can be set from oFF~09. Figure 3-10 Brightness level for OFF state Keysight U1701B User’s and Service Guide... -
Page 56: Setting Brightness Level Of The Backlight For On State
05 until 09 then back to 05 after the backlight is turned on as normal operation. If the default is set to 09, there will be no changes when the SET key is pressed. Figure 3-11 Brightness level for ON state Keysight U1701B User’s and Service Guide... -
Page 57: Reset To Default
Press SAVE key for more than 1 s to reset the setting to the default factory settings. The setup mode will be set to Baud Rate menu item automatically after resetting the meter. Figure 3-12 Reset to default Keysight U1701B User’s and Service Guide... - Page 58 Default Setting Configurations THIS PAGE HAS BEEN INTENTIONALLY LEFT BLANK. Keysight U1701B User’s and Service Guide...
- Page 59 Keysight U1701B Dual Display Handheld Capacitance Meter User’s and Service Guide Service and Maintenance General Maintenance Battery Replacement Cleaning Specification Validation This chapter provides information on warranty services, maintenance procedures, and troubleshooting hints to solve general problems that you may encounter with the instrument.
-
Page 60: Service And Maintenance
– Check the setup mode whether Lbut of lock keys has been set on. – The optical side of cable connected to meter, the Failed on Remote control Keysight logo on the cover should be facing up. Keysight U1701B User’s and Service Guide... -
Page 61: Battery Replacement
3 Slide down the battery cover and remove the cover. 4 Replace the battery with a specified 9 V battery. 5 Reverse the procedure step 3 and 4 to close the bottom cover. Battery Type ANSI/NEDA Alkaline 1604A 6LR61 Keysight U1701B User’s and Service Guide... -
Page 62: Cleaning
Do not spray cleaner directly onto the instrument as it may leak into the cabinet and cause damage. Do not use chemicals containing benzine, benzene, toluene, xylene, acetone or similar solvents to clean the instrument. After cleaning, ensure that the instrument is completely dry before using. Keysight U1701B User’s and Service Guide... -
Page 63: Specification Validation
100 nF ~10 mF ± 0.25% or equivalent Table 4-3 Ranges of Functional Validation Range Test Value Used 1000.0 p 500 p 1000.0 n 500 n 1000.0 µ 500 µ 199.99 m 100 m Keysight U1701B User’s and Service Guide... - Page 64 Service and Maintenance THIS PAGE HAS BEEN INTENTIONALLY LEFT BLANK. Keysight U1701B User’s and Service Guide...
-
Page 65: Specifications And Characteristics
Keysight U1701B Dual Display Handheld Capacitance Meter User’s and Service Guide Specifications and Characteristics For the characteristics and specifications of the U1701B Dual Display Handheld Capacitance Meter, refer to the datasheet at http://literature.cdn.keysight.com/litweb/pdf/5990-3525EN.pdf. - Page 66 Specifications and Characteristics THIS PAGE HAS BEEN INTENTIONALLY LEFT BLANK. Keysight U1701B User’s and Service Guide...
- Page 67 This information is subject to change without notice. Always refer to the Keysight website for the latest revision. © Keysight Technologies 2009-2017 Edition 5, July 1, 2017 Printed in Malaysia *U1701-90055* U1701-90055 www.keysight.com...
Need help?
Do you have a question about the U1701B and is the answer not in the manual?
Questions and answers