Table of Contents
Advertisement
Quick Links
Advertisement
Table of Contents

Related Manuals for Keysight U1190A Series


Summary of Contents for Keysight U1190A Series
- Page 1 Keysight U1190A Series Handheld Clamp Meter Quick Start Guide...
-
Page 2: Contacting Keysight
Do not proceed beyond a WARNING notice until the indicated conditions are fully understood and met. For further safety information details, refer to the Keysight U1190A Series Handheld Clamp Meter User’s Guide. Keysight U1190A Series Quick Start Guide... - Page 3 The descriptions and instructions in this guide apply NOTE to the U1191A, U1192A, U1193A, and U1194A handheld clamp meters. The model U1194A appears in all illustrations. All related documents and software are available for download at www.keysight.com/find/hhTechLib. Keysight U1190A Series Quick Start Guide...
-
Page 4: Install The Batteries
2 Loosen the screw on the battery cover with a suitable Phillips screwdriver. 3 Remove the battery cover and observe the polarity markings. 4 Insert the batteries and replace the battery cover and screw. Keysight U1190A Series Quick Start Guide... -
Page 5: Power On The Clamp Meter
1 Open the clamp 2 Separate the 3 Secure the jaw slightly to desired wire or wire or cable reveal the wire cable by and read the separator tip. hooking it in measurement. the clamp jaw. Keysight U1190A Series Quick Start Guide... -
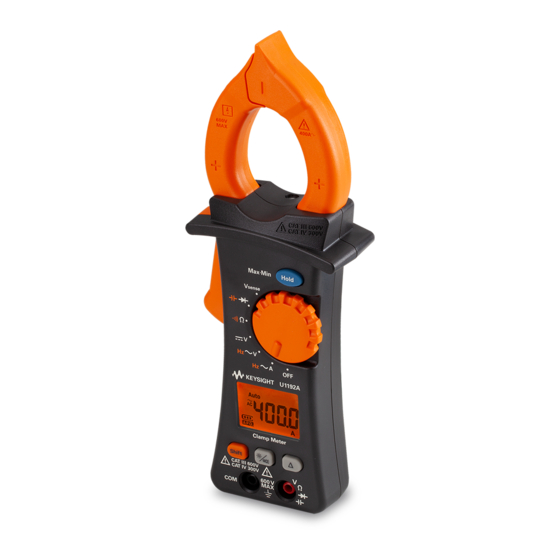
Page 6: The Clamp Meter At A Glance
The Clamp Meter at a Glance Clamp jaw Jaw markings Hold/MaxMin button Rotary switch Display screen Function buttons Input terminals Front view Flashlight Hand guard Handle Battery cover Rear view Keysight U1190A Series Quick Start Guide... -
Page 7: Understanding The Rotary Switch
✔ ✔ ✔ Non-contact voltage ✔ ✔ ✔ detector Temperature ✔ DC μA ✔ AC μA ✔ Remove the test leads from the measuring source or WARNING target before changing the rotary switch position. Keysight U1190A Series Quick Start Guide... -
Page 8: Understanding The Function Buttons
Switches between the primary shifted functions. Turns the LED flashlight on or Turns the LCD backlight on or off. off. Sets the null/relative mode. [a] The LED flashlight function is available for U1194A/U1193A/U1192A models only. Keysight U1190A Series Quick Start Guide... - Page 9 Hi.SE (high sensitivity) to Lo.SE (low sensitivity) and vice versa. Voltage could still be present even if there is no alert WARNING indication. Never touch live voltages or conductors without the necessary insulation protection. Keysight U1190A Series Quick Start Guide...
-
Page 10: Performing Measurements
Ensure that the clamp meter measures only one CAUTION conductor at a time. Measuring multiple conductors may cause inaccuracy in measurement reading due to the vector sum of currents flowing in the conductors. Keysight U1190A Series Quick Start Guide... - Page 11 AC voltage measurement Voltage source Set up your clamp meter to measure AC voltage as shown. Probe the test points and read the display. Press to measure the frequency of the AC voltage source. Keysight U1190A Series Quick Start Guide...
- Page 12 DC voltage measurement Voltage source Set up your clamp meter to measure DC voltage as shown. Probe the test points and read the display. Keysight U1190A Series Quick Start Guide...
- Page 13 Probe the test points and read the display. To avoid possible damage to your clamp meter or to CAUTION the equipment under test, disconnect the circuit power and discharge all high-voltage capacitors before measuring resistance or testing for continuity. Keysight U1190A Series Quick Start Guide...
- Page 14 Set up your clamp meter to test for continuity as shown. Press to switch to the continuity test function ( is shown on the display). The beeper will sound and the backlight will flash NOTE when the circuit-under-test is shorted. Keysight U1190A Series Quick Start Guide...
- Page 15 Probe the test points and read the display. This test sends a current through a semiconductor NOTE junction, and then measures the junction’s voltage drop. A good diode allows current to flow in one direction only. Keysight U1190A Series Quick Start Guide...
- Page 16 To avoid possible damage to the clamp meter or to CAUTION the equipment under test, disconnect circuit power and discharge all high-voltage capacitors before measuring capacitance. Use the DC V function to confirm that the capacitor is fully discharged. Keysight U1190A Series Quick Start Guide...
- Page 17 The clamp meter uses a type-K thermocouple probe for measuring temperature. Press switch to the temperature measurement function. Do not connect the thermocouple to electrically live WARNING circuits. Doing so will potentially cause fire or electric shock. Keysight U1190A Series Quick Start Guide...
- Page 18 Set up your clamp meter to measure low current as shown. Press to switch to the current measurement function. Always use the proper function, range, and terminals WARNING for current measurements. Use the clamp jaw for currents above 600 μA. Keysight U1190A Series Quick Start Guide...
- Page 19 This information is subject to change without notice. Always refer to the Keysight website for the latest revision. © Keysight Technologies 2011-2021 Edition 4, February 2021 Printed in Malaysia U1191-90001 www.keysight.com...
Need help?
Do you have a question about the U1190A Series and is the answer not in the manual?
Questions and answers