Advertisement
Table of Contents
ONE TIME DAILY TIMER 16.
Display
Hour Timer Display 15.
ONE TIME DAILY 14.
Timer SET 13.
Clock Setting 12.
TIMER UP/DOWN 11.
1.
Operation Light: Lit when system is operating.
2.
ON / OFF: Start/Stop operation of the system with the
ON/OFF button.
3.
Changeover
indicates that you cannot changeover
heating/cooling with the remote controller. The absence of
this icon indicates that the controller is designated as the
changeover master with authority to change the system
mode between heating & cooling. See details in the
installation manual.
4.
Operation Mode: Displays the current operation mode:
AUTO-DRY-COOL-HEAT.
5.
FAN Speed Display:
speed, Automatic, or Nighttime are available.
6.
SWING mode:
horizontal louvers, providing a varying air distribution pattern.
7.
MODE selection button: Depending on prior settings, the
MODE button can select operation mode from
DRY, AUTOMATIC, COOLING, or HEATING.
AUTO
Auto changeover - Cooling and Heating switch
automatically to maintain the desired setpoint temperature.
Cooling Operation − Unit operates to
DRY
minimize temperature change but reduces room humidity
levels. Airflow rate cannot be adjusted in this mode.
Cooling Operation − To the desired setpoint
COOL
temperature.
Heating Operation − To the desired
HEAT
setpoint temperature.
Quick User Guide
BRC944B2 Controller
15. TIME
Five levels of Fan
Use to oscillate the vertical/
74
8.
SWING Mode selection button: Press to change airflow
direction of the louvers. Press again to stop airflow. You can
use this button by selecting/deselecting to position the
louvers as needed. *With Wall-mounted types without
horizontal swing function, pressing the SWING button moves
the louvers vertically.
9.
FAN Airflow selection button: Press to adjust fan airflow
rate, Automatic, or Nighttime levels.
10. Temperature selection UP/DOWN buttons: Used for
selection range to adjust the current setpoint or, when
in programming mode, to adjust the programmed
setpoint temperature. Hold buttons down for 5 seconds
to switch from Fahrenheit to Centigrade.
Temperature range is 64-90
11. Timer UP/DOWN: These buttons set current time/Timer.
12. Clock setting button :
lights. Press up/down arrows to select current time.
13. Timer SET button: Press when programming is completed.
14. ONE TIME / DAILY timer setting button: Automatically
turns off operation when you sleep and turns it back on when
you wake up. Use the DAILY Timer mode on weekdays, and
the ONE TIME timer mode on weekends. The Timer will
show a "l" to indicate ON, or a "O" to show it is OFF.
* Even if the timer has been off, its programmed settings are
active in memory.
15. Hour Timer Display: Displays Daily Timer Programs.
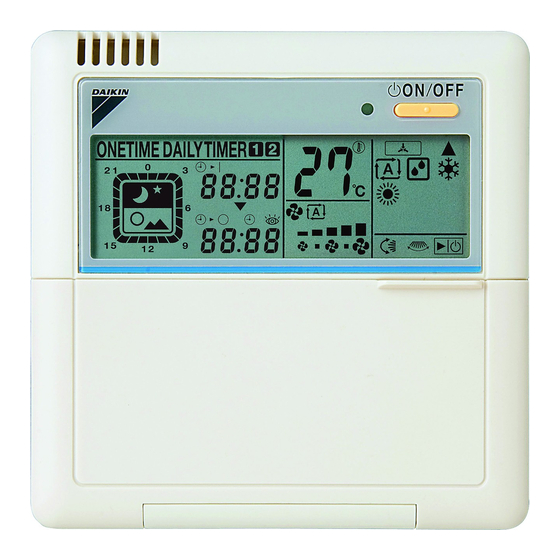
16. ONE TIME DAILY TIMER display: ONETIME is displayed
when the ON/OFF Timer is operational. DAILYTIMER is
displayed when the system is being controlled per the Timer
settings. [1] denotes only one schedule is programmed, [2]
denotes that two separate shedules are programmed.
BRC944B2
1. Operation Light
2. ON / OFF
3. Changeover
4. Operation Modes
5. Fan Speed Display
6. Swing mode indicator
7. MODE selection
8. SWING Mode selection
9. FAN Airflow selection
10. TEMP selection
°
°
F / 18-32
C.
Press button and [0:00]
QUG-BRC944B2_10/08
Advertisement
Table of Contents


Need help?
Do you have a question about the BRC944B2 and is the answer not in the manual?
Questions and answers
how does air conditioning cycle off and on ?
The Daikin BRC944B2 controls the air conditioning cycle using the ON/OFF button on the remote controller. Pressing the ON/OFF button starts the system and turns on the run indicator lamp (green). Pressing it again stops the system and turns off the lamp. Additionally, timer functions such as ONE TIME timer ON, DAILY timer ON, and TIMER OFF can be used to automate turning the system on or off at set times.
This answer is automatically generated
Is there a factory reset function so I can clear my controller of its current settings?