
Subscribe to Our Youtube Channel
Related Manuals for Power Fist 8308231


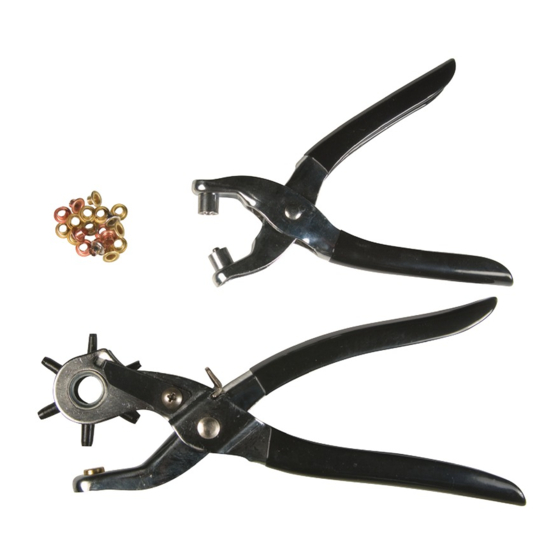
Summary of Contents for Power Fist 8308231
- Page 1 V 2.0 8308231 Leather Punch with Eyelet Pliers User Manual Please read and understand all instructions before use. Retain this manual for future reference.
-
Page 3: Specifications
V 2.0 8308231 Leather Punch with Eyelet Pliers SPECIFICATIONS Punch Hole Sizes 2.5/ 3.0/ 3.5/ 4.0/ 4.5/ 5.0 mm Carbon Steel Construction Coated handle for grip SAFETY IMPORTANT SAFETY PRECAUTIONS WARNING! Read and understand all instructions before using this tool. The operator must follow basic precautions to reduce the risk of personal injury and/or damage to the equipment. -
Page 4: Specific Safety Precautions
V 2.0 Leather Punch with Eyelet Pliers 8308231 2. Gloves a. The gloves should provide protection based on the work materials. b. Wear suitable gloves to reduce the effects of vibration. 3. Protective Clothing Wear protective clothing designed for the work environment and tool. Examples are electrical non-conductive clothes or clothes treated to resist corrosive liquids or materials. -
Page 5: Operation
8308231 Leather Punch with Eyelet Pliers V 2.0 ASSEMBLY NOTE: When this manual refers to a part number, it refers to the included parts list. The leather punch and eyelet pliers come pre-assembled. OPERATION THE LEATHER PUNCH Turn the punch wheel (No.2) towards the front until you have found the correct punch setting. The narrowest diameter is 2.5 mm and the size of each punch hole increases by .5 mm. -
Page 6: Maintenance
V 2.0 Leather Punch with Eyelet Pliers 8308231 Position the eyelet pliers in such a way as to ensure that the rivet's flat base sits in the recessed ring of the rivet holder (No. 2A). Firmly press the eyelet pliers together to force the stem to curl outward, creating a flange to reinforce to rivet. Keep pressing until the rivet stem is fully compact. - Page 7 8308231 Leather Punch with Eyelet Pliers V 2.0 EYELET PLIERS PARTS LIST DESCRIPTION QTY. Counterpoint Rivet Holder Handles Wire Clip (not shown) For technical questions call: 1-800-665-8685...
- Page 9 V 2.0 8308231 Poinçon à cuir avec pinces à oeillet Manuel du Propriétaire Vous devez lire et comprendre toutes les instructions avant d'utiliser l'appareil. Conservez ce manuel afin de pouvoir le consulter plus tard.
-
Page 11: Spécifications
V 2.0 8308231 Poinçon à cuir avec pinces à oeillet SPÉCIFICATIONS Tailles de trou percé 2,5/ 3,0/ 3,5/ 4,0/ 4,5 et 5,0 mm Acier au carbone Construction Poignée revêtue pour une prise sûre SÉCURITÉ CONSIGNES DE SÉCURITÉ IMPORTANTES AVERTISSEMENT ! Lisez et assurez-vous de comprendre toutes les instructions avant d'utiliser cet outil. -
Page 12: Sécurité Personnelle
V 2.0 Poinçon à cuir avec pinces à oeillet 8308231 SÉCURITÉ PERSONNELLE ATTENTION ! Portez de l'équipement de protection homologué par l'Association canadienne de normalisation (ACNOR) ou l'American National Standards Institute (ANSI) quand vous utilisez l'outil. 1. Protection de la tête a. -
Page 13: Identification Des Pièces
8308231 Poinçon à cuir avec pinces à oeillet V 2.0 DÉBALLAGE 1. Retirez soigneusement les pièces et les accessoires de la boîte. Conservez les matériaux d'emballage jusqu'à ce que vous ayez inspecté avec soin et installé ou utilisé l'outil de manière satisfaisante. -
Page 14: Entretien
V 2.0 Poinçon à cuir avec pinces à oeillet 8308231 Bloquez le poinçon à cuir en position fermée en poussant les poignées l'une contre l'autre et en amenant le levier de retenue dans la fente de sécurité. Pour déverrouiller l'outil, poussez les poignées l'une contre l'autre et ramenez le levier de retenue vers l'extérieur. - Page 15 8308231 Poinçon à cuir avec pinces à oeillet V 2.0 4. Inspectez les composants de l'outil régulièrement. Demandez à un technicien autorisé de réparer ou de remplacer les composants endommagés ou usés. ATTENTION ! Seul un personnel d'entretien qualifié doit effectuer la réparation de l'outil.
Need help?
Do you have a question about the 8308231 and is the answer not in the manual?
Questions and answers