
Related Manuals for Rain Bird E-6C


Summary of Contents for Rain Bird E-6C
- Page 1 English ........2 Español ..............29 Français ..............57...
- Page 2 EC CONTROLLER ICON LEGEND TEST PRESET AUTO DATE/TIME SCHEDULES DAY CYCLE SET MONTH WATER DAY PROGRAM START TIME SET DAY STATION RUN TIME SET TIME WATER BUDGET MANUAL CYCLE PROGRAM ENTER MANUAL BUTTON STATION(S) Ec Controller...
-
Page 3: Table Of Contents
Select Pre-Set Schedules ..........13 United States, call your Rain Bird dealer. Select Program (A, B, and/or C) ........14 © 2000 Rain Bird Sprinkler Mfg. Corp. Set Watering Day Cycle ..........14 ® Registered trademark of Rain Bird Sprinkler Mfg. Corp. Ec Controller... -
Page 4: Introduction
• during power outages CERTIFICATE OF CONFORMITY TO EUROPEAN DIRECTIVES Rain Bird declares that the Ec device, an irrigation controller, conforms to the 72/23/CEE European Three year warranty • Directives for electrical safety and to 89/336/CEE and 93/31/CEE concerning electromagnetic compatibility. -
Page 5: Controller Stations
You will need to understand the following terms to successfully program your Ec controller. DIAGRAM 1 The Rain Bird Ec controller is an electronic timer that controls Watering day cycle — The period of days in which the • when your sprinkler system turns on, and how long the controller repeats the program you set. -
Page 6: Controller Basics
CONTROLLER BASICS NOTE: Make sure the controller is connected to an AC power supply when replacing the battery, or you will lose all programming information including Programming Under Battery Power date and time. If you wish, you can program the controller under battery power. -
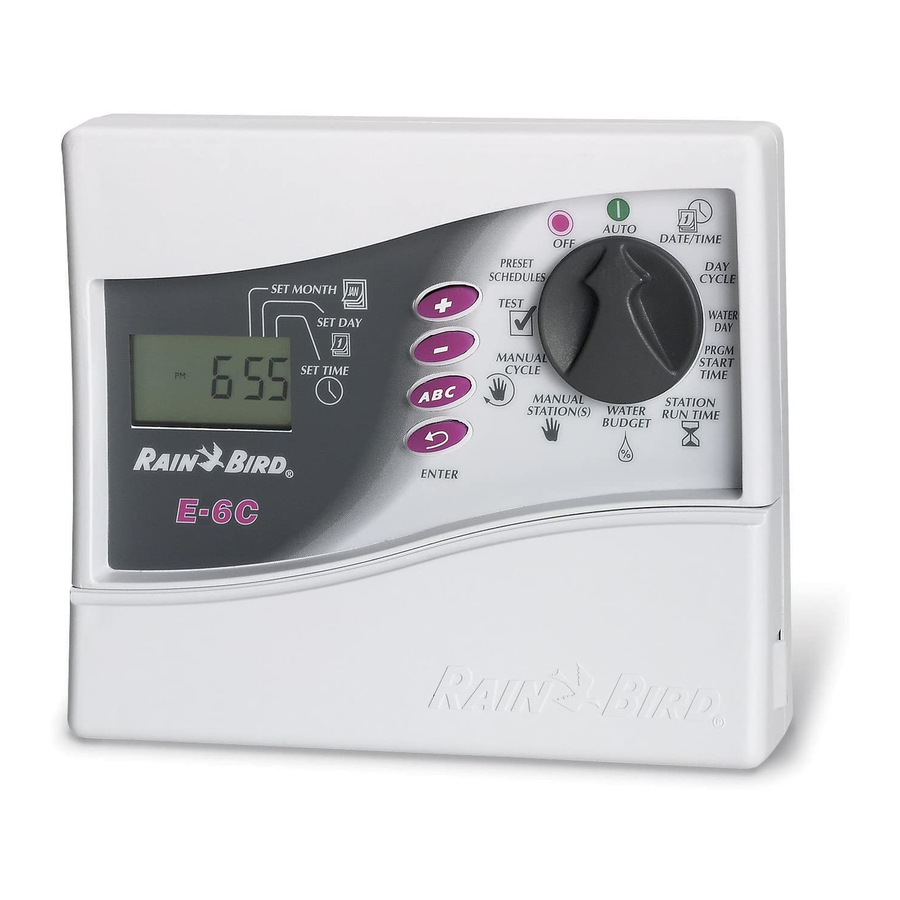
Page 7: Controls And Indicators
Controls and Indicators Every three seconds, the LCD displays the problem station’s number and the letters “Err.” The controller will continue to run DIAGRAM 4 each operable station in the program. As each station is This illustration shows the programming controls on the face running, the controller (at an alternate 3-second interval) of the Ec controller. -
Page 8: Programming Checklist
Programming Checklist Controller Programming Chart To program your Ec controller for the first time, we recommend Before programming your Ec controller, fill out the that you complete the steps in the order listed to the right. Programming Chart included with your controller. Then program the controller in the order shown on the Programming ❒... - Page 9 Ec Controller...
- Page 10 7. In the Run Time column for each program, enter the Od31 = Waters only on odd-numbered days of the month, • number of minutes you want each station to run. but not on the 31st of any month or on February 29. (This watering day cycle complies with special ordinances in Notice that stations 1 through 4 are assigned to program A, some water-restricted areas).
- Page 11 Ec Controller...
-
Page 12: Programming The Controller
PROGRAMMING THE CONTROLLER Set Year DIAGRAM 6 Erase Any Existing Programming 1. Turn the programming dial to the DATE/TIME position. DIAGRAM 5 2. The figure “1998” appears in the display window. After you finish filling out the Programming Chart, you are ready to begin programming the controller. -
Page 13: Set Time
NOTE: In 230 V models, the first flashing “01” 4. Press ENTER. represents the day. You will set the day first, and 5. The minute digits begin flashing. then the current month. 6. Press + or - to set the current minute 4. -
Page 14: Select Program (A, B, And/Or C)
Select Program (A, B, and/or C) 1. Turn the programming dial to PRESET SCHEDULES. 2. The first pre-set schedule (5 Pr E1) appears in the display. DIAGRAM 10 1. Turn the programming dial to DAY CYCLE. 3. To select one of the other pre-set schedules, press + or - 2. -
Page 15: Set Watering Days
2. If you selected a 7-day watering cycle, the seven weekdays 7-day (Custom) — Waters on a weekly cycle; any day of • appear as a row of numbers and the number “1” in the day the week can be a watering day. cycle flashes. -
Page 16: Set Program Start Time(S)
Delete Program Start Time(s) 5. Press + or - to move today’s position in the watering cycle. Set Program Start Time(s) DIAGRAM 15 1. If you want to delete an unwanted start time from a program, DIAGRAM 14 turn the programming dial to PRGM START TIME. 1. -
Page 17: Set Station Run Times
Set Station Run Times OPERATING THE CONTROLLER After programming the controller, you will normally set it to DIAGRAM 16 AUTO mode to operate all programs automatically. You can 1. Turn the programming dial to STATION RUN TIME. manually run one or more programs, or manually run a single 2. -
Page 18: Auto Mode
Auto Mode Adjust Water Budget DIAGRAM 18 & 19 DIAGRAM 20 & 21 1. To return the controller to automatic operation, turn the Adjusting the Water Budget feature is the easiest way to programming dial to AUTO. increase or decrease the run times of all stations on a program. You can use Water Budget to decrease watering during cool 2. -
Page 19: Manually Run Stations And Programs
3. Press + to increase the Water Budget percentage, or press - 3. If you want to manually run a station other than number 1, to decrease the Water Budget percentage. press ENTER until the desired station number appears in the display. -
Page 20: Run A Test Program
NOTE: Water budgeting does apply to manually Manually Run a Program operated programs. DIAGRAM 24 1. Turn the programming dial to MANUAL CYCLE. After the last manual program runs, the controller returns to AUTO mode and awaits the next scheduled program start time. 2. -
Page 21: Installing The Controller
INSTALLING THE CONTROLLER NOTE: If you want to test only one (or more) stations, follow the procedure in “Manually Run a Station(s)” on p. 19. Although this manual provides directions for connecting the wiring to the controller, local electrical codes may vary in their 2. -
Page 22: Mount The Controller
Mount the Controller CAUTION: To avoid electrical shock, DO NOT plug in the transformer until you have connected it DIAGRAM 26 to the controller. 1. Hold the provided template against the wall in the desired mounting location. Use a pencil to mark the location of the To connect the transformer cable to the terminal strip in the three holes for the mounting fasteners, as shown on the controller cabinet:... - Page 23 This illustration shows the various wire runs and connections 5. That completes the mounting and wiring procedures for between the controller and the other devices. Each valve should your Ec controller. Replace the lower access cover on the have its own, separate power wire. Use only wire that is code- controller, and you are ready to begin programming.
-
Page 24: Troubleshooting
If the controller does not operate properly, contact Rain Bird Technical Assistance at 800-247-3782. In Europe, or outside the United Staes call your Rain Bird dealer. Display shows a station The valve may have a Check and repair the valve. - Page 25 SYMPTOM POSSIBLE CAUSE CORRECTION Program does not begin watering Programming dial is set to the Set the programming dial to AUTO. as scheduled. OFF position. Start time has not been Turn the dial to PRGM START TIME and properly entered for the check the start times entered for the program.
- Page 26 SYMPTOM POSSIBLE CAUSE CORRECTION 11. A start time has not been Turn the dial to PRGM START TIME and entered for the station’s check the start times entered for the assigned program. program. If the station’s start time is missing, enter it as described on p.16. Watering starts when it should 12.
- Page 27 SYMPTOM POSSIBLE CAUSE CORRECTION LCD display shows “Err.” 15. The automatic circuit The “Err” in the display indicates a short breaker has detected an circuit or electrical overload on a electrical problem. particular station. The station’s number should also be displayed. For example, “2 Err”...
- Page 28 Notes Ec Controller...
Need help?
Do you have a question about the E-6C and is the answer not in the manual?
Questions and answers
The controller does not have a button titled Enter. It has 4 buttons: + - return and one with letters ABC
Turn the programming dial to the appropriate setting. Use the PROGRAM button to select the desired program (A, B, or C). The controller does not require an Enter button; changes are saved automatically as you adjust settings.
This answer is automatically generated
Where do you put the wired water sensor wire in