Advertisement
Quick Links
INSTALLATION
INSTRUCTIONS
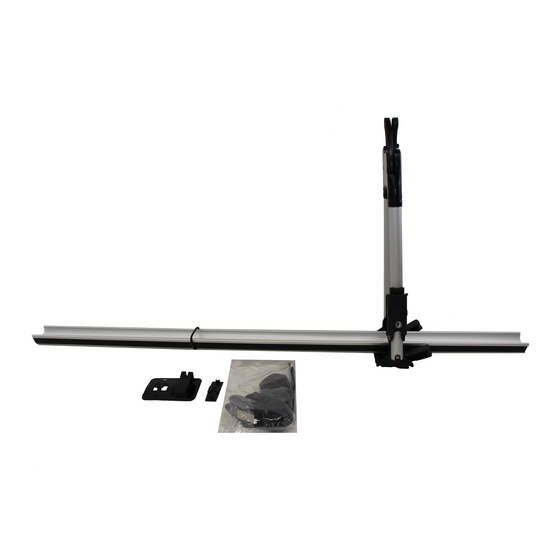
PARTS LIST
Bike attachment
Allen wrench, 5 mm
2 Keys
2 Wheel straps
2 Tire adapters
2 End caps
© 2012 American Honda Motor Co., Inc. - All Rights Reserved.
Accessory
BICYCLE ATTACHMENT
(ROOF MOUNT)
P/N 08L07-TA1-203
TOOLS REQUIRED
Phillips screwdriver
Before Installing and Using This Bicycle
Attachment Kit
If the bicycle attachment is not installed properly, it
may come out of position while the vehicle is in motion,
resulting in serious injury or accident. Read these
instructions carefully before installing the bicycle
attachment.
INSTALLATION
NOTE:
•
•
•
•
•
BII 47360 (1209)
Application
2013 TSX
SPORT WAGON
Be careful not to damage the painted surfaces of the
vehicle when installing the bike attachment.
If you are installing more than one bike attachment,
you may need to alternate the mounting positions
(front to rear) to allow for handle bar clearance.
Make sure the security retainer and the locking clamp
lever are installed on the outboard side. See the
Owner's Manual supplied for details.
The crossbars have a directional positioning. The
short portion in front of the channel should face
toward the front of the vehicle.
These instructions show the bicycle attachment
being installed on the passenger's side of the
vehicle; use the same procedure to install the
bicycle attachment on the driver's side of the
vehicle.
Publications No.
BII 13472
Issue Date
SEP 2012
1 of 6
08L07-TA1-1B00-91
Advertisement

Related Manuals for Acura 08L07-TA1-203


Summary of Contents for Acura 08L07-TA1-203
- Page 1 BII 13472 BICYCLE ATTACHMENT INSTALLATION 2013 TSX (ROOF MOUNT) SPORT WAGON Issue Date INSTRUCTIONS P/N 08L07-TA1-203 SEP 2012 TOOLS REQUIRED PARTS LIST Phillips screwdriver Before Installing and Using This Bicycle Attachment Kit Bike attachment If the bicycle attachment is not installed properly, it may come out of position while the vehicle is in motion, resulting in serious injury or accident.
- Page 2 Preparing the Bicycle Attachment Adjust the front plate to 305 mm from the end of the channel, and retighten the socket bolt. Slide the rear plate foward, and remove the rear plate from the bicycle attachment. FRONT PLATE CHANNEL BICYCLE ALLEN ATTACHMENT WRENCH...
- Page 3 Install an end cap on the bicycle attachment Pull open the end caps on the carrier bars. channel by aligning the lock tab on the end cap RUBBER MOLDING with the hole in the channel. Push down on the Slide. Open.
- Page 4 12. Position the bicycle attachment over the T-bolts 14. Turn and adjust each mounting lever to lock the on the carrier bars, and install the mounting levers bicycle attachment to the roof rack. Check for firm removed in step 8. Do not tighten or lock the pressure while you push down on the mounting mounting levers at this time.
- Page 5 15. Close the locking clamp lever. To deter theft of Installing a Bicycle onto the Bike Attachment the bicycle attachment, lock the locking clamp NOTE: Do not carry a bicycle on this attachment if the lever with the key. diameter of the bicycle frame exceeds 55 mm or if the sectional view is not circular in the area where it is held by the bicycle holder.
- Page 6 20. Position the bicycle on the channel. Lift the arm 22. Lock the locking clamp lever by inserting the key up, position the bicycle’s frame in the holder, and in the key cylinder and turning it in a clockwise push down on the slider. direction.
Need help?
Do you have a question about the 08L07-TA1-203 and is the answer not in the manual?
Questions and answers