Kramer MV-6 User Manual
3g hd-sdi multiviewer
Hide thumbs
Also See for MV-6:
- User manual (74 pages) ,
- Quick start manual (4 pages) ,
- User manual (75 pages)
Table of Contents
Advertisement
Quick Links
Download this manual
See also:
User Manual
Advertisement
Table of Contents

Related Manuals for Kramer MV-6


Summary of Contents for Kramer MV-6
-
Page 1: User Manual
Vertrieb von CAMBOARD Electronics Kramer Electronics, Ltd. Preliminary USER MANUAL Model: MV-6 3G HD-SDI Multiviewer www.camboard.de Tel. 07131 911201 ce-info@camboard.de Fax 07131 911203... -
Page 2: Table Of Contents
Recycling Kramer Products Accessory to Medical Equipment (IEC 60601-1) Defining the MV-6 3G HD-SDI Multiviewer Installing the MV-6 3G HD-SDI Multiviewer in a Rack Connecting the MV-6 3G HD-SDI Multiviewer Connecting to the RS-232 Port Connecting to the Ethernet Port 6.2.1... - Page 3 12.2.2 Network Setting Commands 12.2.3 Device Specific Commands Figures Figure 1: MV-6 3G HD-SDI Multiviewer Front Panel Figure 2: MV-6 3G HD-SDI Multiviewer Rear Panel Figure 3: Connecting the MV-6 3G HD-SDI Multiviewer Figure 4: Local Area Connection Properties Window...
- Page 4 CAMBOARD Electronics Contents Figure 16: About MV-6 Window Tables Table 1: MV-6 3G HD-SDI Multiviewer Front Panel Features Table 2: MV-6 3G HD-SDI Multiviewer Rear Panel Features Table 3: Windows Sub-menu Parameters and Descriptions Table 4: Output Sub-menu Parameters and Descriptions...
-
Page 5: Introduction
Our 1,000-plus different models now appear in 11 groups that are clearly defined by function. Thank you for purchasing the Kramer MV-6 3G HD-SDI Multiviewer which is ideal for: • Professional broadcasting and production studios •... -
Page 6: Quick Start
Vertrieb von CAMBOARD Electronics Getting Started Quick Start The following quick start chart summarizes the basic setup and operation. www.camboard.de Tel. 07131 911201 ce-info@camboard.de KRAMER: SIMPLE CREATIVE TECHNOLOGY Fax 07131 911203... -
Page 7: Overview
• Medical equipment compliance The MV-6 is housed in a 2U height enclosure and is fed from a 100-240 VAC universal switching power supply. The device can be controlled via the front panel buttons and remotely via: •... -
Page 8: Recommendations For Best Performance
European Advanced Recycling Network (EARN) and will cover any costs of treatment, recycling and recovery of waste Kramer Electronics branded equipment on arrival at the EARN facility. For details of Kramer’s recycling arrangements in your particular country go to our recycling pages at http://www.kramerelectronics.com/support/recycling/. -
Page 9: Accessory To Medical Equipment (Iec 60601-1)
In this environment, the MV-6 can be added to the system ONLY if the connecting equipment has been evaluated and meets the IEC 60601-1-2 Emc standards. -
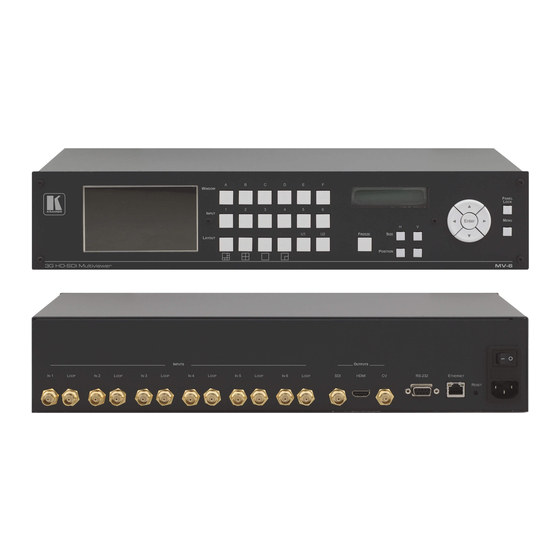
Page 10: Defining The Mv-6 3G Hd-Sdi Multiviewer
CAMBOARD Electronics Defining the MV-6 3G HD-SDI Multiviewer Defining the MV-6 3G HD-SDI Multiviewer Figure 1 Table 1 define the front panel of the MV-6 3G HD-SDI Multiviewer. Figure 1: MV-6 3G HD-SDI Multiviewer Front Panel www.camboard.de Tel. 07131 911201 ce-info@camboard.de... -
Page 11: Table 1: Mv-6 3G Hd-Sdi Multiviewer Front Panel Features
Vertrieb von CAMBOARD Electronics Defining the MV-6 3G HD-SDI Multiviewer Table 1: MV-6 3G HD-SDI Multiviewer Front Panel Features Feature Function LCD Video Preview Screen LCD screen to display the output signal WINDOW Buttons (A to F) Press to select one of the windows... -
Page 12: Figure 2: Mv-6 3G Hd-Sdi Multiviewer Rear Panel
CAMBOARD Electronics Defining the MV-6 3G HD-SDI Multiviewer Figure 2 Table 2 define the rear panel of the MV-6 3G HD-SDI Multiviewer. Figure 2: MV-6 3G HD-SDI Multiviewer Rear Panel Table 2: MV-6 3G HD-SDI Multiviewer Rear Panel Features Feature... -
Page 13: Installing The Mv-6 3G Hd-Sdi Multiviewer In A Rack
Vertrieb von CAMBOARD Electronics Installing the MV-6 3G HD-SDI Multiviewer in a Rack Installing the MV-6 3G HD-SDI Multiviewer in a Rack This section provides instructions for rack mounting the device. www.camboard.de Tel. 07131 911201 ce-info@camboard.de Fax 07131 911203... -
Page 14: Connecting The Mv-6 3G Hd-Sdi Multiviewer
Connecting the MV-6 3G HD-SDI Multiviewer Connecting the MV-6 3G HD-SDI Multiviewer The MV-6 accepts up to six SD/HD/3G HD-SDI inputs. The device outputs a signal (which can be any combination of the inputs) to the SDI, HDMI and composite video connectors as shown in... -
Page 15: Connecting To The Rs-232 Port
You can connect the Ethernet port of the MV-6 to the Ethernet port on your PC, via a crossover cable with RJ-45 connectors. 1 Switch off the power to each device before connecting it to your MV-6. After connecting your MV-6, switch on its power and then switch on the power to each device... -
Page 16: Figure 4: Local Area Connection Properties Window
This type of connection is recommended for identification of the factory default IP address of the MV-6 during the initial configuration After connecting the Ethernet port, configure your PC as follows: 1. Right-click the My Network Places icon on your desktop. -
Page 17: Connecting The Ethernet Port Via A Network Hub
Figure 5: Internet Protocol (TCP/IP) Properties Window 6.2.2 Connecting the Ethernet Port via a Network Hub You can connect the Ethernet port of the MV-6 to the Ethernet port on a network hub or network router, via a straight-through cable with RJ-45 connectors. -
Page 18: Adjusting The Size Of A Window
4. Press Menu twice to exit the window position setting. Defining and Saving a Custom Window Layout In addition to the four predefined window layouts, the MV-6 can store two custom window layouts. Once you have defined a custom window layout you can save it for future recall. -
Page 19: Freezing/Releasing A Video Output
Vertrieb von CAMBOARD Electronics Operating the MV-6 3G HD-SDI Multiviewer Locally To select a window layout: • Press one of the six screen layout buttons. The button flashes quickly three times and the window layout is recalled from the memory... -
Page 20: Windows Sub-Menu
Vertrieb von CAMBOARD Electronics Operating the MV-6 3G HD-SDI Multiviewer Locally • Enter—display the menu or select a parameter/value • Up (▲)—scroll up through the parameter/value list • Down (▼)—scroll down through the parameter/value list • Left (◄)—move left in the current field •... -
Page 21: Output Sub-Menu
Vertrieb von CAMBOARD Electronics Operating the MV-6 3G HD-SDI Multiviewer Locally 7.9.2 Output Sub-menu The parameters in the Output sub-menu set the output and LCD preview screen characteristics. Note: NTSC or PAL is automatically selected depending on the selected output resolution refresh rate. -
Page 22: User Presets Sub-Menu
Vertrieb von CAMBOARD Electronics Operating the MV-6 3G HD-SDI Multiviewer Locally 7.9.5 User Presets Sub-menu The options in the User Presets sub-menu save and recall the preset configuration memories (see Section 7.4 Table 7: User Presets Parameters and Descriptions... -
Page 23: Operating The Mv-6 3G Hd-Sdi Multiviewer Remotely
Ethernet port (see Section 8.2 Operating the MV-6 via the RS-232 Serial Port Kramer offers free control software that allows you to operate the MV-6 remotely via a PC or serial controller using serial commands (see Section 12.1). This software can be downloaded from www.kramerelectronics.com. -
Page 24: Figure 6: Mv-6 Controller Software Main Window
Vertrieb von CAMBOARD Electronics Operating the MV-6 3G HD-SDI Multiviewer Remotely Figure 6: MV-6 Controller Software Main Window Table 9: MV-6 Controller Software Features Feature Function Menu Bar Operate and configure the device using the Menu Bar options (see Section 8.2.1... -
Page 25: The Menu Bar
Vertrieb von CAMBOARD Electronics Operating the MV-6 3G HD-SDI Multiviewer Remotely 8.2.1 The Menu Bar The menu bar options are shown in Table Table 10: Menu Bar Options Menu Bar Options Sub Menu Description FILE Open Open an existing configuration... -
Page 26: Connecting To The Device
Vertrieb von CAMBOARD Electronics Operating the MV-6 3G HD-SDI Multiviewer Remotely Feature Description Press Take to enable multiple off-line changes to be made. Press Update to implement the changes (see Section 8.2.8 Set the screen to display the 6-window configuration... -
Page 27: Windows Position
Vertrieb von CAMBOARD Electronics Operating the MV-6 3G HD-SDI Multiviewer Remotely • For a serial connection, select the required Com port from the drop- down list. 3. Click Connect. If the connection is successful, the main window shown in Figure 6 appears. -
Page 28: Switch Buttons
Vertrieb von CAMBOARD Electronics Operating the MV-6 3G HD-SDI Multiviewer Remotely 8.2.5 Switch Buttons The switching configuration can be modified by clicking on the Windows and Inputs buttons. Figure 10: Switch Buttons Table 12: Switch Button Characteristics Description C Window... -
Page 29: Changing The Layer Order
Vertrieb von CAMBOARD Electronics Operating the MV-6 3G HD-SDI Multiviewer Remotely 8.2.7 Changing the Layer Order You can modify the order in which the windows are arranged. The top layer is on the right and the bottom layer on the left. In... -
Page 30: Switching An Input To A Window
Vertrieb von CAMBOARD Electronics Operating the MV-6 3G HD-SDI Multiviewer Remotely Figure 12: Switching an Input to a Window 2. Click on the required Inputs button. The input is assigned to the previously selected window and the button changes to a solid color. -
Page 31: Changing Input Button Properties
Vertrieb von CAMBOARD Electronics Operating the MV-6 3G HD-SDI Multiviewer Remotely 8.2.11 Changing Input Button Properties To change the properties of an input button: 1. Right-click on the relevant input button. The Input Properties window appears as shown in... -
Page 32: Changing The Device Details
Vertrieb von CAMBOARD Electronics Operating the MV-6 3G HD-SDI Multiviewer Remotely 8.2.12 Changing the Device Details From this window you can change the device name and its IP communication parameters. To change the device details: 1. From the Menu bar, click on Device. -
Page 33: Setting The Ip Network Parameters
Vertrieb von CAMBOARD Electronics Operating the MV-6 3G HD-SDI Multiviewer Remotely 4. Click Open. The device firmware is loaded. Note: Do not interrupt the uploading process or the device may be damaged. 5. When the process is complete, reset the device. -
Page 34: Upgrading The Firmware
CAMBOARD Electronics Upgrading the Firmware Upgrading the Firmware For instructions on upgrading the firmware see “Upgrading the MV-6 Firmware Using the K-Upload Software”. Note: To upgrade to firmware V3.2.7321 you must use K-Upload software V1.0.0.50. After upgrading, perform a factory reset (see... -
Page 35: Default Communication Parameters
im Vertrieb von CAMBOARD Electronics Default Communication Parameters 11 Default Communication Parameters Table 14: Default Communication Parameters RS-232 Protocol 3000 Baud Rate: 115200 Data Bits: Stop Bits: Parity: None Command Format: ASCII Example (Output 1 to Input 2): #V 2>1CR Ethernet To reset the IP settings to the factory reset values, power cycle the device while holding in the Factory Reset button, located on the rear panel of the unit... -
Page 36: Kramer Protocol 3000
Vertrieb von CAMBOARD Electronics Kramer Protocol 3000 12 Kramer Protocol 3000 The MV-6 can be operated using serial commands from a PC, remote controller or touch screen using the Kramer Protocol 3000. This section describes: • Kramer Protocol 3000 syntax (see Section 12.1... -
Page 37: Entering Commands
You can directly enter all commands using a terminal with ASCII communications software, such as HyperTerminal, Hercules, etc. Connect the terminal to the serial or Ethernet port on the Kramer device. To enter press the Enter key. is also sent but is ignored by command parser). -
Page 38: Chaining Commands
Commands in the string do not execute until the closing character is entered. A separate response is sent for every command in the chain. 12.1.7 Maximum String Length 64 characters 12.2 Kramer Protocol 3000 Commands 12.2.1 Common Commands Command Abbreviation Description... -
Page 39: Network Setting Commands
Vertrieb von CAMBOARD Electronics Kramer Protocol 3000 12.2.2 Network Setting Commands Command Abbreviation Description Type Permission ETH-PORT ETHP Change protocol Ethernet port Ethernet Administrator ETH-PORT? ETHP? Query protocol Ethernet port Ethernet End User NET-DHCP NTDH Set DHCP mode Ethernet... - Page 40 <CR> WND-FRZ? Get freeze #WND-FRZ? win_num<CR> ~WND-FRZ? win_num,freeze<CR> window WND-LR Set window layer #WND-LR win_num,layer <CR> ~WND-LR win_num,layer [result]<CR> WND-LR? Get window layer #WND-LR? win_num<CR> ~WND-LR? win_num, layer<CR> www.camboard.de Tel. 07131 911201 ce-info@camboard.de KRAMER: SIMPLE CREATIVE TECHNOLOGY Fax 07131 911203...
- Page 41 im Vertrieb von CAMBOARD Electronics www.camboard.de Tel. 07131 911201 ce-info@camboard.de Fax 07131 911203...
- Page 42 Vertrieb von CAMBOARD Electronics For the latest information on our products and a list of Kramer distributors visit www.kramerelectronics.com where updates to this user manual may be found. We welcome your questions, comments and feedback. Safety Warning: Disconnect the device from the power supply before opening/servicing.
Need help?
Do you have a question about the MV-6 and is the answer not in the manual?
Questions and answers