Table of Contents
Advertisement
Quick Links
Scan for full manual
Step 1: Check what's in the box
MV-6 3G HD-SDI Multiviewer
Remote control transmitter with batteries
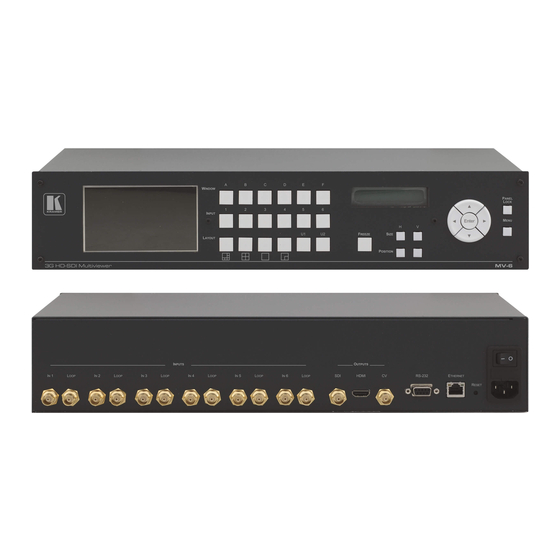
Step 2: Get to know your MV-6
Front Panel
#
Feature
1
LCD Video Preview Screen
2
WINDOW Buttons (A to F)
3
INPUT Buttons (1 to 6)
4
LCD Character Display
5
Menu Navigation Buttons
6
ENTER Button
7
PANEL LOCK Button
8
LAYOUT 6 Input Button
9
LAYOUT 4 Input Button
10 LAYOUT Full Screen Button
11 LAYOUT 2 Input Button
12 U1 Button
13 U2 Button
14 FREEZE Button
15 POSITION Buttons
16 SIZE Buttons
17 MENU Button
MV-6 Quick Start
MV-6 Quick Start Guide
This guide helps you install and use your
Go to
www.kramerav.com/downloads/MV-6
upgrades are available.
Function
Displays the output signal.
Press to select one of the windows displayed on the screen.
Press to select the active input after selecting one of the windows displayed on the screen.
During normal operation, displays the Window/Input list. During menu operation, displays the
menu options.
Press to navigate the menu options.
Press to select a menu or accept a parameter/value.
Press and hold to disable/enable the front panel buttons.
Press to display all six inputs in the window configuration shown on the button.
Press to display four selected inputs in the window configuration shown on the button.
Press to display one selected input as a full screen.
Press to display two selected inputs in the window configuration shown on the button.
Press to select the first user-defined output window configuration (see Step 6).
Press to select the second user-defined output window configuration (see Step 6).
Press to freeze the selected output window.
Press either the H (horizontal) or V (vertical) button to change the position of the active
window (see Step 6).
Press either the H (width) or V (height) button to change the size of the active window (see
Step 6).
Press to move back one level through the menu.
MV-6
for the first time.
to download the latest user manual and check if firmware
1 Set of rack ears
1 Power cord
P/N: 2 9 0 0 - 3 0 1 2 7 8 QS
4 Rubber feet
1 Quick start guide
Rev: 2
Advertisement
Table of Contents

Related Manuals for Kramer MV-6


Summary of Contents for Kramer MV-6
- Page 1 MV-6 3G HD-SDI Multiviewer 1 Set of rack ears 4 Rubber feet Remote control transmitter with batteries 1 Power cord 1 Quick start guide Step 2: Get to know your MV-6 Front Panel Feature Function LCD Video Preview Screen Displays the output signal.
- Page 2 Press and hold while power cycling the device to reset to factory default configuration. 27 Mains Power Connector Connect to the mains power. Step 3: Mount MV-6 • Ensure that the environment (e.g., maximum ambient temperature & To rack mount the machine, attach both rack ears air flow) is compatible for the device.
- Page 3 Step 4: Connect inputs and outputs Always switch OFF the power on each device before connecting it to your MV-6. To achieve specified extension distances, use the recommended Kramer cables available at www.kramerav.com/product/MV-6. Using third-party cables may cause damage! RS-232 Connection: Use a 9-wire straight cable and connect only pin 2 to pin 2, pin 3 to pin 3, and pin 5 to pin 5 to the RS-232 9-pin D-sub port on your PC.
- Page 4 Viewing the Window/Input Display: When MV-6 is powered on, the unit performs a self-test and then, the display shows the letters of each output window and, underneath each letter, the input that corresponds to that window: During operation, if there is no button activity for approximately 60 seconds the display reverts to the Window/Input display.
Need help?
Do you have a question about the MV-6 and is the answer not in the manual?
Questions and answers