
Related Manuals for Kärcher NT 35/1 AP Te


Summary of Contents for Kärcher NT 35/1 AP Te
- Page 1 NT 25/1, 35/1, 65/2, 75/2 AP (Te) Service Manual English 5.906-520.0 Rev. 00 (03/12)
-
Page 2: Table Of Contents
Contents Contents............2 Preface . - Page 3 Basic settings and service tasks NT 65/2 AP and NT 75/2 AP ..19 8.1 Overview of the individual parts of the suction head ....10 9.1.1 Appliance hood and filter cleaning system .
-
Page 4: Preface
Preface Technical Features Good service work requires extensive and practice- 4.1 General oriented training as well as well-structured training Wet/dry vacuum cleaner to clean floors and walls – materials. for commercial use at construction sites, industrial Hence we offer regular basic and advanced training sites and workshops. -
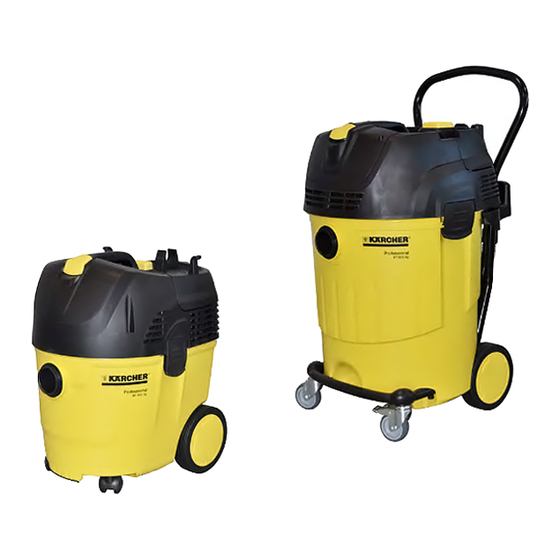
Page 5: Installation Nt 25/1 Ap, Nt 35/1 Ap
Installation NT 25/1 AP, NT 35/1 AP 5.1 Front view 5.2 Rear view 1 Wheel 2 Container 25/35 l 3 Air outlet, working air 1 Steering roller 4 Handle to open the filter cover 2 Container 25/35 l 5 Cable hook 3 Suction air guide 6 AP key 4 Power switch... -
Page 6: Suction Head (View From Below)
5.3 Suction head (view from below) 5.4 Suction head, filter cover opened 1 Baffle plate 1 Air outlet, working air 2 Flat fold filter 2 Flat fold filter 3 Container locking tab 3 Rough dirt filter 4 Washer 4 AP filter cleaning system 5.3.1 Electrode overflow protection 5 Handle to open the filter cover 6 Hinge with stop bolt... -
Page 7: Installation Nt 65/2 Ap, Nt 75/2 Ap
Installation NT 65/2 AP, NT 75/2 AP 6.1 Front view 6.2 Rear view 1 Steering roller 1 Drain hose 2 Frame 2 Drain opening 3 Container 65/75 l 3 Cable hook 4 Suction air guide 4 Air outlet, working air 5 Lock, suction head 5 Push handle 6 Cover, appliance electronics... -
Page 8: Suction Head (View From Below)
6.3 Suction head (view from below) 6.4 Suction head, filter cover opened 1 Flat fold filter 2 Electrode overflow protection 3 Container locking tab 1 Flat fold filter 4 Washer 2 Hinge with stop bolt Note 3 AP filter cleaning system The appliance will switch off immediately if the con- 4 Rough dirt filter tainer is filled with enough fluid so that it touches both... -
Page 9: Function
Function 7.1 Suction system 1 Suction turbine 2 Air input 3 Coarse dirt 4 Fine dust 5 Dirt receptacle 6 Air outlet 7 Flat fold filter 8 AP filter cleaning system The air flows from the air input through the waste con- tainer and flat fold filter via the suction turbine to the exterior. -
Page 10: Basic Settings And Service Tasks Nt 25/1 Ap And Nt 35/1 Ap
Basic settings and service tasks NT 25/1 AP and NT 35/1 AP Danger First pull out the plug from the mains before carrying out any tasks on the machine. 8.1 Overview of the individual parts of the suction head 8.1.1 Cover English 5.906-520.0 Rev. -
Page 11: Ap Filter Cleaning System
8.1.2 AP filter cleaning system English 5.906-520.0 Rev. 00 (03/12) -
Page 12: Turbine Casing And Suction Turbine
8.1.3 Turbine casing and suction turbine English 5.906-520.0 Rev. 00 (03/12) -
Page 13: Overview Of The Components Of The Container And The Chassis
8.1.4 Overview of the components of the container and the chassis English 5.906-520.0 Rev. 00 (03/12) -
Page 14: Replace The Mechanics Of The Ap Filter Cleaner
8.2 Replace the mechanics of the AP filter cleaner Remove the screws from the filter cap. Remove the filter cover. Observe the alignment of the slide cap (arrow) during installation. 8.3 Replace the AP actuation key Pull the pin out of the lever hinge. -
Page 15: Replace Appliance Switch
8.5 Replace appliance switch 8.7 Replace the appliance electronics Caution Risk of damage by electrostatic discharge (ESD)! Pri- or to the installation, take the appropriate measures to discharge electrostatic charge. Pull the appliance switch from its holder. Pull the connecting cable out on the appliance switch. -
Page 16: Replace The Glide Contacts Of The Suction Turbine
8.9 Replacing the mains cable Unscrew the fastening screws of the traction relief. Disconnect the connecting cable of the mains ca- ble on the appliance electronics and on the appli- ance switch. Replace the mains cable. 1 Top seal ring, to the appliance hood 2 Suction turbine 3 Bottom seal ring, to the turbine holder ... -
Page 17: Remove The Outlet (Te Appliances)
8.10 Remove the outlet (Te appliances) 8.11 Maintenance jobs on the container 8.11.1Replace the suction air guidance Turn the suction air guidance in a clockwise direc- tion to unlock it. Remove the suction air guidance toward the front. 8.12 Replacing the steering roller ... - Page 18 Remove the wheel cover. For this, lift the cover us- ing a screwdriver and carefully release it. Remove the safety ring. Pull the wheel off the axle. When installing the axle, observe the spacer be- tween the wheel and the container. English 5.906-520.0 Rev.
-
Page 19: Basic Settings And Service Tasks Nt 65/2 Ap And Nt 75/2 Ap
Basic settings and service tasks NT 65/2 AP and NT 75/2 AP Danger First pull out the plug from the mains before carrying out any tasks on the machine. 9.1 Overview of the individual parts of the suction head 9.1.1 Appliance hood and filter cleaning system English 5.906-520.0 Rev. -
Page 20: Suction Turbine
9.1.2 Suction turbine English 5.906-520.0 Rev. 00 (03/12) -
Page 21: Overview Of The Components Of The Container And The Chassis
9.1.3 Overview of the components of the container and the chassis English 5.906-520.0 Rev. 00 (03/12) - Page 22 9.2 Replace the mechanics of the AP filter cleaner Remove the screws from the filter cap. Remove the filter cover. Observe the alignment of the slide cap (arrow) during installation. 9.3 Replace the AP actuation key Pull the pin out of the lever hinge.
-
Page 23: Replace Appliance Switch
9.5 Replace appliance switch Pull the PCB out of the casing toward the top. Pull the appliance switch from its holder. Replace the circuit board. Pull the connecting cable out on the appliance Connect the new circuit board as per the circuit di- switch. -
Page 24: Replacing The Mains Cable
9.10 Maintenance jobs on the container 9.10.1Replace the suction air guidance Turn the suction air guidance in a clockwise direc- tion to unlock it. Remove the suction air guidance toward the front. 9.11 Replacing the steering roller Replace the suction turbine. -
Page 25: Replace The Push Handle
Remove the wheel cover. For this, lift the cover us- Unscrew the screws of the push bow. ing a screwdriver and carefully release it. Remove the safety ring. Remove the wheel from the axle and replace it. 9.13 Replace the push handle ... -
Page 26: Replace Drain Hose
10 Maintenance and care 9.14 Replace drain hose. Danger First pull out the plug from the mains before carrying out any tasks on the machine. 10.1 Exchanging the flat pleated filter 1 Drain hose 2 Seal 3 Locknut Open filter door. ... -
Page 27: Troubleshooting
11 Troubleshooting Danger First pull out the plug from the mains before carrying out any tasks on the machine. 11.1 Suction turbine does not run Turn on the appliance. Container (in wet vacuuming mode) is full. Empty the container. ... -
Page 28: Technical Documentation
12 Technical Documentation Appliance type Appliance no.: Circuit dia- Operating in- Spare parts gram structions list NT 25/1 AP *EU 1.184-510.0 0.089-359.0 5.963-983.0 5.971-325.0 NT 35/1 AP *EU 1.184-512.0 0.089-359.0 5.963-983.0 5.971-325.0 NT 65/2 AP *EU 1.667-235.0 0.088-514.0 5.964-226.0 5.971-491.0 NT 75/2 AP *EU 1.667-236.0 0.088-514.0... -
Page 29: Nt 65/2 Ap Nt 75/2 Ap
12.1.2NT 65/2 Ap / NT 75/2 AP NT 65/2 Ap NT 75/2 Ap Mains voltage 220-240 220-240 Frequency 50/60 50/60 Max. performance 2760 2760 Rated power 2400 2400 Container capacity Filling quantity (liquid) Air volume (max.) 2x 74 2x 74 Negative pressure (max.) 25,4 (254) 25,4 (254) -
Page 30: Circuit Diagram
12.4 Circuit diagram The status of the attached circuit diagram represents please always use the current circuit diagram in the creation date of the service manual. This circuit DISIS. diagram is not updated. When working on the device, 12.4.1NT 25/1 / NT 35/1 12.4.2NT 65/2 / NT 75/2 English 5.906-520.0 Rev.
Need help?
Do you have a question about the NT 35/1 AP Te and is the answer not in the manual?
Questions and answers