Table of Contents
Advertisement
Quick Links
Advertisement
Table of Contents

Related Manuals for Rose electronics Intuvia


Summary of Contents for Rose electronics Intuvia
- Page 1 OWNER’S MANUAL...
- Page 2 Frame Stem Saddle Handlebar Seat post Front light Saddle clamp Mudguard Pannier rack Fork Rear light Brake disc Mudguard Chain Spoke Mid-drive motor Pedal Tyre Battery pack Translation of original manual...
- Page 3 Congratulations on the purchase of your ROSE dream bike! We are pleased that you have decided to buy a ROSE bike and are sure that your new bike will put a smile on your face every day. Your bike is unique – before it has found its way to your home, this bike was individually assembled by hand by a skilled mechanic and carefully inspected by another specialist to ensure it meets our highest quality standards.
-
Page 4: Table Of Contents
1. General information ........................ 6 Explanation of symbols used ......................6 Target group .............................7 Requirements to operate an e-bike ..................7 Owner’s manuals supplied by component manufacturers ..........7 Tools ..............................7 Installation of add-on parts and accessories.................7 Replacement of parts ........................7 Warranty and guarantee .......................8 Wearing parts ...........................8 1.10 Weight limit ............................8 1.11 Exclusion of liability ........................8... - Page 5 8. Transport, storage and disposal ................... 31 Transport by car ..........................31 Transport on a hitch or roof rack ....................31 Battery storage ..........................31 Bike storage ............................31 Bike shipping ............................32 Battery shipping ..........................32 Disposal..............................32 9. Maintenance ..........................33 Bike servicing ...........................33 Replacement of parts ........................34 Tyre pressure ...........................35...
-
Page 6: General Information
General information This manual is the most important element to prevent any damages and risks during the assembly, use and servicing of your new bike. It is provided to give you the most important technical information on your bike, to support you during bike assembly and to give you helpful tips over the entire life of your bicycle. -
Page 7: Target Group
Target group This manual is intended for you, the owner of the ROSE bike. Assembly and maintenance works require basic knowledge in bicycle technology. If in doubt consult a qualified bicycle mechanic. Improper assembly or maintenance of your bike may result in serious injury or death! Requirements to operate an e-bike The rider should be able to ride a bike, this means that he/she must have basic cycling skills and sufficient balance to safely ride and steer a pedelec. -
Page 8: Warranty And Guarantee
Warranty and guarantee For all information on warranty and guarantee see rosebikes.com/content/help/terms-and-conditions. Tuning the e-bike will invalidate the warranty. Wearing parts As a technical product, a bicycle consists of many components which are all subject to wear given the nature of their function. -
Page 9: Safety
Safety General safety DANGER Always wear a helmet. Adapt your style of riding to your skills. Respect your limits and only ride cautiously in new situations. DANGER Risk of accident due to using on-board computer while riding! Reading from the computer display or changing settings while riding may distract from the traffic situation. This may result in accidents caused by delayed or hindered rider responses! •... -
Page 10: Safe Use Of The Brakes
Safe use of the brakes DANGER Risk of accident due to reduced braking performance caused by brake pads that are not broken in! Disc brakes can only achieve full braking power when the brake pads are broken in. Choose a place off public roads to break in the pads. -
Page 11: Safe Use Of A Pannier Rack
DANGER Risk of injury due to escaping liquid or vapour! • Damages or improper use may cause liquid to escape from the battery. This may cause skin irritation, eye irritation or burns! • Avoid contact with skin and eyes. • In case of contact with skin, wash off with water. •... -
Page 12: Intended Use
Intended use The intended use of ROSE bikes is divided into five different categories – ranging from the use on paved roads through to downhill or freeride use. The bikes must only be used in accordance with their intended purpose/use. Otherwise, the user takes responsibility. -
Page 13: Bike Assembly
Bike assembly This chapter aims at helping you remove your bike from the ROSE bike box and re-assemble it. Depending on the bike model, different components may have been removed or repositioned for shipping. In addition, you need to fit the pedals and check if your bike is in a roadworthy condition. DANGER Risk of accident due to improperly installed components! Improperly installed components may loosen during the ride! -
Page 14: Straightening The Handlebar And Adjusting The Steering Play
Straightening the handlebar and adjusting the steering play CAUTION The adjusting bolt for the steering play (1) does not serve to tighten the stem, but only to adjust the play in the steering bearing! 1. Loosen the stem clamp bolt(s) (2) with a hex wrench. Do not loosen the adjusting bolt for the steering play (1). -
Page 15: Straightening The Handlebar And Adjusting The Steering Play [Speedlifter]
Straightening the handlebar and adjusting the steering play [Speedlifter] *Speedlifter Twist only Speedlifter 1. Loosen the stem clamp bolt(s) (2) with a hex wrench. 2. Turn the handlebar through 90 degrees and align it with the front wheel. 3. Tighten the stem clamp bolt(s) (2) alternately to a torque of 8 Nm. 4. -
Page 16: Adjusting The Angle Of The Handlebar
Adjusting the angle of the handlebar 1. Loosen the handlebar clamp bolts by turning them anti-clockwise until the angle of your handlebar can be adjusted. 2. Check whether there is a protective film between handlebar and stem. If there is a protective film: 2.1 Completely loosen the handlebar clamp bolts and remove the handlebar clamp(s). -
Page 17: Adjusting The Saddle Height
Adjusting the saddle height DANGER Risk of accident and damage due to the extension of the seat post beyond the minimum insertion mark! If the seat post is not inserted to the minimum insertion mark, it may break or damage the frame while riding. •... -
Page 18: Installing The Pedals
Installing the pedals One of the pedals has a right- and the other a left-hand thread. Most pedals have the letter “L” and “R” stamped on the end of the thread. Some pedals come with a groove in the flange of the left pedal. For more information see the manufacturer‘s manual. -
Page 19: Before Your First Ride
Before your first ride 4.1 Checking the battery before first use Check the battery pack before charging or using your e-bike for the first time. Press the on/off switch to switch on the battery. → If no charge indicator LED lights up , the battery pack might be faulty. -
Page 20: Riding Your E-Bike
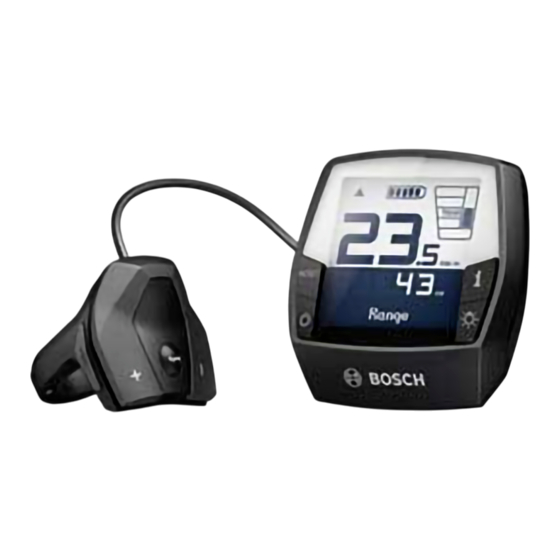
Riding your e-bike Information on the e-bike system 5.1.1 On-board computer Display elements a Drive unit assistance indicator b Assistance level indicator TURBO SPORT TOUR c Light indicator d Text indication KM/H PMWH KM/H e Value indication Reichweite f Speed indication g Shift recommendation: higher gear h Shift recommendation: lower gear i Battery charge indicator... - Page 21 5.1.3 Battery pack 1 Charger 2 Key of battery lock 3 Battery lock 4 Upper holder 5 Battery pack 6 Lower holder 7 Charging socket 8 Cover of charging socket 9 On/off switch 10 Operating status and battery charge indicator 5.1.4 Drive unit 1 Drive unit 1 Speed sensor...
-
Page 22: Riding
Riding 5.2.1 Inserting the battery pack 1. Switch off the battery pack and the e-bike system by pressing the button on the on-board computer. 2. Make sure the contacts on the lower holder (3) are free from dirt. 7 ° 3. - Page 23 5.2.4 Setting the assistance level You can set the level of assistance by using the buttons “ ” or “ “ on the control unit. You may change the assistance level at any time, even while riding. You can choose between the following assistance levels: •...
- Page 24 5.2.7 Switching the walk assist function on/off The walk assistance may help you push your e-bike. The assistance provided depends on the selected gear and may reach up to 6 km/h. The lower the selected gear, the lower the speed in the push assistance mode (at full power). Only use the walk assist function while pushing the e-bike.
- Page 25 5.2.10 Interrupting your ride If no power output from the e-bike drive unit is requested (e. g. because the e-bike is parked) and no button on the on-board computer or control unit is pressed for approx. 10 minutes, the e-bike system and the battery pack will automatically switch off to save energy.
-
Page 26: Charging The Battery
Charging the battery DANGER Risk of injury due to improper charging of the battery! Improper charging may cause the battery or other inflammable materials nearby to catch fire. • Only use the original charger. • Do not locate the charger or battery near inflammable materials while charging. •... -
Page 27: Cycling With Kids
Cycling with kids Carrying kids with a bike seat There are some basic things you should pay attention to when carrying a child with a bike seat: • Children over seven years of age are not permitted to sit in a child seat. •... -
Page 28: Before And After Your Ride
Before and after your ride Before your ride To make sure your bike is safe to ride, you should carry out certain tasks before your ride. This is for your own safety in particular, yet also for your riding pleasure. Nothing is more annoying than having a defect on a bike tour. If there are any defects or flaws, your bike must be inspected by a qualified bicycle mechanic and repaired. - Page 29 Verify the tight fit of the stem: Stand in front of the bike with the front wheel between your knees. Try to turn handlebar left and right. → It should not be possible to turn the handlebar with normal force. Check the headset for play: Stand next to your bike with both hands on the handlebar.
-
Page 30: After Your Ride
After your ride DANGER Brake failure or reduced braking power due to dirty brake pads or rim flanges! Brake pads and rim flanges must be free from lubricating substances such as grease, oil (also skin oil), wax, silicon etc.! Brake pads or rim flanges contaminated in this way must not be used! 7.2.1 Cleaning your bike After your ride you should clean your bike thoroughly using a soft cloth and clear water. -
Page 31: Transport, Storage And Disposal
Transport, storage and disposal Transport by car The best and safest way to transport your bike is by car. Here, your bike is perfectly protected from the elements and from theft. Yet there are some things you should bear in mind: •... -
Page 32: Bike Shipping
Bike shipping The e-bike can be pushed into the bike box for shipping. 1. Turn the handlebar down. 2. Turn the handlebar through 90 degrees. 3. Secure or cover all loose or moving parts properly. Sharp or pointed components must be wrapped additionally to make sure they won’t damage other parts of your bike and won’t tear through the outer packaging. -
Page 33: Maintenance
Maintenance Regular care and maintenance will prolong the life of your new bicycle. You should carry out easy cleaning, servicing and repair tasks yourself (see “”7. Before and after your ride“ on page 28). The required services must be performed by a qualified bicycle mechanic. -
Page 34: Replacement Of Parts
Replacement of parts Not all components of your e-bike might be changed or replaced without approval. The two German associations “Zweirad Industrie Verband” (ZIV) and “Verbund Service und Fahrrad“ (VSF) have agreed on a uniform guideline. This guideline defines the conditions under which e-bike components can be replaced. The document divides the e-bike components in four categories: Category 1: Components which can only be replaced after approval by the electronic drive system provider or ROSE Bikes •... -
Page 35: Tyre Pressure
Tyre pressure The maximum tyre pressure depends on the tyre width and the inner rim width. The following table might be of help when adjusting the tyre pressure. Do not exceed the maximum tyre pressure! On bicycles with originally fitted tyres, the maximum tyre pressure can be determined from the tyre width. You can find the tyre width on the sidewall of the tyre. - Page 36 ROSE Bikes GmbH Schersweide 4 46395 Bocholt Germany...
Need help?
Do you have a question about the Intuvia and is the answer not in the manual?
Questions and answers