Advertisement
Quick Links
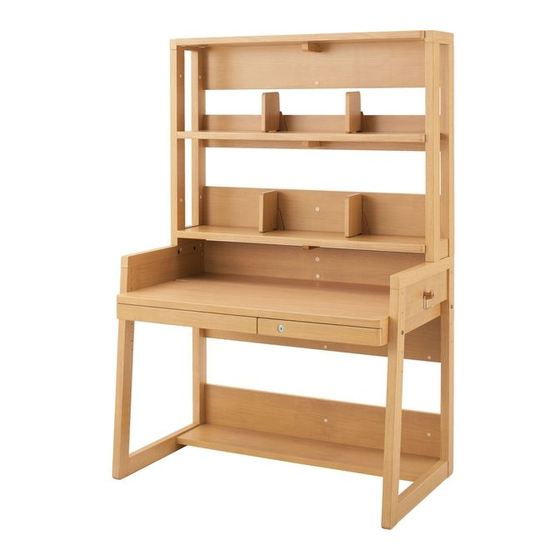
Desk
Assembly Instruction Manual
Special Edition
Thank you very much for purchasing the
OKAMURA Study DESK. Before using this
product, carefully read this Assembly
Instruction Manual in order to fully under-
stand and correctly assemble the product.
■ Parallel placement example of
desk and bookshelf
Assembly Final Drawing
A cross slot
screwdriver is required for
assembly. Please have one available.
* Do not use an electric screwdriver
because it may damage the
product.
Movable shelf plate
Fixed shelf plate
Movable shelf plate
Notch for mounting
illumination
Desktop
Drawer
Lower shelf plate
(Name of each part)
Two
persons should
assemble this
product.
Movable divider
Swing hook
Advertisement

Related Manuals for Okamura 865JAD


Summary of Contents for Okamura 865JAD
- Page 1 Fixed shelf plate Special Edition Thank you very much for purchasing the Movable shelf plate OKAMURA Study DESK. Before using this product, carefully read this Assembly Instruction Manual in order to fully under- stand and correctly assemble the product. Notch for mounting...
- Page 2 To Use Safely This indicates that improper handling due to disregard of this warning may result in injury or CAUTION CAUTION damage to property. CAUTION Cautions for assembly Fully read the instruction manual before assembly, securely tighten the bolts After assembling, fully tighten the product on a flat with a screwdriver, and use all of the assembly parts without leaving any surface, and make sure that each part is securely bl y...
- Page 3 Desktop Height, Chair Height/Depth <JIS standard No. and body height reference> No. 6 OKAMURA Study DESK series complies with JIS Standard No. 2 (body height 120cm) through No. 6 (body height 180cm). The desktop height is five-stage adjustable. No. 5 The following diagram shows bolt installation positions at the time of assembly according to No.
-
Page 4: Details Of Parts
Desk Details of Parts (make sure to check before assembly) Connecting bolt Actual size Ring Single-end Desktop × × × × (M6 × 45mm) connection bolt receiving dowel (24mm) Cap for insert nut Plug cap Swing hook Connecting bolt Actual size ×... - Page 5 Desk Installation of rear panel (lower) and lower shelf plate Seal of “This face is lower” Install the lower shelf plate to the rear panel (lower) and securely tighten the screw-type connector. * Assemble the face to which a seal of the lower shelf plate is attached to the lower side.
- Page 6 Desk Fixation of desktop, installation of hook Desk 5 Fixation of desktop, installation of hook After temporarily placing the desktop on the desktop receiving dowels, insert the rings of into the holes on outside of the side panel, and tighten with the connecting bolts of Swing Install the swing hooks of...
- Page 7 Bookshelf Details of Parts (make sure to check before assembly) Single-end Cap for insert Plug cap Connecting bolt Actual size × connection bolt × × × (8mm) (M6 × 45mm) (24mm) Single-end connection Shelf receiving Plug cap bolt × fitting pin ×...
- Page 8 Installation of rear Installation of side panel Bookshelf Bookshelf panel (middle) and and rear panel Right side panel fixed shelf plate Install the parts of and the rear panels (upper and lower) to the left side panel, Install the rear panel (middle) to the fixed shelf plate with the and then install the right side connecting bolt of , and securely tighten.
- Page 9 Bookshelf Tightening of fitting, installation of movable divider When tightening * When tightening from above Securely tighten the fitting on the movable shelf plate with a the bolt from screwdriver from above. Tighten above the shelf ■ How to install and remove plate, turn movable divider counterclock-...
-
Page 10: Tightening Of Bolts
Desk + bookshelf Installation of movable shelf plate Installing position of the For installation of the movable shelf plate, shelf plate is two-location after installing the shelf receiving fitting pin selectable. , install the movable shelf plate, and tighten with the connecting bolts of from the rear of the rear panel. - Page 11 Desk + bookshelf Installation of movable divider The movable divider can be installed to the desired notch part shown in the diagram. Insert the plate from the notch parts on the right and left sides of the bookshelf and desk, and slide laterally to install. Completion Two-stage wagon drawer unit and lighting Desktop (install later)
- Page 12 Okamura Corporation International Sales and Marketing Division Address: 2-14-27 Akasaka, Minato-ku, Tokyo 107-0052 Japan Phone : +81-3-5561-4085 : +81-3-5561-4086 Website: http://www.okamura.co.jp/...
Need help?
Do you have a question about the 865JAD and is the answer not in the manual?
Questions and answers