Table of Contents
Advertisement
Quick Links
Advertisement
Table of Contents

Related Manuals for Dahua MJHJ4P


Summary of Contents for Dahua MJHJ4P
- Page 1 MJHJ4P Mobile 4-Port PoE Network Switch Quick Start Guide...
- Page 2 Important Safeguards and Warnings Please read the following safeguards and warnings carefully before using the product in order to avoid damages and losses. Note Do not expose the device to lampblack, steam or dust. Otherwise it may cause fire or electric shock.
-
Page 3: Table Of Contents
Table of Contents Product Overview ......................- 1 - 1.1 Specifications and parameters ....................- 1 - 1.2 Front Panel ..........................- 2 - 1.3 Rear Panel ..........................- 2 - 1.4 Aviation Port .......................... - 3 - 1.5 Installation and Connection ....................- 4 - Quick Configuration .................... -
Page 4: Product Overview
1 Product Overview 1.1 Specifications and parameters Product name: 4-port PoE Network Switch Product dimension: 159*100*30mm (Length*Width*Height) Application environment: Mobile HD surveillance transmission and power supply Working environment: Temperature: -30℃~65℃, humidity: 0~95% (no condensation) Power supply: Aviation port power supply >60W Port description: Aviation port power supply, five 10/100 Mbps self-adaption RJ 45 ports, 4 channels with PoE power supply network port while 1 channel main network port supports port auto reverse (Auto MDI/MDIX) -
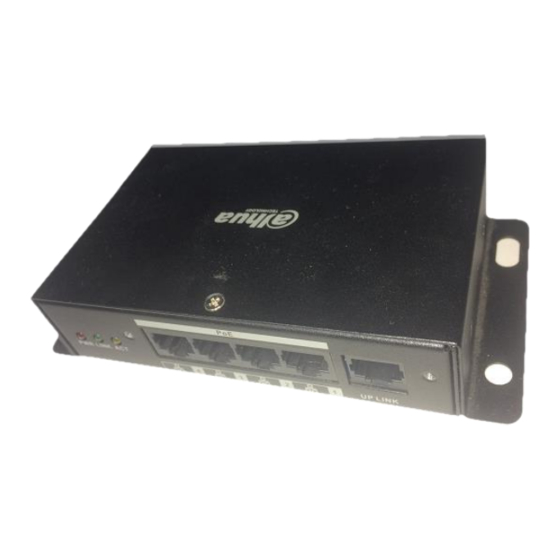
Page 5: Front Panel
1.2 Front Panel The front panel is shown in Figure 1-1. Figure 1-1 Mark Name Note Power indicator light Normally on when power is enabled LINK Network indicator light Normally on when network port connects to LINK Network indicator light ACT flashes when data transmitting LAN 4 IPC port... -
Page 6: Aviation Port
1.4 Aviation Port See Figure 1-3 for more details about the aviation port. Figure 1-3 DC 12V pin definition Terminal Number Definition DC12V+ NULL NULL - 3 -... -
Page 7: Installation And Connection
1.5 Installation and Connection See Figure 1-4 for more details about the installation and connection. Figure1-4 Note: Network cable, camera and other accessories are not included in the accessories bag, users have to prepare by themselves. The network cable cover should be installed when accessing network cable, which is to prevent the network cable from being loose during vibration. -
Page 8: Quick Configuration
2 Quick Configuration Software Setting IPC needs to configure IP address which should be the same as the IP address of NVR during use. 2.1.1 Network Setting Step 1 Enter “Main Menu”> “System Setting”> “Network Setting”interface, as shown in Figure 2-1. - Page 9 Step 1 Enter “Main Menu”> “Remote Device”or “Main Menu”> “IPC”configuration interface, as shown in Figure 2-2: Figure 2-2 Step 2 Click ''Device Search'' and corresponding IPC can be searched. Attention: It will fail to search corresponding IPC if the IP address of IPC and the IP address of NVR are not in the same network segment.
- Page 10 Figure 2-3 Step 4 Click ''Confirm'' after configuring corresponding IP address, the IP address of IPC is successfully saved. Attention: NVR products from some manufacturers may not support modifying device IP ”in front of “Onvif” displays gray. It needs to login the WEB interface of IPC to online if the “...
-
Page 11: Web Setting
WEB Setting Users can configure the IP address of IPC and the IP address of NVR via WEB. 2.2.1 Network Setting Select ''System Setting > Network Setting'', the system enter ''Network Setting'' interface, and users can set IP address of NVR on this interface. 2.2.2 IPC Configuration Select ''System Setting >...
Need help?
Do you have a question about the MJHJ4P and is the answer not in the manual?
Questions and answers