Rational CombiMaster Plus CMP 61 Original Operating Instructions

Rational CombiMaster Plus CMP 61 Original Operating Instructions

Advertisement

CombiMaster
Plus / CombiMaster
®
®
Original operating instructions

Advertisement

Table of Contents
loading
Need help?

Need help?

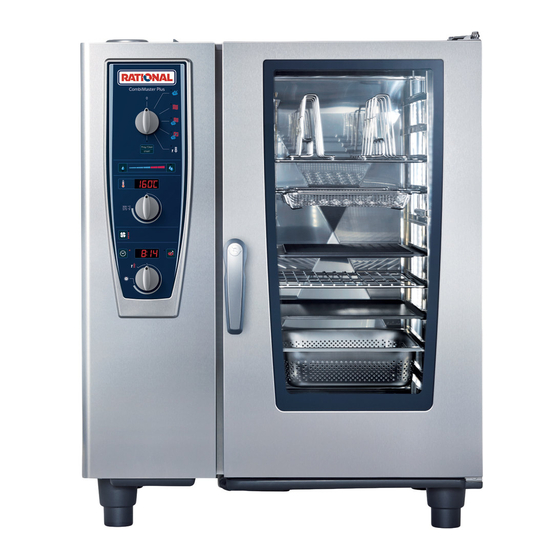
Do you have a question about the CombiMaster Plus CMP 61 and is the answer not in the manual?

Questions and answers

Kerry Whitehead
April 20, 2025

We don’t have a basket inside our oven for the tablets. What do we do?

User image 68053a5fdb7d6
1 comments:
Mr. Anderson
May 10, 2025

If there is no basket inside the Rational CombiMaster Plus CMP 61 oven for the tablets, remove the tablets before starting operation to avoid a fire risk.

This answer is automatically generated

Subscribe to Our Youtube Channel

Summary of Contents for Rational CombiMaster Plus CMP 61

  • Page 1 CombiMaster Plus / CombiMaster ® ® Original operating instructions...
  • Page 2 FREE OF CHARGE! - RATIONAL ConnectedCooking Connect your RATIONAL appliances easily with the latest network solution for professional kitchens. With ConnectedCooking you always have everything under control: Simple appliance...
  • Page 3 RATIONAL SERVICE PARTNERS Our appliances are reliable and have a long service life. However if you should encounter technical difficulties, the RATIONAL SERVICE PARTNERS can provide swift and efficient help. Guaranteed spare parts supply and a weekend call-out team included: Tel. +49 (0) 81 91/327 666.
  • Page 4 We give a 24 month warranty calculated from the date of initial installation, providing you have filled in the warranty registration for your appliance completely and correctly. You can do this conveniently online at www.rational-online.com/warranty or using the enclosed postcard. The warranty excludes glass damage, light bulbs and seals as well as damage caused by improper installation, use, maintenance, repair or descaling.
  • Page 5 Contents Explanation of the pictograms Initial start-up Safety Instructions Liability Care, inspection, maintenance and repair Function parts Notes on using your appliance Working with the core temperature probe Working with the hand shower Operating controls General notes ClimaPlus ® Overview of modes Steam mode Dry heat mode Combination mode...
  • Page 6 Contents Settings Celsius/Fahrenheit Settings Time/Date Cleaning CombiMaster ® Plus Start clean Cleaning programmes CleanJet ® abort Cleaning CombiMaster ® Steam generator descaling display LAN cable connection Network settings Building services - steam generator descaling Building services - steam generator drainage Domestic technology Servicing the air filter Replacing the door gasket...
  • Page 7: Explanation Of The Pictograms

    Explanation of the pictograms Danger! Warning! Caution! Imminently hazardous Potentially hazardous Potentially hazardous situation, which, if not situation, which, if not situation, which, if not avoided, will result in severe avoided, may result in avoided, may result in slight injuries or death. serious injury or death.
  • Page 8: Initial Start-Up

    Initial start-up Please read the manual carefully prior to initial start-up. During initial start-up of your new appliance, you will be requested to start an automatic one- off self-test. This self-test takes about 45 minutes and is used to adapt the appliance to the specific environmental conditions.
  • Page 9 Initial start-up step info/button instructions Open the cooking chamber door and remove the packaging material, starter kit, grids and containers. Insert an empty GN sheet with the opening facing downwards into the rack in front of every fan wheel. Please read the installation instructions for more details.
  • Page 10: Safety Instructions

    Safety Instructions Keep this manual in a safe place so that it can always be consulted by anyone using the appliance. This appliance may not be used by children or people with limited physical, sensor or mental capacity or those without the necessary experience and/or knowledge, unless such people are supervised by a person who is responsible for their safety.
  • Page 11 IEC 60417-6332 certification allows the setting up of the electric version of the combi- steamer in humid and warm environments.   Warning! Smoking food in the appliance Smoking food in the appliance may only be done using the original RATIONAL smoking accessory, VarioSmoker.   Warning! No objects on the appliance ceiling.
  • Page 12 Safety Instructions Warning! Gas appliances only - If your appliance is installed under an extractor hood, this must be switched on when the appliance is in use - combustion gases! - If your appliance is connected to a chimney, the flue duct must be cleaned in compliance with specific regional regulations - risk of fire! (Contact your installer).
  • Page 13: Liability

    Safety instructions and liability Warning! Safety instructions during use - When filling containers with liquids or if containers fill up with liquid food products during cooking, only use the rack levels where the user can easily look into the inserted container - risk of burns! Information sticker is enclosed with the unit.
  • Page 14 Safety instructions and liability Liability Installations and repairs that are not carried out by authorised specialists or using original spare parts, and any technical modification that is not approved by the manufacturer will void the manufacturer’s warranty and product liability. 14 / 107...
  • Page 15: Care, Inspection, Maintenance And Repair

    Care, inspection, maintenance and repair In order to retain the high quality of the stainless steel, for hygienic reasons and to avoid interferences to operation, the appliance must be cleaned daily or when prompted to clean. Follow the instructions in the "Cleaning" section. Constant operation at high cooking cabinet temperatures (≥...
  • Page 16 Care, inspection, maintenance and repair Warning! Inlet filter maintenance The device automatically detects if the air filter is dirty. You will receive a service message and prompt to clean or replace the air filter when it is dirty. The appliance may only be operated without an air filter.
  • Page 17 Care, inspection, maintenance and repair Inspection, maintenance and repair Danger - high voltage - Inspection, maintenance and repair work must only be carried out by trained technicians. - The appliance must be disconnected from the mains for cleaning (apart from CleanJet ®...
  • Page 18: Function Parts

    Function parts Appliance number (only visible when the door is open) Flow guard (optional) (for gas appliances only) Cooking cabinet lighting Appliance door with triple glazing Appliance door with double glazing Door handle Tabletop units: One-handed operation with sure-shut function Standalone appliances: One-handed...
  • Page 19: Notes On Using Your Appliance

    Notes on using your appliance - Avoid having heat sources (e.g. grill plates, deep-fat fryers etc.) near the appliance. - Only use the appliance in areas with a room temperature of > 5 °C. For ambient temperatures of less than + 5 °C, you must heat the cooking cabinet to room temperature (>...
  • Page 20 Notes on using your appliance If the maximum load sizes are exceeded, this can damage the appliance. Please also note the maximum load sizes for food in the "Manual Cookbook". Table-top appliance 6 x 2/3 GN with hinging rack - To remove the right hinging rack, hold the top of the hinging rack and press it upwards.
  • Page 21 Notes on using your appliance Working with mobile oven racks, mobile plate racks and transport trolleys for table-top units (option) - Remove the hinging rack as described above. - Place the run-in rail on the fixing provided on the appliance's base. Make sure it is fixed accurately in place (4 pins).
  • Page 22: Working With The Core Temperature Probe

    Notes on using your unit Working with the core temperature probe Caution! The core temperature probe can be hot – Risk of burns. Always insert the core temperature probe into the thickest point on the product. Make sure that a large part of the probe needle is in the product. Insert the core temperature probe at an angle into the product.
  • Page 23 Notes on using your unit Into the breast meat At the thickest point on the product - Always correctly position the core temperature probe in the park position provided – Risk of damage.! - Do not let the core temperature probe hang out of cooking cabinet – risk of damage. - Remove the core temperature probe from the food before you take the food from the cooking cabinet –...
  • Page 24: Working With The Hand Shower

    Notes on using your unit Working with the hand shower - If you use the hand shower, please pull the hose at least 20 cm out of the park position. - You can select 2 jet strengths by pressing the control button. - Always let the hand shower slide slowly back into the park position.
  • Page 25: Operating Controls

    Operating controls Operating mode switches Steam (30 °C to 130 °C) Convection (30 °C to 300 °C) Combination of steam and convection (30 °C to 300 °C) Finishing (30 °C to 300 °C) Cool down Programming / Start programme and clean Sets humidity / displays number of cleaner and rinse aid tabs...
  • Page 26 Operating controls Air speed Set the cooking time (0 to 23 h 59 min) Set the core temperature (0 °C to 99 °C) Displays cooking time/core temperature/cleaning time Selector switch for cooking time/ core temperature 26 / 107...
  • Page 27: General Notes

    General notes Operation: Choose the required Choose the required Choose the required cooking mode. cooking cabinet cooking time/core temperature. temperature. The cooking time can be set in minutes for times between 0 and 2 hours, in 5-minute intervals for times between 2 and 3 hours, in 15-minute intervals for times between 3 and 6 hours and in 30-minute...
  • Page 28 General notes Notes: A buzzer signals the end of cooking. The cooking mode display Button lights up when the flashes when the cooking heating is active. cabinet is too hot (see the “Cool Down” section on cooling the cooking cabinet). Fault messages:  ...
  • Page 29: Climaplus

    ClimaPlus ® ClimaPlus® measures and regulates the humidity in the cooking cabinet. You can set the exact product-specific climate for each food in the climate window. Steam: Dry heat: Steam + dry heat: The factory setting for You can set the mixture ClimaPlus allows you to ®...
  • Page 30 ClimaPlus ® Press the cooking time or core temperature button to display the current humidity in the cooking cabinet. For continuous operation that is as resource friendly as possible, we recommend using standard cooking cabinet humidity e.g. 100% for dry heat. 30 / 107...
  • Page 31: Overview Of Modes

    Overview of modes Steam mode (30 °C to 130 °C) The high performance fresh steam generator with new steam control always produces hygienic fresh steam. You can cook without adding water and without waiting for the water to boil. Constant cooking cabinet temperatures and maximum possible steam saturation guarantee a uniform and highly gentle cooking process.
  • Page 32 Overview of modes "Cool down" With the Cool Down function, you can quickly and gently cool a hot cooking cabinet, e.g. for low temperature cooking or manual cleaning. Programming/Programme Start/ Cleaning" Using the programming function, create and save manual programmes. For recurring cooking processes, there are 100 programme slots with up to 6 cooking steps available.
  • Page 33: Steam Mode

    Steam mode In the “steam” cooking mode, the steam generator generates hygienic fresh steam. You can set the cooking cabinet temperature from 30 °C to 130 ℃ . Cooking methods: Steaming, stewing, blanching, simmering, soaking, vacuum cooking, thawing, preserving step info/button instructions Choose the “steam”...
  • Page 34 Steam mode - After preheating and loading, an acoustic signal and the 00:00 setting in the display will remind you that you still have to set the required cooking time or core temperature. - If no further action takes place after the preheat temperature is reached, heating mode is switched off after 10 minutes.
  • Page 35 Steam mode Sample dishes   Mise en place Tomatoes concassé, garnishes (vegetables, fruit), mushrooms, blanching juliennes and brunoises, blanching vegetables for stuffings, roulades etc., peeling onions and chestnuts, soaking pulses, blanching bacon and ham, poaching fish dishes, soups, sauces, stocks, fumets etc.
  • Page 36 Steam mode To get the most out of your appliance, check daily the types of food which can be cooked together using “steam” . Remember that fish, meat, vegetables, side dishes and fruit can be cooked together (as long as they are all being prepared by the same method).
  • Page 37: Dry Heat Mode

    Dry heat mode In “dry heat” cooking mode, powerful heating elements heat up the dry air. You can set the cooking cabinet temperature from 30 °C to 300 °C . You can limit the cooking cabinet humidity if necessary. Cooking methods: Baking, roasting, grilling, deep-frying, gratinating, glazing. step info/button instructions...
  • Page 38 Dry heat mode - After preheating and loading, an acoustic signal and the 00:00 setting in the display will remind you that you still have to set the required cooking time or core temperature. - If no further action takes place after the preheat temperature is reached, heating mode is switched off after 10 minutes.
  • Page 39 Dry heat mode Sample dishes   Mise en place Sweating bacon, roasting bones, allowing dough (yeast) to rise.   Starters Meatballs, vegetarian bakes, vegetables au gratin, vegetable pasties, pies, sirloin, chicken wings, finger food, duck breasts, quiches, shortcrust pastry, tartlets.  ...
  • Page 40 Dry heat mode Cooking times Cooking times will depend on product quality, weight and height. Do not overload grids or containers so that air can circulate evenly.   General notes on pan-frying - Preheat to as high a temperature as possible (300 °C) to build up sufficient stored heat. - load as quickly as possible, in order to minimise cabinet temperature drop.
  • Page 41: Combination Mode

    Combination mode The two operating modes “steam” and “dry heat” are combined. This combination creates a hot humid cabinet climate for especially intensive cooking. You can set the cooking cabinet temperature from 30 °C to 300 °C . You can set the cooking cabinet climate if necessary. Cooking methods: Roasting, baking, finishing.
  • Page 42 Combination mode - After preheating and loading, an acoustic signal and the 00:00 setting in the display will remind you that you still have to set the required cooking time or core temperature. - If no further action takes place after the preheat temperature is reached, heating mode is switched off after 10 minutes.
  • Page 43 Combination mode Sample dishes   Mise en place Roasting bones.   Starters Quiche Lorraine, vegetable soufflés, flans, moussaka, lasagne, canneloni, paella, pasta bakes.   Main courses Roasts (beef, veal, pork, lamb, poultry, game), roulades, stuffed vegetables (peppers, aubergines, cabbage, onions, kohlrabi), vegetable gratins (cauliflower), turkey legs, stuffed breast of veal, ham with noodles, leg of pork, belly of pork, various omelettes.
  • Page 44 Combination mode Do not place joints too close together to allow even cooking. Joints with rinds or larger joints should be steamed for approximately 1/3 of the cooking time. Collect condensate in a container (additional rail) and make the gravy by adding it to the lightly roasted bones.
  • Page 45: Finishing ® Cooking Mode

    Finishing ® cooking mode The two operating modes steam and dry heat are combined. This produces the ideal cooking climate, both preventing the food drying out and the formation of unwanted puddles. You can set the cooking cabinet temperature from 30 °C to 300 ℃ . step info/button instructions...
  • Page 46: Cooking Mode

    Finishing ® cooking mode - After preheating and loading, an acoustic signal and the 00:00 setting in the display will remind you that you still have to set the required cooking time or core temperature. - If no further action takes place after the preheat temperature is reached, heating mode is switched off after 10 minutes.
  • Page 47 Finishing ® cooking mode Sample dishes   Starters All types of spaghetti, canneloni, lasagne, vegetable dishes, cheese and herb noodles, quiche Lorraine, spring rolls, vegetarian cutlets, onion flans.   Main courses All types of roast, meat loaves, bakes, ready-to-serve meals, roulades, stuffed vegetables.  ...
  • Page 48 Finishing ® cooking mode Finishing utensils   Porcelain plates, earthenware, glass, silverware, copper pans, stainless steel, aluminium dishes (brought in).   Banqueting service/tour groups Reheat plates in the mobile plate rack. – Large quantities in next to no time. – Fast loading and unloading. –...
  • Page 49: Cool Down

    Cool down You have been operating your appliance at high cooking cabinet temperatures at first and then want to continue working at low cabinet temperature. You can cool the cooking cabinet down quickly but gently using “cool down”. Warning! - Do not use the “cool down” function unless the air baffle has been locked correctly – risk of injury.
  • Page 50: Program Mode

    Program mode You use the programming function to create and save programs manually. There are 2x50 program slots available with up to 6 cooking steps each for repeat cooking processes. So that you can guarantee constant quality – even when you have assistants doing the cooking. Create program step info/button...
  • Page 51 Program mode step info/button instructions Press the button to set the cooking time. Set the required cooking time Press the button. Select a further cooking mode e.g. “dry heat”, and this is confirmed by “S2” appearing on the display. Set the required cooking time Select the required cooking cabinet humidity or work with the default setting.
  • Page 52 Program mode step info/button instructions Choose the required core temperature. Press the button. Use the selection button to set “Prog/Clean | Start” to save the program. - Activate the “Prog/Clean | Start” button for programming again if it has gone out. - If you would like to keep the same cooking mode in the next program step, choose another cooking mode briefly in order to be able to start the next program step.
  • Page 53: Check Program

    Program mode Check program step info/button instructions Use the selection button to set “Prog/Clean | Start”. Choose the required program. Start the program by pressing “Prog/Clean | Start”. 53 / 107...
  • Page 54 Program mode - If the display flashes, it means the program slot is vacant. - The remaining cooking time is shown during operation in the “cooking time/core temperature” display. If the program includes a step with core temperature, the remaining time is only shown when this step has been finished.
  • Page 55: Check Program

    Program mode Check program step info/button instructions Use the selection button to set “prog/start”. Choose the required program. Press “prog/start” to show the first program step. Press the button again to request the next step. The cooking cabinet door should be open. - If the display flashes, it means the program slot is vacant.
  • Page 56: Delete Program

    Program mode Delete program step info/button instructions Use the selection button to set “prog/start”. Select a program, e.g. P4. Keep the “prog/start” button pressed for 5 seconds. A flashing program slot confirms deletion. Individual program steps can neither be deleted nor changed. 56 / 107...
  • Page 57: Download Programme

    Download Programme Use the download function to save your own programs to a USB stick. The USB stick should be connected when the unit is switched off. step info/button instructions Switch the unit off and insert the USB stick in the slot underneath the control panel.
  • Page 58 Download Programme step info/button instructions When the process has been completed, “end” appears on the display. Remove the USB stick. 58 / 107...
  • Page 59: Upload Programme

    Upload Programme - Connection of energy optimisation system. Copy your individual cooking porgrams to the unit with the upload function. The USB stick should be connected when the unit is switched off. step info/button instructions Switch the unit off and insert the USB stick in the slot underneath the control panel.
  • Page 60 Upload Programme step info/button instructions When the process has been completed, “end” appears on the display. Remove the USB stick. When the upload function is used, all program slots on the unit are overwritten. Back up existing programs on a USB stick before you transfer programs from another unit. 60 / 107...
  • Page 61: Haccp

    HACCP The data is stored for a period of 10 days and can be output via the USB interface on the unit as required.. To save HACCP data permanently on a USB stick, please follow the instructions. The USB stick should be connected when the unit is switched off. step info/button instructions...
  • Page 62 HACCP step info/button instructions When the process has been completed, “end” appears on the display. Remove the USB stick. The following data is logged: - Batch no. - Time - Cooking program name - Cooking cabinet temperature - Core temperatura - -Door open /door closed - Change of cooking mode - Connection of energy optimisation system.
  • Page 63: Software Update

    Software update The unit software can be updated with a USB-Stick. The USB stick should be connected when the unit is switched off. step info/button instructions Switch the unit off and insert the USB stick in the slot underneath the control panel. Keep the “ClimaPlus”®...
  • Page 64: Settings Celsius/Fahrenheit

    Settings Celsius/Fahrenheit The temperatures of your unit can be shown in Celsius or Fahrenheit. To change the display, proceed as follows. step info/button instructions "Prog/Start" press Turn the selection button clockwise. Appears on the display. Press the button. The temperatures of your unit can be shown in Celsius or Fahrenheit.
  • Page 65 Settings Celsius/Fahrenheit step info/button instructions Press the button to save the setting. 65 / 107...
  • Page 66: Settings Time/Date

    Settings Time/Date You can set the time and date on your unit for correct evaluation of HACCP data. Carry out the settings as follows. step info/button instructions "Prog/Start" anwählen Turn the selection button clockwise. Appears on the display. Press the button. Shown on the upper display for the hour setting.
  • Page 67 Settings Time/Date step info/button instructions Turn the lower selection button to set the hour and save this using the “prog/start” button. Shown on the upper display for the minute setting. The current day appears in the lower display. Turn the lower selection button to set the hour and save this using the “prog/start”...
  • Page 68: Start Clean

    Cleaning CombiMaster Plus ® Start clean CleanJet is the automatic cleaning system for cleaning the cooking cabinet. The 3 ® cleaning programmes allow you to adapt the cleaning process to the particular level of soiling. Attention! - For hygiene reasons and to prevent malfunctions it is essential to clean your appliance every day - risk of fire! - Your appliance must be cleaned every day, even if it is only operated in "Steam"...
  • Page 69 Cleaning CombiMaster Plus ® step info/button instructions Turn the temperature selector switch to the right to select the desired cleaning programme "CLE1", "CLE2" or "CLE3". Depending on the cleaning programme selected, either "CLE1", "CLE2" or "CLE3" will appear on the display. Press the button.
  • Page 70 Cleaning CombiMaster Plus ® step info/button instructions Now open the cooking cabinet door to add the Open the door cleaner and rinse aid tabs. Warning! Always wear protective gloves to handle the cleaner tabs - risk of chemical burns. Unpack the displayed number of rinse aid tabs and place the tabs in the tab basket.
  • Page 71 Cleaning CombiMaster Plus ® Warning! - Do not open the cooking cabinet door while cleaning is in progress – chemical cleaner and hot vapour may escape – risk of chemical burns and scalding. A horn sound is heard if the door is opened during the cleaning process. - Once the CleanJet cleaning process is aborted or has ended, check the entire cooking ®...
  • Page 72 Cleaning CombiMaster Plus ® Chemical handling instructions Warning! Only use cleaner and rinse aid tabs in compliance with the relevant safety measures, always wear, for example, protective gloves when handling the tabs - risk of chemical burns! Rinse aid tab: Remove Place the rinse aid tab with exterior protective film the transparent protective...
  • Page 73 Cleaning CombiMaster Plus ® Before starting the CleanJet clean, make sure that the hinging racks or mobile oven rack are ® correctly inserted in the cooking cabinet. When using softened water, the recommended quantity of cleaning tabs can be reduced by up to 50%.
  • Page 74: Cleaning Programmes

    Cleaning CombiMaster Plus ® Cleaning programmes cleaning stage description/application tabs "Powerful clean" For heavy roasting and grilling deposits, e.g. CLE1 Cleaner & rinse aid multiple loads of chicken, steaks, etc. Duration approx. 3 hours 45 minutes. Economical clean - "Eco" For light soiling (up to 200°C) with the most CLE2 Cleaner &...
  • Page 75 Cleaning CombiMaster Plus ® CLE2 Appliance No soft water Soft water Duration Cleaner tabs Rinse Cleaner tabs Rinse aid tabs aid tabs 6x 2/3 GN 02:30 h:mm 6x 1/1 GN 02:30 h:mm 10x 1/1 GN 02:30 h:mm 6x 2/1 GN 02:30 h:mm 10x 2/1 GN 02:30 h:mm...
  • Page 76: Cleanjet ® Abort

    Cleaning CombiMaster Plus ® CleanJet abort ® In the event of a power outage or after switching off the appliance, "StOP" will appear in the temperature display and the "Prog/Clean | START" button will blink. If the "Prog/Clean | START" button is not pressed, the clean will run for another 30 seconds. To abort, the "Prog/Clean | START"...
  • Page 77 Cleaning CombiMaster Plus ® step info/button instructions The word "rInS" will then appear in the temperature display and the full humidity display will flash blue. The word "cAb" will also appear on the time display. Open the door Open the door. Rinse out the cooking cabinet (behind the air baffle too) with water.
  • Page 78 Cleaning CombiMaster Plus ® Abort if the cleaner or rinse aid tabs have come into contact with water step info/button instructions "STOP" will appear in the temperature display To abort, the "Prog/Clean | START" button must be pressed. If the abort operation is confirmed, "tAb" and "out"...
  • Page 79 Cleaning CombiMaster Plus ® 79 / 107...
  • Page 80 Cleaning CombiMaster Plus ® If no water has yet been introduced into the cooking cabinet at the time of aborting or if a defined time has not yet passed, the abort programme will not run. This means that the cooking cabinet will not be automatically rinsed with water.
  • Page 81: Cleaning Combimaster

    Cleaning CombiMaster ® Warning! - For hygiene reasons and to prevent malfunctions it is essential to clean the unit every day - risk of fire. - Please note that your unit must be cleaned every day, even if only “steaming” mode is used. - Follow the safety instructions on the spray bottle and cleaner canister.
  • Page 82 Cleaning CombiMaster ® step info/button instructions Spray the space behind the air baffle, cooking cabinet, door seal and inside of the door with cleaner. Reset and lock the air baffle and hanging rack in place, close the cooking cabinet door. Warning! Do not open the cooking cabinet door while cleaning is in progress –...
  • Page 83 Cleaning CombiMaster ® step info/button instructions At the end of the cleaning time, you will be prompted to open the doors. When the cleaning program has finished, rinse the unit down, including behind the air baffle. Wipe the cooking cabinet and cooking cabinet seal with a damp cloth.
  • Page 84 Cleaning CombiMaster ® If there is a power failure during cleaning, the following warning appears: The cleaning program must be cancelled in these circumstances. This is achieved by pressing the Prog/Start button. The device must then be rinsed manually! Warning! Aggressive chemical fluid –...
  • Page 85: Steam Generator Descaling Display

    Steam generator descaling display Your appliance is equipped with the CleanJet® automatic cleaning system. The steam generator in your appliance still needs regular descaling, depending on water hardness and use. The descale level of your steam generator is determined with Calc Info. Once a critical level of scale is reached, the unit display will indicate that the steam generator should be descaled.
  • Page 86: Lan Cable Connection

    LAN cable connection The following manual describes how to connect a LAN cable to the LAN interface of your appliance. The LAN interface is located Unscrew the splash Thread the individual on the underside on the left protection cover. components on the cable, side of the appliance (for as shown in the diagram.
  • Page 87 LAN cable connection Danger of burns. When laying the LAN cable underneath the unit floor, make sure they do not come in contact with hot components Do not wrap the LAN cable around hot components. The assembly and splash protection can only be guaranteed if you use an Ethernet cable with the following specifications: Maximum plug length of the Ethernet plug 45 mm Maximum plug diameter diagonally of 18.5 mm...
  • Page 88: Network Settings

    Network settings How to configure the network settings on your unit is described below. The following settings may be made: IP address Subnet mask Gateway step info/button instructions Turn the top dial to the "Prog/Clean | START" button. Turn the temperature selector to the right until "IP"...
  • Page 89 Network settings step info/button instructions Confirm the number with the "core temperature" button. Now turn the temperature selector slightly to the right until "IP 2" appears on the temperature display. Now you can enter the second position of the IP address. E.g. 10.10.x.x Next the subnet mask must be entered.
  • Page 90: Building Services - Steam Generator Descaling

    Building services - steam generator descaling The steam generator must be descaled manually on a regular basis. We recommend the following descaling intervals based on 8 hours’ steaming per day: - up to 18 °dH (to 3.2 mmol/litres) at least 1x annually - up to 24 °dH (to 4.3 mmol/litres) at least 2x annually - over 24 °dH (to 4.3 mmol/litres) at least 3x annually These recommended descaling intervals may vary from the approximate values given above,...
  • Page 91 Building services - steam generator descaling step info/button instructions Turn the selector switch to the right appears in the display. Press the button. The descaling process is started. If the cooking cabinet temperature is over 40 °C when descaling commences, "Cool Down"...
  • Page 92 Building services - steam generator descaling step info/button instructions Guide hose into steam inlet opening as far as the mark.   Tip: The allocation of marks to appliance size is described in the instructions for the descaler pump. Warning! Aggressive chemical fluid – risk of chemical burns.
  • Page 93 Building services - steam generator descaling step info/button instructions Descaling quantities for electric appliances 6 x 2/3 GN 10 x 1/1 GN 20 x 1/1 GN 1.8 litres 6 litres 9 litres       6 x 1/1 GN 10 x 2/1 GN 20 x 2/1 GN 3.5 litres 8.5 litres...
  • Page 94 Building services - steam generator descaling step info/button instructions Close the cooking cabinet door. The length of the descaling phase is displayed. The steam generator is automatically rinsed several times. The appliance then automatically switches to Steam. "End” appears on the display when descaling is complete.
  • Page 95 Building services - steam generator descaling step info/button instructions Switch appliance off and wait for 4 seconds. Switch on the appliance. Descaling will be aborted if the core temperature button is pressed within 30 seconds. If the core temperature button is not pressed within 30 seconds descaling will continue.
  • Page 96: Building Services - Steam Generator Drainage

    Building services - steam generator drainage You can drain the steam generator before transportation or for frost protection. step info/button instructions Close the water hose and open the doors Set "Prog/Clean | Start" with the selector switch. Turn the selector switch to the right "ESG"...
  • Page 97: Domestic Technology

    Air filter no.: 40.03.461 Standalone appliances 20 x 1/1 GN and 20 x 2/1 To replace air filters for standalone appliances 20 x 1/1 GN and 20 x 2/1 GN, please notify your Rational Service Partner! 97 / 107...
  • Page 98: Replacing The Door Gasket

    No.: 20.00.399 Replacing the lamps LED lighting To replace the LED lighting, please contact your authorised RATIONAL Service Partner. Changing the halogen lamp First switch off the appliance at the mains. - Cover the appliance drain in the cooking cabinet.
  • Page 99: Service Notifications

    Service notifications Should a fault occur in your appliance, this will be indicated on the display. step info/button instructions Faults in your appliance that allow the user to continue using the unit for cooking can be disabled by pressing the clock button. fault indication when and how remedial action...
  • Page 100 Service notifications fault indication when and how remedial action After switching on for Notify customer service! 30 seconds. Is displayed Please check and replace the air filter under continuously the control panel. Check whether an external heat source is affecting the appliance. If the service notification remains - notify customer service! Is displayed...
  • Page 101 Service notifications fault indication when and how remedial action On occurrence of the Cooking time/core temperature selector error. switch defective. - Notify customer service! Must be confirmed Steam mode and combi-steam mode not at the end of the available - notify customer service. cleaning programme.
  • Page 102: Before You Call Service

    Before you call Service: error possible cause Rectification Water dripping out of Door is not closed If the door is closed correctly, the door the unit’s door. correctly. handle will point down on floor units. Door seal is worn or Replace the door seal (see the damaged.
  • Page 103 Before you call Service: of fat are cooked frequently or if the drop on the outlet pipe is too shallow. To remedy: Run the outlet pipe as described in the installation instructions. The unit does not External main switch is Switch on at the main switch indicate a function switched off...
  • Page 104: Eu Declaration Of Conformity

    EU Declaration of Conformity 104 / 107...
  • Page 105 EU Declaration of Conformity 105 / 107...
  • Page 106 EU Declaration of Conformity 106 / 107...
  • Page 108 80.02.407 V-02 MDS/Ad 09/17...

Table of Contents

Save PDF