Ruckus Wireless SmartZone 100 Getting Started Manual
Hide thumbs
Also See for SmartZone 100:
- Administrator's manual (298 pages) ,
- Getting started manual (50 pages) ,
- Quick setup manual (5 pages)
Table of Contents
Advertisement
Quick Links
- 1 Get to Know the Physical Features of the Controller
- 2 Preparing the Controller's Interface Settings to Use
- 3 Step 2: Configure the Port Grouping
- 4 Step 3: Configure the Ip Settings
- 5 Step 4: Configure the Cluster Settings
- 6 Connecting the Controller to the Network
- 7 Method 1: Perform Auto Discovery of the Controller Using the Ap Registrar
- 8 Method 4: Configure Dhcp Option 43 on the Dhcp Server
- Download this manual
See also:
Administrator's Manual
Advertisement
Table of Contents

Related Manuals for Ruckus Wireless SmartZone 100


Summary of Contents for Ruckus Wireless SmartZone 100
- Page 1 Ruckus Wireless ™ SmartZone ™ Getting Started Guide for SmartZone 3.5.1 Part Number 800-71518-001 Rev A Published June 2017 www.ruckuswireless.com...
- Page 2 ZoneFlex, Dynamic PSK, FlexMaster, MediaFlex, MetroFlex, Simply Better Wireless, SmartCast, SmartMesh, SmartSec, SpeedFlex, ZoneDirector, ZoneSwitch, and ZonePlanner are trademarks of Ruckus Wireless, Inc. in the United States and other countries. All other product or company names may be trademarks of their respective owners.
- Page 3 If This Controller Is Joining an Existing Cluster ....... 39 SmartZone 100 Getting Started Guide for SmartZone 3.5.1, 800-71518-001 Rev A...
- Page 4 What to Do Next ............56 Index SmartZone 100 Getting Started Guide for SmartZone 3.5.1, 800-71518-001 Rev A...
- Page 5 This SmartZone™ 100 Getting Started Guide SmartZone 3.5.1 provides infor- mation on how to set up the SmartZone 100 (SZ-100) appliance on the network. Topics covered in this guide include mounting, installation, and basic configuration. This guide is intended for use by those responsible for installing and setting up network equipment.
-
Page 6: Document Conventions
WARNING! Information that alerts you to potential personal injury Related Documentation In addition to this Getting Started Guide, each SmartZone 100 documentation set includes the following: • Administrator Guide: Provides detailed information on how to configure the SZ. The Administrator Guide is available for download on the Ruckus Wireless Support website at http://support.ruckuswireless.com. -
Page 7: Documentation Feedback
For a complete list of documents that accompany this release, refer to the Release Notes. Documentation Feedback Ruckus Wireless is interested in improving its documentation and welcomes your comments and suggestions. You can email your comments to Ruckus Wireless at: docs@ruckuswireless.com When contacting us, please include the following information: • Document title •... -
Page 8: Unpacking The Controller
NOTE The AC power cable (part number 902-0174-XX00, where XX is the two- character country code) is not supplied with the SmartZone 100 appliance and may be ordered separately. SmartZone 100 Getting Started Guide for SmartZone 3.5.1, 800-71518-001 Rev A... -
Page 9: Rack Mount Kit Contents
The rack mount kit contains the following items: • Mounting brackets x 2 • Rack cabinet mounting screws x 4 • Small screws x 10 Figure 1. Contents of the rack mount kit SmartZone 100 Getting Started Guide for SmartZone 3.5.1, 800-71518-001 Rev A... -
Page 10: Before You Begin
• A standard EIA 19-inch wide rack with an available 1RU space NOTE At the beginning of each procedure, this guide lists the specific tools, accessories, or equipment that you will need to complete that procedure. SmartZone 100 Getting Started Guide for SmartZone 3.5.1, 800-71518-001 Rev A... -
Page 11: Determine Which Controller Sku You Have
• SKU P01-S124-WW10 has four (4) 1000BASE-T (RJ-45) and two (2) 10GBASE- X (SFP+) ports Figure 2. SKU P01-S124-WW10 has two 10GBASE-X (SFP+) ports, which SKU P01-S104-WW10 does not SKU P01-S104-WW10 does not have these two SFP+ ports SmartZone 100 Getting Started Guide for SmartZone 3.5.1, 800-71518-001 Rev A... -
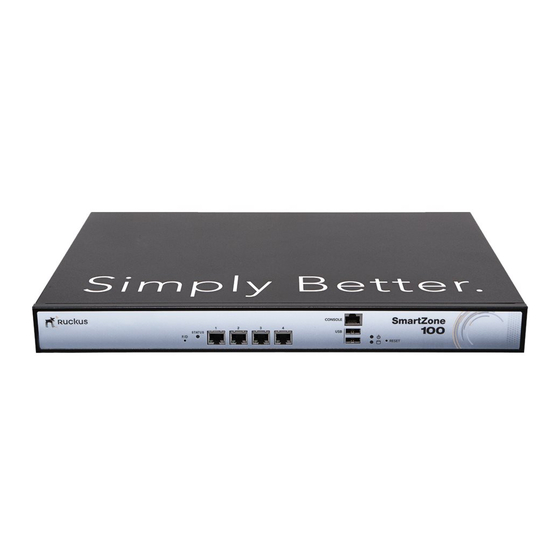
Page 12: Get To Know The Physical Features Of The Controller
For descriptions of the numbered parts, refer to Table Figure 3. The front panel of the SmartZone 100 (SKU P01-S124-WW10) SmartZone 100 Getting Started Guide for SmartZone 3.5.1, 800-71518-001 Rev A... - Page 13 Two USB ports Power LED (see LEDs on the Front Panel) HDD LED (see LEDs on the Front Panel) Reset button. Press for 5 seconds to restart the SZ-100. SmartZone 100 Getting Started Guide for SmartZone 3.5.1, 800-71518-001 Rev A...
- Page 14 • Green: 1000Mbps speed LED • Amber: 100Mbps • Off: 10Mbps Power • On: Power available • Off: No power • On: Disk I/O (usually blinking) • Off: No disk I/O SmartZone 100 Getting Started Guide for SmartZone 3.5.1, 800-71518-001 Rev A...
- Page 15 Preparing to Set Up the Controller Before You Begin Rear Panel Figure 4 shows the rear panel of the SmartZone 100. For descriptions of the numbered parts, refer to Table Figure 4. Rear panel of the SmartZone 100 Table 3.
-
Page 16: Before You Begin
What You Will Need • 3/8-inch hex driver or wrench • Phillips (crosshead) screwdriver, #1 and #2 bits • Anti-static wrist strap and conductive foam pad (recommended) SmartZone 100 Getting Started Guide for SmartZone 3.5.1, 800-71518-001 Rev A... -
Page 17: Mounting The Controller
2 Find a flat and surface (such as a table) and place the SZ100 unit on top of it. Figure 6. Place the SZ100 on a flat, dry surface SmartZone 100 Getting Started Guide for SmartZone 3.5.1, 800-71518-001 Rev A... - Page 18 3 Take one mounting ear, and then use a Phillips to secure it to the right side of the chassis with the supplied mounting ear screws. Figure 7. Secure the mounting ear to the right side of the chassis SmartZone 100 Getting Started Guide for SmartZone 3.5.1, 800-71518-001 Rev A...
- Page 19 Ten mounting ear screws are supplied. So you may have two or more mounting ear screws left (depending on how many you use) when you finish. SmartZone 100 Getting Started Guide for SmartZone 3.5.1, 800-71518-001 Rev A...
- Page 20 5 Using the supplied four rack mounting screws, secure the SZ-100 chassis to the rack. Use two screws on each side of the chassis. Figure 9. Use the supplied screws to secure the mounting ears to the rack SmartZone 100 Getting Started Guide for SmartZone 3.5.1, 800-71518-001 Rev A...
- Page 21 Mounting and Powering the Controller Mounting the Controller Figure 10. Use two mounting screws on each mounting ear You have completed mounting the controller to a rack. SmartZone 100 Getting Started Guide for SmartZone 3.5.1, 800-71518-001 Rev A...
-
Page 22: Powering On The Controller
3 Press the power switch on the rear panel to power on the SZ-100. The power LED on the front panel turns amber while the SZ-100 boots up, and turns off when the startup is complete. SmartZone 100 Getting Started Guide for SmartZone 3.5.1, 800-71518-001 Rev A... - Page 23 Mounting and Powering the Controller Powering On the Controller Figure 12. Press the power switch to power on the SmartZone 100 You have completed powering on the controller. SmartZone 100 Getting Started Guide for SmartZone 3.5.1, 800-71518-001 Rev A...
-
Page 24: Preparing The Controller's Interface Settings To Use
The following network settings are required: • IP address • Netmask • Gateway • Primary DNS server • Secondary DNS server SmartZone 100 Getting Started Guide for SmartZone 3.5.1, 800-71518-001 Rev A... -
Page 25: Preparing The Administrative Computer
The TCP/IP Properties dialog box appears. NOTE Write down all of the currently active settings so you can restore your computer to its current configuration later (when this process is complete). SmartZone 100 Getting Started Guide for SmartZone 3.5.1, 800-71518-001 Rev A... - Page 26 6 Click OK to save your changes and exit first the TCP/IP Properties dialog box, then the Local Area Connection Properties dialog box. Your changes are put into effect immediately. You have completed preparing the administrative computer. SmartZone 100 Getting Started Guide for SmartZone 3.5.1, 800-71518-001 Rev A...
- Page 27 Step 3: Configure the IP Settings • Step 4: Configure the Cluster Settings • Step 5: Verify the Settings • Connecting the Controller to the Network • Logging On to the Web Interface SmartZone 100 Getting Started Guide for SmartZone 3.5.1, 800-71518-001 Rev A...
-
Page 28: Overview Of The Setup Wizard
1 Connect one end of an Ethernet cable to Port 1 on the front panel of the controller, and then connect the other end to an Ethernet port on the administrative computer. Figure 14. Location of Port 1 on the front panel Port 1 SmartZone 100 Getting Started Guide for SmartZone 3.5.1, 800-71518-001 Rev A... - Page 29 2 Start your web browser, and then enter the following in the address bar: http://192.168.2.2:8443 The Setup Wizard appears, displaying the Port Configuration page. Figure 15. The Port Configuration page with the One Port Group option selected SmartZone 100 Getting Started Guide for SmartZone 3.5.1, 800-71518-001 Rev A...
-
Page 30: Step 2: Configure The Port Grouping
NOTE: On the SZ104, the two 10GB ports are bound to Port Group 2. Figure 16. Two-port grouping separates the management and AP control traffic from AP tunnel traffic SmartZone 100 Getting Started Guide for SmartZone 3.5.1, 800-71518-001 Rev A... -
Page 31: Step 3: Configure The Ip Settings
IP address from Router Advertisements (RAs) or from a DHCPv6 server on the network. If you want to manually assign the IPv6 network address, click Static, and then set the values for the following: SmartZone 100 Getting Started Guide for SmartZone 3.5.1, 800-71518-001 Rev A... - Page 32 3 Click Next. The Cluster Information page appears. Go to Step 4: Configure the Cluster Settings to continue. Figure 17. The IP Setting page, showing the options when IPv4 only is selected SmartZone 100 Getting Started Guide for SmartZone 3.5.1, 800-71518-001 Rev A...
-
Page 33: If You Selected Two Port Groups
1 Click OK on the warning message to close it. The Port Group 1 configuration page appears. Figure 19. The Management & AP Control tab on the Port Group 1 page SmartZone 100 Getting Started Guide for SmartZone 3.5.1, 800-71518-001 Rev A... - Page 34 Static, and then set the values for the following: IP address (IPv6): Enter an IPv6 address (global only) with a prefix length (for example, 1234::5678:0:C12/123). Link-local addresses are unsupported. SmartZone 100 Getting Started Guide for SmartZone 3.5.1, 800-71518-001 Rev A...
- Page 35 2 interface, through which client traffic and configuration data will be sent and received. The following network settings are required: • IP address • Netmask • Default gateway SmartZone 100 Getting Started Guide for SmartZone 3.5.1, 800-71518-001 Rev A...
-
Page 36: Step 4: Configure The Cluster Settings
A SmartZone (SZ) 100 unit can only form a cluster with other SmartZone 100 units. It cannot join a cluster of SmartCell Gateway (SCG) 200 units (and vice versa). Figure 21. The Cluster Information page SmartZone 100 Getting Started Guide for SmartZone 3.5.1, 800-71518-001 Rev A... -
Page 37: If This Controller Is Forming A New Cluster
• Confirmation Password: Retype the password above to confirm. 6 Click Next to continue. The Confirmation page appears and displays all the controller settings that you have configured using the Setup Wizard. SmartZone 100 Getting Started Guide for SmartZone 3.5.1, 800-71518-001 Rev A... - Page 38 Running the Setup Wizard and Logging On to the Web Interface Step 4: Configure the Cluster Settings Figure 22. Set the administrator passwords for the web interface and command line interface SmartZone 100 Getting Started Guide for SmartZone 3.5.1, 800-71518-001 Rev A...
-
Page 39: If This Controller Is Joining An Existing Cluster
7 Click Next to continue to the next Setup Wizard page. The Confirmation page appears and displays a summary of the settings that you have configured. SmartZone 100 Getting Started Guide for SmartZone 3.5.1, 800-71518-001 Rev A... -
Page 40: Step 5: Verify The Settings
When the process is complete, the progress bar shows the message 100% Done. The page also shows the IP address through which you can access the controller’s web interface to manage the appliance. SmartZone 100 Getting Started Guide for SmartZone 3.5.1, 800-71518-001 Rev A... - Page 41 Figure 25. This page indicates that you have completed the Setup Wizard Congratulations! You have completed the Setup Wizard. You are now ready to log on to the controller’s web interface. SmartZone 100 Getting Started Guide for SmartZone 3.5.1, 800-71518-001 Rev A...
-
Page 42: Connecting The Controller To The Network
(Web) interface and append a colon and 8443 (controller’s management port number) at the end of the address. For example, if the IP address that you assigned to the Management (Web) interface is 192.168.2.21, then you should enter: https://192.168.2.21:8443 SmartZone 100 Getting Started Guide for SmartZone 3.5.1, 800-71518-001 Rev A... - Page 43 3 If a browser security warning appears, this is because the default SSL certificate (or security certificate) that the SZ is using for HTTPS communication is signed by Ruckus Wireless and is not recognized by most web browsers. Click continue or proceed (depending on the browser that you are using).
- Page 44 The web interface refreshes, and then displays the Dashboard page, which indicates that you have logged on successfully. You are now ready to configure the controller. Refer to the SmartZone 100 Admin- istrator Guide for information on how to configure the controller and manage Ruckus Wireless APs and wireless clients.
- Page 45 Method 3: Register the Controller with the DNS Server • Method 4: Configure DHCP Option 43 on the DHCP Server • Method 5: Manually Configure the Controller Address on the AP’s Web Interface SmartZone 100 Getting Started Guide for SmartZone 3.5.1, 800-71518-001 Rev A...
-
Page 46: Is Lwapp2Scg Enabled On The Controller
Obtaining the LWAPP2SCG Application If your controller release does not have the LWAPP2SCG application pre-installed, contact Ruckus Wireless Support to obtain a copy of the LWAPP2SCG application files and installation instructions. Enabling LWAPP2SCG If the LWAPP2SCG application is pre-installed but disabled in your controller release, do the following to enable it: 1 Log on to the controller’s console. -
Page 47: Method 1: Perform Auto Discovery Of The Controller Using The Ap Registrar
1 Ensure that you have purchased on-going support for all your Ruckus equipment and products. 2 Ensure that you have a signed and fully executed NDA with Ruckus Wireless. If you have not signed NDA, reach out to Ruckus Wireless APR support team. -
Page 48: Important Notes
If the AP is unable to discover its parent controller after the first attempt, it will continue to do so: • Once every 5 minutes for up to 60 minutes (12 queries) • Once every hour for the remaining day (23 queries) SmartZone 100 Getting Started Guide for SmartZone 3.5.1, 800-71518-001 Rev A... -
Page 49: Subnet
To register the controller with the DNS server, do the following. 1 Open the DNS zone file, and then add two records with the following information: • Record Key#1: RuckusController Type: A (IPv4 Domain Name Translation) SmartZone 100 Getting Started Guide for SmartZone 3.5.1, 800-71518-001 Rev A... - Page 50 3 Open the DHCP configuration file, and then insert the DNS domain name in the DHCP configuration file. For example, if the DNS domain name is “38.jack”, insert the following line into the DHCP configuration file: option domain-name “38.jack” SmartZone 100 Getting Started Guide for SmartZone 3.5.1, 800-71518-001 Rev A...
- Page 51 DHCP server, the AP will attempt to resolve “RuckusController” and “zonedirector” without a domain name from the DNS server as the FQDN of controller's control interface. You have completed registering the controller with the DNS server. SmartZone 100 Getting Started Guide for SmartZone 3.5.1, 800-71518-001 Rev A...
-
Page 52: Method 4: Configure Dhcp Option 43 On The Dhcp Server
1 Log on to your DHCP server via a console terminal (for example, PuTTY). 2 Go to /etc directory. 3 Run vi dhcpd.conf. This command opens the DHCP configuration file for editing. SmartZone 100 Getting Started Guide for SmartZone 3.5.1, 800-71518-001 Rev A... - Page 53 CLI, and then enter the following command: show running-config lwapp2scg If LWAPP2SCG is enabled, the value for ACL Policy should show as Accept all. SmartZone 100 Getting Started Guide for SmartZone 3.5.1, 800-71518-001 Rev A...
- Page 54 Enter this command if you want all APs that discover the controller to be managed by it. Figure 31. Options that appear after you enter the “policy” command SmartZone 100 Getting Started Guide for SmartZone 3.5.1, 800-71518-001 Rev A...
-
Page 55: Method 5: Manually Configure The Controller Address On The Ap's Web Interface
AP if the primary controller is unavailable. 5 Click Apply. You have completed manually configuring the controller’s IP address on the AP’s web interface. SmartZone 100 Getting Started Guide for SmartZone 3.5.1, 800-71518-001 Rev A... - Page 56 AP What to Do Next For more information on configuring and managing the controller, refer to the SmartZone 100 Administrator Guide for Release 3.4, which is available for download on the Ruckus Wireless Support website at http://support.ruckuswireless.com. NOTE: For a complete list of documentation that is available for this SZ release, refer to the Release Notes.
- Page 57 IP address unpacking joining a cluster Web browser web browser Web interface logging on SmartZone 100 Getting Started Guide for SmartZone 3.5.1, 800-71518-001 Rev A...
- Page 58 Copyright © 2006-2017. Ruckus Wireless, Inc. 350 West Java Dr. Sunnyvale, CA 94089. USA www.ruckuswireless.com...
Need help?
Do you have a question about the SmartZone 100 and is the answer not in the manual?
Questions and answers