
Related Manuals for KERUI G19


Summary of Contents for KERUI G19
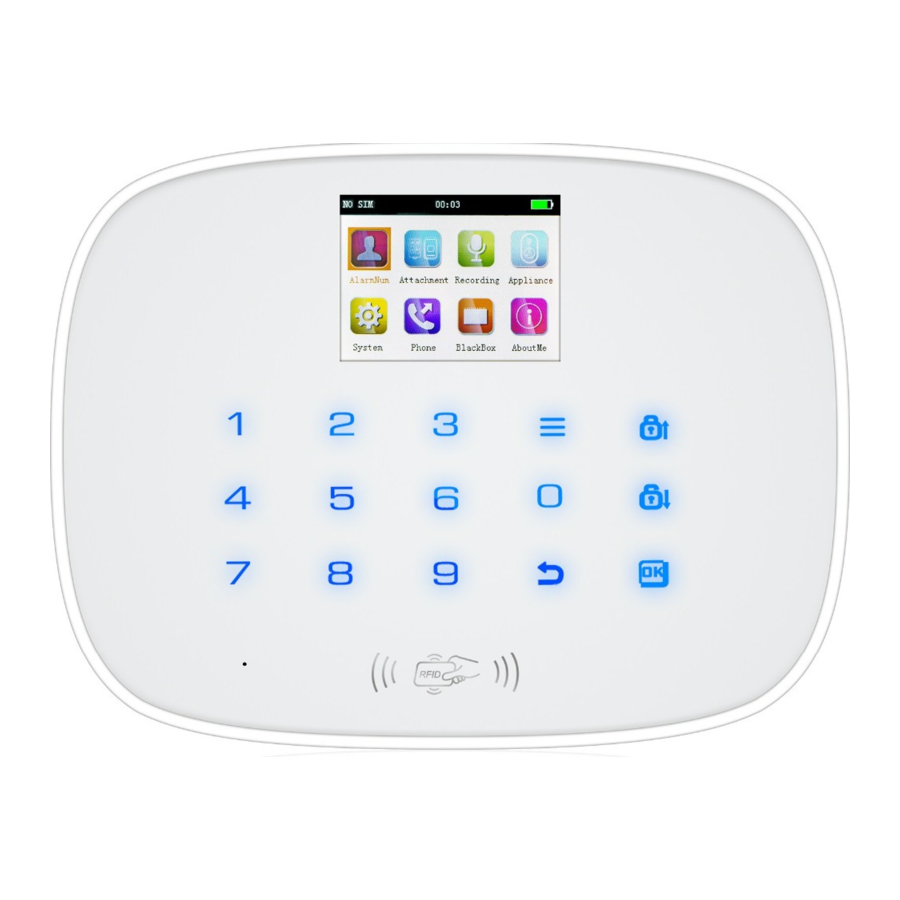
- Page 1 RFID Color Screen Intelligent GSM Network Alarm System G19 Version 1.0 Reading carefully before handle Keeping the user manual reserved 封底 封面 尺寸:25 0*1 8 5MM 材质:12 8G铜版纸...
- Page 2 Table of Contents 4 10 System Set 4.10.1 Delay Set 4.10.1.1 Delay Arm Set l. System Introduction 4.10.1.2 Delay Alarm Set ll. Function Features 4.10.2 Timing Arm/Disarm lll. Host Installation 4.10.2.1 Timing Arm/Disarm Set lV. Operation and Set 4.10.2.2 Delete Timing Arm/Disarm Set 4.1 Initial Power-on 4.10.3 Time Date Set 4.2 Arm...
-
Page 3: L. System Introduction
Vll. Receive Alarm and Remote Control l. System Introduction 7.1 Measures after receiving Alarm 7.2 Remote Control by Phone This alarm system is a high-end GSM alarm with stable and reliable performance Vlll. System Parameters and applies 2.4-inch TFT color screen and touch keyboard with built-in powerful 8.1 System Factor y Default Zone Type CPU master and excellent operation experience. -
Page 4: Lll. Host Installation
lll. Host Installation Host should be installed in the central position of the guard area to receive the Wired PIR signals from detectors best. Keep away from large mental objects or appliances Terminal Block with high frequency interference, meanwhile, avoid the reinforced concrete walls and fire doors barriers etc. -
Page 5: Disarm
work. STAY function needs to be set that is the defense zones of the interior 4-4, there is a number input box in the page and the 4 functions below optional: detectors should be changed to be stay zones in order to work properly. After phone, SMS, access card, CID. - Page 6 On accessories manage page, as shown in picture 4-7. Press key【UP/DOWN】 4.7.1 Remote Control to select Detector, then press key【OK】or number 2 directly to enter detector 4.7.1.1 Study Remote Control page, as shown in picture 4-13. There are 99 zones in the page, and it displays On accessories manage page, press key【OK】directly or number 1 to enter the number of detectors learned,siren state, event code, and zone attribute in remote control page.
-
Page 7: Alarm Number
No, call alarm OFF, then press key【OK】to save. If selecting OFF, the host will not CHINA MOBLLE 16:11 CHINA MOBLLE 16:11 CHINA MOBLLE 16:11 alarm if there is an alert in this zone. The factor y default of call alarm is ON. 01 RFID RFID RFID... - Page 8 alarm indicator lit constantly to enter learning state; Then on wireless strobe siren 4.7.5.1 Code Match between Host and Smart Socket page, press menu key to switch【Wireless Strobe Siren】ON or OFF, host will send Code Match Method: In smart socket standby mode, long press key SET for 5s signal as shown in picture 4-26;...
- Page 9 After entering appliances set page, stop the cursor on【All Sockets】, press key CHINA MOBLLE 中国移动 16:15 中国移动 16:16 16:11 【UP/DOWN】to move the cursor behind【Time Switch】, then press key【OK】 Attachment Rccording 录音 to enter time switch page, as shown in picture 4-36. There are 40 set items on RFID the page, press key【UP/DOWN】to select set item, and press key【OK】to enter Press any key to start...
-
Page 10: Remote Control
255s), then press key【OK】to save setting. During delay arm, host beeps “di” 4.10.4 Volume Adjustment ever y 1s until the delay ends. If user press key ARM in delay arm state, host will As shown in picture 4-40, on system set page, press key【DOWN】to move the exit delay arm state and arm directly. - Page 11 4.10.10.2 Administrator Password CHINA MOBLLE 16:11 CHINA MOBLLE 16:11 CHINA MOBLLE 16:11 On security set page, press key【DOWN】to move the cursor behind【Administrator GPRS KeyTone Screensaver Password】, input the 6-digit password to set directly, then press key【OK】to GPRS: save. With the highest authority, administrator password can set through opening Seconds Key Tone: Key Tone:...
-
Page 12: Detector
4.10.13 SMS Reply ON/OFF 中国移动 16:18 CHINA MOBLLE CHINA MOBLLE 16:11 16:11 As shown in picture 4-40, on system set page, press key【UP/DOWN】to move the Power alarm Restore factor y Phone cursor behind【 SMS Reply ON/OFF 】, then press key【 OK 】to enter SMS Reply (Empty) Delete remotes Panel power off:... -
Page 13: Zone Attribute
4.12.2 Alarm Records On Black Box page, press key【 DOWN 】 to move the cursor behind【 Alarm Re-dial/ 1234563 Records】, As shown in picture 4-62, press key【Confirmation】to enter Alarm Monitor Alarm Panel Redial Records Inquir y page.Press key【UP/DOWN】to inquir y each alarm records. As 1234564 Linkage high as 99 records can be saved, and it displays Alarm date, time and zones etc... -
Page 14: Alarm Siren
1—User 00or01-40 Delete Password( Scheduling 1234561502 Scheduling 4 digits) Group Delete 2nd Group 123456242345678 1234or Appliances 2— 00:Delete All Appliance Timing Set Password Set User Password as 123456 Administrator Scheduling 345678 Password(6 Inquir y 01-40 1234561601 digits) Scheduling Scheduling Inquir y 1st Group Appliances 1--User Group... - Page 15 6.1 Download and Installation iOS user log in APP Store, input key word”G19 alarm system”, or scan the bar code in picture 6-1 below to reach G19 alarm host software, download and install it...
-
Page 16: Illegal Arm
click【Confirm】after completing selection. APP interface jumps to SMS Message 8.2 System Factor y Default Value interface, click【Send】, and the message will be sent to host SIM Card number. Administrator Password 123456 Send SMS Message Vll. Receive Alarm and Remote Control User Password 1234 Ringing Times... -
Page 17: Appliances
The door contact should be installed on the movable door. Firstly, clean the bottom. Find the base and reinforce it with two screws in the wall. Press the PIR corresponding position, and take out wireless door contact , then put on the with bracket into the center hole of base.
Need help?
Do you have a question about the G19 and is the answer not in the manual?
Questions and answers