Table of Contents
Advertisement
Advertisement
Table of Contents

Related Manuals for KERUI PG-103


Summary of Contents for KERUI PG-103
- Page 1 USER’S GUIDE Cellular + Wi-Fi Smart Security System...
-
Page 2: Table Of Contents
CONTENTS DO THIS FIRST ................Things to Note Before Getting Started System Requirements IN THE BOX..................MEET YOUR ALARM SYSTEM............How the Alarm System Works Getting to Know Your System Smart Hub (Panel) Remote Control RFID Tag Door/Window Sensor PIR Motion Detector PLACEMENT/INSTALLATION TIPS.......... -
Page 3: Do This First
DO THIS FIRST. Things to Note Before Getting Started Please check the following conditions for a successful set-up: You have selected a 2.4GHz Wi-Fi network. The hub does not support the 5GHz option. Select the 5GHz band instead of the most common mistake when setting up the hub for the first time. -
Page 4: In The Box
IN THE BOX. Remote Control x2 Wireless key to quickly away-arm, Smart Hub(panel) PIR Motion Detector x1 home-arm and disarm your home, Alarm, display and keypad. and to trigger an emergency alarm. Senses when someone walks nearby. Door/Window Sensor External Siren (Optional) x1(x2 optional) RFID Tags x2 (Optional) Wireless Siren (Optional) -
Page 5: Meet Your Alarm System
MEET YOUR ALARM SYSTEM How the Alarm System Works The Panel receives the command and enters “Armed” mode. Disarmed Arm the system using the remote, RFID tag, the ARM button of hub panel or the APP. When a Door/Window Sensor detects a door/window opening, the sensor sends a signal to the panel letting the panel know . -
Page 6: Getting To Know Your System
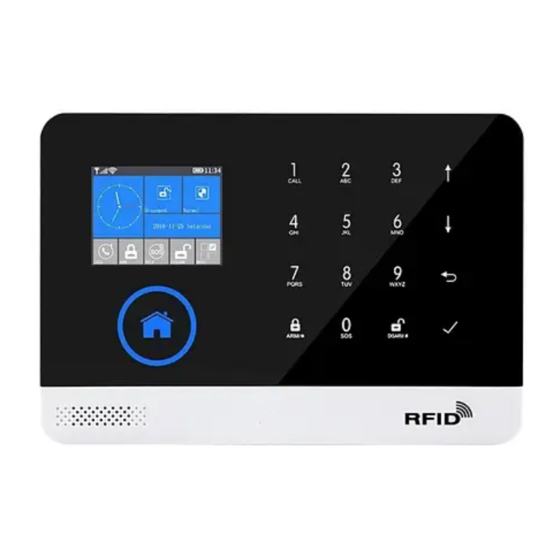
Getting to Know Your System This is a dual network system that utilizes both WiFi and cellular (GSM/3G). All sensors are wirelessly linked to the panel. In the event of alarm activation, for example, when a sensor is triggered, a push notification will automatically be sent and an alarm call will be made to all registered users. - Page 7 ON/OFF button Press to turn the panel on, and “Welcome” is displayed. Press and hold it until the Power port screen is off to turn the panel off. Plug in the power cable here. Siren port Plug in the siren cable here. SIM card slot Plug in the SIM card here.
- Page 8 What you see and What it means about the home screen display SMS/Call Status Text message sending Keypad locked Calling Power status AC powered, and the progress bars shows in case of charging. Displayed when the system has lost AC power. The icon is red when the backup battery power is low.
- Page 9 Quick view of menu functions Enable/Disable Human Voice Human Voice...
- Page 10 Used to set a schedule to arm automatically, and Enable/Disable automation Used to set a schedule to disarm automatically, and Enable/Disable automation...
- Page 11 Description Exit/Entry Delay: Your security system has been programmed with delay times that allow you to exit the premises after arming, and to disarm the system upon entry, before an alarm occurs. If you leave the premises too late when exiting, or disarm too late when arriving home, it will cause a false alarm.
-
Page 12: Remote Control
Remote Control Wireless Key to quickly away-arm, home-arm and disarm your home, and to trigger an emergency alarm. LED indicator Arm button Disarm button Use when no one is home. Use when you don’t want The alarm sounds when a security. -
Page 13: Door/Window Sensor
Door/Window Sensor Door/window sensors are set to ‘Stay Arm Active’ mode by default and are ideal for protecting entry/exit points,such as front/back doors and all windows. When the system is armed or home armed and a sensor is triggered (magnet separated from the sensor), a push notification including the sensor name will automatically be sent to the registered users, and the alarm will sound . -
Page 14: Pir Motion Detector
PIR Motion Detector The motion detector is designed for use on interior walls and is set to ‘Out Arm Active’ Mode by default. Whenever the sensor detects movement (only while the alarm is armed), a push notification including the sensor name will automatically be sent to the registered users,and the alarm will sound . -
Page 15: Placement/Installation Tips
PLACEMENT/INSTALLATION TIPS Where to place/install Smart Hub It should be close to where you come and go. So it’s easy to access on your way in and out. Find a spot with a good Wi-Fi and Use an unswitched wall outlet. cellular signal. -
Page 16: How To Install Pir Motion Detector
How to install PIR Motion Detector Mount the bracket with the included screws as shown to the left. Then place the motion detector in the bracket. Specify the right direction of the detection range of the motion sensor. Test the operation of the motion Mounting height detector by putting it into testing mode which is described at the... -
Page 17: Cellular Network Connection
Cellular network connection appears at the top of the home screen, you’re If the white connected to a cellular network. NOTE: If the gray is always displayed, the panel has not connected to a network. Make sure the SIM card has been put in the panel when it was off and the security code of the SIM card is permanently deactivated How to set Phone Numbers for SMS texts and phone calls by Panel... -
Page 18: How To Record A Voice Message By Panel
How to record a Voice Message by Panel Your system can Record/Playback/Delete a brief voice message(up to 20 seconds) that can be played back later. The voice message will be played to the remote when a alarm call is connected. Go to Menu>Record>... -
Page 19: How To Pair A New Wireless Sensor By Panel
How to pair a wireless sensor by Panel (Door/Window Sensor or PIR Motion Detector) Go to Menu>Parts>Detector>Add and enter Set Name/Mode/Number to scroll to , then use to scroll to the desired Function Zone Name. Door Alarm to scroll to , then use to scroll to the desired Name... -
Page 20: How To Pair A New Rfid Tag By Panel
How to Pair a New RFID Tag by Panel Go to Menu>Parts>RFID>Add and enter ‘Synchronizing’ is displayed, the panel goes into the sniffer mode and count down the pairing time remaining . Tap the RFID Tag on the panel. As the serial number of RFID Tag is added to the panel, ‘Leaning OK’... -
Page 21: App
Download app Scan the QR codes via a smart phone to download and install the application. Special Tips After installing the app, the phone will request permission to receive notifications from ’Smart Security Control’. Forbidden to receive notifications may result in an application running failure. Signing Up/In If you have not registered an account yet, please tap the Sign up on the app and follow the instructions to create your account first. -
Page 22: Using Smart Security System
USING SMART SECURITY SYSTEM. The security levels Smart Hub has three different security levels you’ll use when you’re home or away. You can easily switch between them on Smart Hub or with RFID tag, Remote Control, or the app. NOTIFICATIONS WHAT’S DETECTED WHAT YOU HEAR WHAT HAPPENS... - Page 23 RFID tag Tap the tag on the panel to: Disarm in case of arm mode. Arm in case of disarm mode. Remote Control or App Press to away arm . Press to home arm. Press to disarm. Press Press to trigger an emergency alarm. to trigger an emergency alarm.
-
Page 24: Smart Hub Features
Smart Hub features Battery backup If the building and/or neighbourhood has lost electrical power, Smart Hub includes a backup battery that will last for more than 6 hours . So even if the power is out, Smart Hub can still detect when an intruder is in your home and sound the alarm. -
Page 25: Troubleshootings
TROUBLESHOOTINGS Reason/Solution Issues 1. Make sure alarm hub power adapter is connected to AC The alarm cannot start up. power properly; 2. Ensure the power is on 1. Check if indicator on remote control is on when pressing, if not, please re-install or replace battery ; Remote control 2. - Page 26 1. Make sure alarm hub power adapter is connected to The alarm hub AC power properly; cannot start up 2. Make sure alarm hub power is on. 1. Check if indicator on remote control is on when pressing, if not, please re-install or replace battery ; Remote control 2.
- Page 27 1.Please make sure your arm/disarm SMS notification switch is on. No SMS notification when 2.Please make sure alarm notification numbers are stored and turned on. hub is arming or disarming: Mobile phones cannot 1.Please make sure phone number is set as system alarm number. 2.Please make sure SIM card is with enough balance credit.
-
Page 28: Specifications
SPECIFICATIONS Power Supply: Micro USB 110/220VAC to 5V, 1000mA Backup Battery: 3.7V, 500mAh Rechargeable Lithium Battery Consumption: <150mA@normal Siren Output: <300mA Radio Frequency: 433Mhz GSM: 850/900/1800/1900MHz Wi-Fi: IEEE802.11b/g/n Operation Temperature: 0~55℃ Remote Control Power Supply: DC 3V (CR2025 Lithium Battery x1) Standby Current:<5uA Alarm Current: <15mA Transmitting Distance: <80m (Open Area/No Interference) - Page 29 RFID Tag Chip:4100 Frequency: 125KHz Read Distance:<2cm Wireless Siren Power Supply: Micro USB 110/220VAC to 5V, 1000mA Backup Battery: 3.7V, 300mAh Rechargeable Lithium Battery Standby Current:<15mA Alarm Current:<230mA Volume:100dB Radio Frequency: 433Mhz Operation Temperature: 0~55℃ Siren with 3.5mm Male Cable Power Supply: DC 3~12V Working Current:<110mA Volume:100dB...
Need help?
Do you have a question about the PG-103 and is the answer not in the manual?
Questions and answers
Перестало работать приложение на телефоне, пишет что убрано из онлайн магазина Эпл
забыл пароль, что делать?