Anritsu MT1000A Network Master Pro Quick Reference Manual
Hide thumbs
Also See for MT1000A Network Master Pro:
- Remote scripting operation manual (996 pages) ,
- Operation manual (605 pages) ,
- Quick reference manual (36 pages)
Advertisement
Quick Links
1.
Port 1, Tx Bantam (DS1)
2.
Port 1, Tx BNC (E1, E3, E4, DS3, STM-1e, STS-3)
3.
Port 1, Rx Bantam (DS1)
4.
Port 1, Rx BNC (E1, E3, E4, DS3, STM-1e, STS-3)
5.
Port 2, Tx Bantam (DS1)
6.
Port 2, Tx BNC (E1, E3, E4, DS3, STM-1e, STS-3)
7.
Port 2, Rx Bantam (DS1)
8.
Port 2, Rx BNC (E1, E3, E4, DS3, STM-1e, STS-3)
9.
Port 1, Tx/Rx RJ48 (E1 balanced)
10. Port 2, Tx/Rx RJ48 (E1 balanced)
11. Port 1, Tx/Rx SFP/SFP+ (SDH / SONET / OTN / FC Ethernet optical)
12. Port 2, Tx/Rx SFP/SFP+ (SDH / SONET / OTN / FC Ethernet optical)
13. Port 1, Tx/Rx RJ45 (Ethernet electrical)
14. Port 2, Tx/Rx RJ45 (Ethernet electrical)
15. Audio
16. AUX
17. Clock input
18. USB B
○
○
○
4
2
6
○
○
○
○
5
7
1
3
○
○
○
17
16
15
Printed on Recycled Paper
Printed in Denmark
19. USB A
20. USB A
21. Ethernet service interface
22. DC input (18 VDC)
○
8
○
○
○
○
○
○
13
14
11
12
9
10
○
○
○
○
○
21
22
18
19
20
Quick Reference Guide
MT1000A/MU100010A
Network Master Pro
Fourth Edition
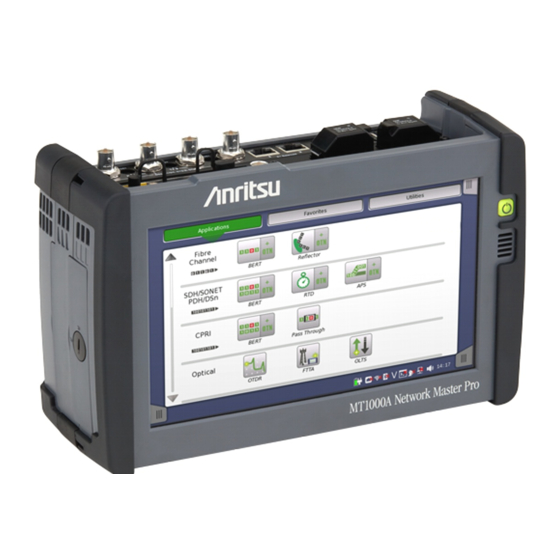
Touch Screen display
Battery
Additional safety and warning information is provided
within the "MT1000A/MU100010A Network Master
Pro" Operation Manual. Please refer to that document
before using the equipment.
Keep this manual with the equipment.
Document No.: M-W3681AE-4.0
Power button
Advertisement

Related Manuals for Anritsu MT1000A Network Master Pro


Summary of Contents for Anritsu MT1000A Network Master Pro
- Page 1 Port 1, Tx Bantam (DS1) Quick Reference Guide Port 1, Tx BNC (E1, E3, E4, DS3, STM-1e, STS-3) Port 1, Rx Bantam (DS1) Port 1, Rx BNC (E1, E3, E4, DS3, STM-1e, STS-3) Port 2, Tx Bantam (DS1) MT1000A/MU100010A Port 2, Tx BNC (E1, E3, E4, DS3, STM-1e, STS-3) Port 2, Rx Bantam (DS1) Network Master Pro Port 2, Rx BNC (E1, E3, E4, DS3, STM-1e, STS-3)
- Page 2 Network Master Pro is equipped with a touch screen display for operating the Advanced Use of Network Master Pro instrument and test applications. The power button also works as menu button when the instrument is turned on. Running multiple applications Power is supplied by an AC adopter or a 10.8V intelligent Li-Ion rechargeable and replaceable battery, which is accessed from the side of the instrument.
- Page 3 General Functions Selecting Applications General functionalities such as insertion of stimuli, start/stop of test, creation of the A number of predefined applications are available – the types depending on which report etc. are placed in expandable toolbars. The GUI contains two such toolbars: options are installed in the instrument.
- Page 4 Basic Screens and Navigation Each screen contains a number of sub-screens, accessible via tabs or buttons The GUI guides you through the setup and execution of the application, first asking you to configure the related port(s), then to set up and run the actual displayed at the top of the screen (in the “navigation area”...
Need help?
Do you have a question about the MT1000A Network Master Pro and is the answer not in the manual?
Questions and answers