Table of Contents
Advertisement
Quick Links
Advertisement
Table of Contents

Related Manuals for iWave iW-RainboW-G21D


Summary of Contents for iWave iW-RainboW-G21D
- Page 1 RZ/G1H Qseven SOM Development Platform iW-RainboW-G21D R0.1 Quick Start Guide...
-
Page 2: Warranty And Rma
Disclaimer iWave Systems reserves the right to change details in this publication including but not limited to any Product specification without notice. No warranty of accuracy is given concerning the contents of the information contained in this publication. To the extent permitted by law no liability (including liability to any person by reason of negligence) will be accepted by iWave Systems, its subsidiaries or employees for any direct or indirect loss or damage caused by omissions from or inaccuracies in this document. -
Page 3: About This Guide
INTRODUCTION About this Guide This document is intended as the guide for unpacking iWave’s iW-RainboW-G21D - RZ/G1H Qseven Development Platform package and setting up the test environment for it. It also gives details about safety information and important cautions which should adhere while using the platform. -
Page 4: Safety Information
UNPACKING Safety Information Before unpacking and installing the Development Platform or adding devices on it, carefully read all the manuals that came with the package. Place the product on a stable surface. To avoid short circuits in electronics, keep all conducting ... -
Page 5: Unpacking Guidelines
Quick Start Guide Unpacking Guidelines Please follow the below guidelines while unpacking the RZ/G1H Qseven Development Platform. Wear the anti-static wristband while unpacking and handling the Development platform to prevent electrostatic discharge. Use anti-static pad/mat with proper grounding to place the Development platform. ... -
Page 6: Package Checklist
Quick Start Guide Hard copy Camera Add On Module Optional (With Screw Bag) Custom JTAG Cable Optional Do not proceed with installation, if any of the items listed in the above checklist is missing or damaged. Contact iWave support team. - Page 7 Quick Start Guide Get to Know the RZ/G1H Development Platform The RZ/G1H Qseven Development platform consists of 70mmx70mm RZ/G1H Qseven SOM and 120mmx120mm Nano-ITX form factor Qseven Carrier Board. The RZ/G1H Qseven Development platform supports the following features. RZ/G1H Qseven SOM Features Renesas RZ/G1H MPU Quad ARM Cortex®-A15 MPCore®...
- Page 8 The RZ/G1H Qseven SOM major components location are shown in the below figure. MXM Edge Conn. (J1) JTAG Header (J2) VIN1/EthernetAVB Switch (SW1) SPI Programing Header (J3) VIN0/8bit eMMC Switch (SW2) Top View of SOM Expansion Connector 2 (J5)
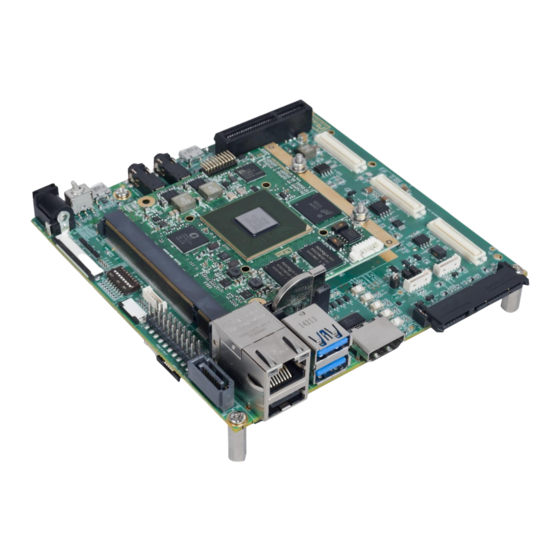
- Page 9 Quick Start Guide The RZ/G1H Qseven Carrier Board major components location are shown in the below figure. USB 3.0 Conn (J23, Bottom) USB 3.0 Conn (J23, Top) HDMI Conn. (J24) Top View of Qseven Carrier Board Bottom View of Qseven Carrier Board Refer Development Platform Hardware User Guide for more details.
-
Page 10: Getting Start
SETTING UP THE TEST ENVIRONMENT Getting Start This section describes the step by step procedure to setup the test environment for RZ/G1H Qseven Development Platform. Read the Development Platform Documents Setting Board Configuration Switch Setting up the Debug port ... - Page 11 Quick Start Guide Configuration Switch Setting - RZ/G1H Qseven SOM The RZ/G1H Qseven SOM has two single bit DIP switch SW1 and SW2 for configuration setting. This switch can be used to select one interface over other as given in the below table. SWITCH ON (HIGH) OFF (LOW)
-
Page 12: Debug Port Setting
Debug Port Setting Please follow the below procedure to setup the Debug Micro USB port of RZ/G1H Qseven Development Platform. Connect TypeA end of USB cable to PC and MicroB end of USB cable to Development platform's debug Micro USB connector(J3) as shown below. - Page 13 Qseven SOM and carrier board will glow as shown in the above image. Do not use different power adapter other than the supplied one. Do not proceed with installation, if any of the Power Status LEDs are blinking or not glowing. Contact iWave support team.
- Page 14 Once power is applied to the RZ/G1H Qseven Development Platform as explained in the previous section, the HyperTerminal of the PC/Laptop which is connected to the Development platform will immediately show the boot messages of the boot loader. iWave supports below mentioned Operating System Releases for RZ/G1H Qseven Development Platform. Linux 3.10.31(or higher) ...
- Page 15 Quick Start Guide Linux Test Environment In Linux Release, U-boot boot messages will appear in Hyper Terminal as shown below. U-boot on Terminal Immediately after power on, press any key in HyperTerminal to go to the U-boot command prompt ...
- Page 16 Once Linux is launched, the LCD will show the Yocto images as shown below and HyperTerminal will show the Linux Login. LCD after Linux Launch To Login in Linux, enter “root” in terminal and you will get the Linux command prompt as shown ...
-
Page 17: Dvd Contents
Quick Start Guide DVD Contents DVD Contents The following figure shows the DVD content structure for Linux Operating System Release. Linux Release DVD Contents iWave continuously improves software releases with latest kernel version. Contact iWave for latest software release detail. - Page 18 Quick Start Guide iW-RainboW-G21D RZ/G1H Camera Add On Module iWave supports Camera Add-on Module for RZ/G1H Development platform, which supports following features. RZ/G1H Camera Add On Module Features 8bit CMOS Camera (VIN0, VIN1, VIN2 and , VIN3) x 4 Ports...
- Page 19 Products iW-RainboW-G22M-RZ/G1E SODIMM SOM The RZ/G1E SODIMM SOM is industry latest ultra-compact yet highly integrated SOM based on Renesas high performance RZ/G1E Dual ARM Cortex A7 MPU running at 1GHz. A single ruggedized miniature SODIMM connector allows compact carrier board form factors which is ideally suitable for space constraint embedded applications.
- Page 20 EUROPE JAPAN iWave Europe iWave Japan, Inc. Postbus 6197 8F-B, Kannai Sumiyoshi Building, 3130 DD Vlaardingen 3-29, Sumiyoshi-cho, Naka-ku, Yokohama, The Netherlands Kanagawa, Japan. Ph: +31 10 28403383 Ph: +81 45 227 7626 Email: info@iwavesystems.eu Email: info@iwavejapan.co.jp www.iwavejapan.co.jp NETHERLANDS, LUXEMBOURG...
Need help?
Do you have a question about the iW-RainboW-G21D and is the answer not in the manual?
Questions and answers