Table of Contents
Advertisement
Quick Links
Advertisement
Table of Contents

Related Manuals for iWave iW-RainboW-G15S


Summary of Contents for iWave iW-RainboW-G15S
-
Page 1: Quick Start Guide
Pico ITX Single Board Computer iW-RainboW-G15S Quick Start Guide R3.0... -
Page 2: Technical Support
Disclaimer iWave Systems reserves the right to change details in this publication including but not limited to any Product specification without notice. No warranty of accuracy is given concerning the contents of the information contained in this publication. To the extent permitted by law no liability (including liability to any person by reason of negligence) will be accepted by iWave Systems, its subsidiaries or employees for any direct or indirect loss or damage caused by omissions from or inaccuracies in this document. -
Page 3: About This Guide
INTRODUCTION About this Guide This document is intended as the guide for unpacking iWave’s iW-RainboW-G15S - i.MX6 Pico ITX Single Board Computer (SBC) package and setting up the test environment for it. It also gives details about safety information and important cautions which should adhere while using the SBC. -
Page 4: Safety Information
UNPACKING Safety Information Before unpacking and installing the SBC or adding devices on it, carefully read all the manuals that came with the package. Place the product on a stable surface. To avoid short circuits in electronics, keep all conducting material away from the SBC. -
Page 5: Unpacking Guidelines
Quick Start Guide Unpacking Guidelines Please follow the below guidelines while unpacking the iW-RainboW-G15S SBC. Make sure to follow the below antistatic guidelines before unpacking. Wear the anti-static wristband while unpacking and handling the SBC to prevent electrostatic discharge. -
Page 6: Package Checklist
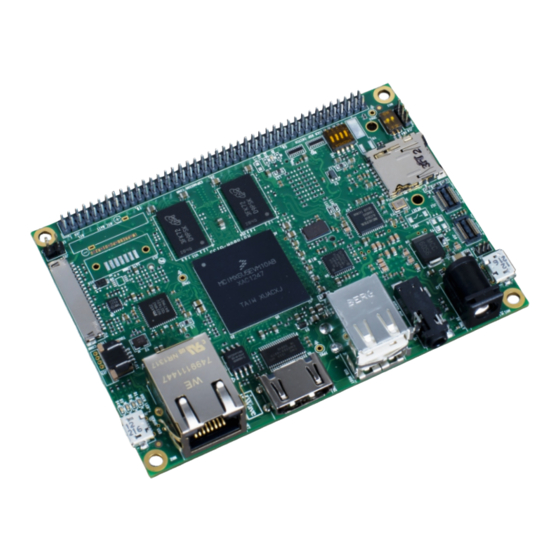
Package Checklist The iW-RainboW-G15S Pico ITX SBC will be shipped with the following items: Image Sl. No. Package Item iW-RainboW-G15S All components used i.MX6 Pico ITX in this system is L e a d f r e e a n d ROHS complaint 5V,2.5A Power Adaptor... -
Page 7: Getting Start
Read the Documents Before setting up the test environment, one must read all the documents of the iW-RainboW-G15S SBC to know about the system, its features and to get familiar with it. These documents are available in the DVD which comes along with the iW-RainboW-G15S Package. -
Page 8: Boot Mode Setting
Boot Mode Setting iW-Rainbow-G15S SBC supports different boot mode options for booting. Internal Boot Mode (Default): This mode is used for normal booting and default set while shipping. Please make sure that boot mode switch (SW4) is in this mode while setting up the Test Environment. -
Page 9: Debug Port Setting
Quick Start Guide Debug Port Setting iW-RainboW-G15S SBC supports Micro USB Connector as Debug port for Debugging and Testing. Please follow the below procedure to setup the Debug port of SBC. Use USB MicroAB to Type A cable to connect between SBC and PC for debugging. Connect ... - Page 10 5V, 2.5A power supply with universal plugs. Please follow the below procedure to power ON the SBC. Connect the 5V power supply plug to the power connector (J3) of the iW-RainboW-G15S SBC as shown below and switch ON the power supply.
- Page 11 Quick Start Guide iW-RainboW-G15S Done with Test Environment Once power is applied to iW-RainboW-G15S SBC as explained in the previous section, the HyperTerminal of the PC/Laptop which is connected to the SBC will immediately show the boot messages of the boot loader.
- Page 12 Linux Test Environment In Linux Release, U-boot boot messages will appear in Hyper Terminal as shown below. U-boot on Terminal Immediately after power on, Press any key in HyperTerminal to go to the U-boot command prompt as shown below. Otherwise Linux will launch automatically.
- Page 13 Quick Start Guide Once Linux is launched, Linux login prompt will come in Hyper terminal and enter "root" in Hyper terminal to get the Linux command prompt as shown below. Once you get the prompt you are done with Test Environment setup on Linux delivery. Linux Command Prompt Refer Linux Software User Manual for further details.
- Page 14 Android Test Environment In Andriod Release, U-boot boot messages will appear in Hyper Terminal as shown below. U-boot on Terminal Immediately after power on, Press any key in Hyper Terminal to go to the U-boot command prompt ...
- Page 15 Quick Start Guide Quick Start Guide Once Android is launched, if the HDMI display is connected to SBC, Android screen will appear as shown below and Hyper Terminal will show the Android command prompt. HDMI display after Android Launch Press Enter key in terminal to see the Android command prompt as shown below.
- Page 16 WEC7 Test Environment In WEC7 Release, E-boot boot messages will appear in HyperTerminal as shown below. E-Boot on HyperTerminal Immediately after power on, Press Space key in Hyper Terminal to go to the E-boot command prompt as shown below. Otherwise WEC7 will launch automatically.
- Page 17 Quick Start Guide Once WEC7 is launched, if the HDMI display is connected to SBC, WEC7 screen will appear as shown below. Once you get the WEC7 screen, you are done with Test Environment setup on WEC7 delivery. HDMI display after WEC7 Launch Refer WEC7 Software User Manual for further details.
- Page 18 DVD Contents iWave supports below mentioned Operating System Releases for iW-RainboW-G15S SBC iW-G15S-PILXC - Linux 3.0.35 or higher iW-G15S-PILAC - Android 4.0.4 or higher iW-G15S-PIWCC - Windows Embedded Compact 7 DVD contents will differ depending upon the operating system supported on the particular delivery.
- Page 19 Quick Start Guide Android Release DVD Contents...
- Page 20 WCE7 Release DVD Contents iWave continuously improves software releases with latest kernel version. Contact iWave for latest software release detail.
- Page 21 Quick Start Guide Unified LCD Add On Module for RainboW-G15S iWave supports unified LCD add-on module for RainboW-G15S SBC which can be used to connect different size of LCD panels from 3.5 inch to 7.0 inch. *For more details about Unified LCD add on module, contact iWave Sales Team.
- Page 22 New SOM Products iW-RainboW-G17M-Cyclone V SoC Q7 SOM iWave Systems launching Altera's Cyclone V SX SoC based Qseven compatible CPU module for the increased system performance requirements. The Dual ARM Cortex A9 core with the FPGA allows greater flexibility for the system designers and helps to lower the system cost and power consumption.
- Page 23 CPU features. WEC7 on i.MX6 SABRE SDP/SDB iWave Systems, profoundly known for its genuine embedded solution offerings spanning from SOMs to fully integrated systems, announced the availability of Windows Embedded Compact 7 (WEC7) reference BSP for Freescale’s i.MX6 SABRE SDP/SDB. The Freescale’s i.MX6x SABRE SDP/SDB is powered with Freescale’s i.MX6 Quad/Dual 1GHz, MMPF0100 Freescale PMIC.
- Page 24 Headquarter Branches JAPAN FRANCE INDIA iWave Japan, Inc. iWave Systems Technologies iWave Systems Tech. Pvt. Ltd., 8F-B, Kannai Sumiyoshi Building, 11,Rue Emmanuel Mounier 7/B, 29 Main, BTM Layout 2 Stage, Bangalore-560076, India. 3-29, Sumiyoshi-cho, Naka-ku, 78370 Plaisir. Yokohama, Kanagawa, Japan.
Need help?
Do you have a question about the iW-RainboW-G15S and is the answer not in the manual?
Questions and answers