Table of Contents
Advertisement
Quick Links
- 1 100W and 100Wp Models
- 2 Connecting to a Meter Register Using a Cable
- 3 Connecting to a Meter Register Using the Inline Connector
- 4 Chapter 3 Connecting, Initializing, and Programming
- 5 Initializing the 100W
- 6 Connecting the 100Wp to a Remote Meter Register
- 7 Chapter 4 Installing the 100W Endpoint
- Download this manual
See also:
Installation Manual
Advertisement
Table of Contents

Related Manuals for ITRON 100W


Summary of Contents for ITRON 100W
- Page 1 Water Solutions 100W and 100WP Pit Datalogging Water Endpoint Installation Guide TDC-0909-002...
- Page 2 All product returns must be shipped by ground transportation to Itron. Suggestions If you have comments or suggestions on how we may improve this documentation, send them to TechnicalCommunicationsManager@itron.com If you have questions or comments about the software or hardware product, contact Itron Technical Support: Contact Internet: www.itron.com...
-
Page 3: Table Of Contents
Optional Leak Sensor Installation ..................... 24 Required Equipment ....................... 24 Required Materials ..........................26 Pipe Preparation ......................27 Chapter 5 Optional Remote Antenna Installation ............ 32 Mounting the Remote Antenna......................32 TDC-0909-002 100W and 100WP Pit Datalogging Water Endpoint Installation Guide Proprietary and Confidential... - Page 4 Contents Appendix A Using an Inline Connector ..............35 Appendix B Using Gel-cap Connectors ..............37 Appendix C Troubleshooting ..................40 Index ..........................41 TDC-0909-002 100W and 100WP Pit Datalogging Water Endpoint Installation Guide Proprietary and Confidential...
-
Page 5: Chapter 1 Before You Begin
Caution Installing an integrated 100W endpoint and meter register in a water pit box reduces the endpoint's RF signal distance significantly. If read reliability is a problem, install a remote antenna or select a new installation method. -
Page 6: How This Document Is Organized
PUB-0063-001 Water Meter Compatibility List PUB-0063-002 mlogonline™ Network Leak Monitoring System User Guide TDC-0792-XXX Note: XXX designates the document revision and is subject to change without notice. TDC-0909-002 100W and 100WP Pit Datalogging Water Endpoint Installation Guide Proprietary and Confidential... -
Page 7: Chapter 2 About The 100W Endpoint
The endpoint operates in both bubble-up mode and two-way modes. The 100W endpoints ship in Factory Mode. The endpoints acquire and transmit meter register data within one hour following register connection. The endpoint transfers meter data immediately if the unit is initialized... -
Page 8: 100W And 100Wp Models
<10% useful battery life, a Low Battery flag is set to indicate impending battery failure. 100W and 100WP Transmission Modes The 100W endpoint can be set to transmit in Fixed Network, Mobile High Power, Mobile and Handheld, or Hard to Read Mobile and Handheld Mode. -
Page 9: 100W Operating Modes
For SCM, the 100W default bubble-up rate is 9 seconds. For NIM, the 100W default bubble-up rate is 6 minutes. When the endpoint is set for NIM, the 100W transmits a contingency SCM message every minute. Program FN mode with a programming device to configure NIM mode. - Page 10 About the 100W Endpoint 2. Run Mode 100WP’s normal operation mode. The 100W transmitted message is dependent on its factory settings for standard consumption messages (SCM) or network interval message (NIM). For SCM, the 100WP default bubble-up rate is 9 seconds.
-
Page 11: Chapter 3 Connecting, Initializing, And Programming
FC200SR handheld computer (Itron part number FC2-0005-004 or FC2-0006-004) FC300 with SRead For normal activation, connect the 100W to the water meter register. The endpoint polls for a register every hour. The 100W automatically activates after the endpoint detects a register. - Page 12 Connecting, Initializing, and Programming To connect the 100W to the register Connect the 100W wires to the register screw terminals according to the following table. 100W wire color Black White (data) (power/clock) (ground) Register Manufacturer Register screw terminal Elster AMCO Invision...
-
Page 13: Connecting The 100Wp To A Remote Meter Register
Using Gel Cap Connectors on page 37). Using an Extension Cable Order the 25-foot inline connector extension cable assembly (CFG-0151-401) to extend the 100W with the inline connector. Verifying 100W Endpoint Operation Use one of the following handheld computers to verify consumption:... -
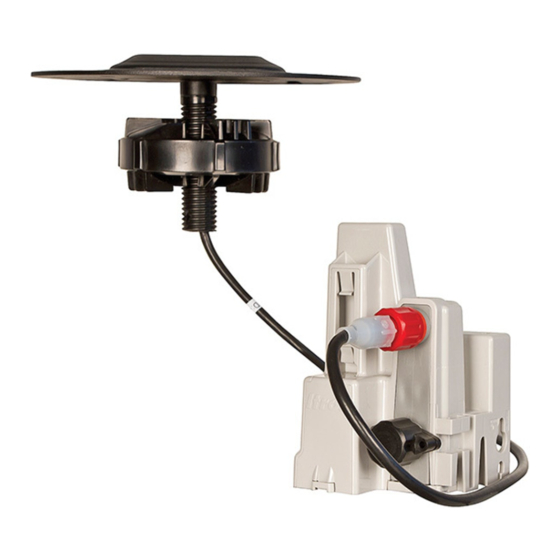
Page 14: Chapter 4 Installing The 100W Endpoint
Metal lids may require a through-lid remote mount antenna for optimal endpoint radio performance. Plastic lids and other composite materials accept any installation methods described above. The 100W endpoint is temperature rated from -20º C to +60º C. Do not install the 100W endpoint in locations that may exceed the temperature rating. -
Page 15: Rod Mount Installation
3. Pull the cable tie tight to secure it (as shown). 4. Remove the excess cable tie. Rod Mount Installation 100W endpoints can mount below the pit lid on a customer-supplied 1/2-inch OD rod. The example installation described in this section uses a fiberglass rod. For more information, visit www.itron.com reference the Water Meter Compatibility List (PUB-0063-002). -
Page 16: Required Tools And Hardware
Rod-driving tool (optional) Rod cutting tool The 1/2-inch diameter rod hole is shown in the following 100W endpoint bottom and side view. To install the 100W endpoint on a rod 1. Remove the pit lid. Inspect the area to make sure there are no buried cables, pipes, or other obstructions. - Page 17 If the rod is the correct depth but remains loose in the soil, replace the rod with a longer version. Caution Cutting fiberglass creates dust particles. Practice proper safety precautions when using cut-off tools to prevent exposure to fiberglass dust particles. TDC-0909-002 100W and 100WP Pit Datalogging Water Endpoint Installation Guide Proprietary and Confidential...
- Page 18 Caution Verify the pit lid does not touch the endpoint when the lid is replaced. There must be a 1 to 2- inch space between the top of the endpoint and the bottom of the pit lid. If the 100W endpoint is installed too high, too low, or is touching any of the surrounding surfaces, adjust as necessary.
-
Page 19: Wall Mount Installation
Endpoint positioning other than upright could negatively affect radio performance and battery life. Use only Itron-approved splice kits or inline connectors. The 100W is suitable for use with up to 300 feet of Itron approved cable. Required Tools and Hardware Itron 100W Shelf Mount Kit To install the 100W endpoint using the wall mount procedure 1. - Page 20 Note If mounting requires a screw anchor, mark the location of the bottom anchor and remove the endpoint. Drill the required mounting hole, insert the anchor, and re-attach the endpoint. 7. Holding the 100W endpoint in the upright position, drill the second pilot hole. Use the bottom mounting hole as a template.
Need help?
Do you have a question about the 100W and is the answer not in the manual?
Questions and answers