Advertisement
Advertisement
Table of Contents

Related Manuals for Neptune E-CODER


Summary of Contents for Neptune E-CODER
- Page 1 E-CODER Quick Install Guide ®...
-
Page 3: General Instructions
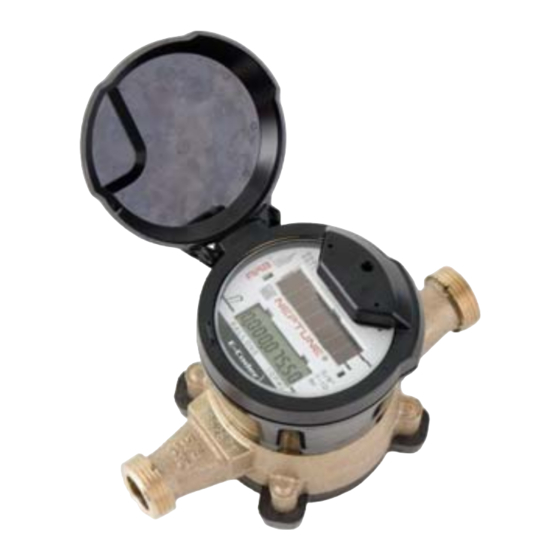
2 Product Description The face of the E-CODER allows you to read various types of information available. The face of the E-CODER is shown in Figure 1. - Page 4 3 Wiring Inside Set Version Run a three-conductor cable from the E-CODER register to the MIU. Refer to the following steps. 1 Connect the three-conductor wire to the encoder register’s terminals as described in the manufacturer’s instructions, using the color code in Table 1.
- Page 5 #4 to the terminal screws and exposed bare wires. See Figure 5. Figure 5 Applying Compound Neptune recommends Novaguard G661 or Dow Corning Compound #4. Novagard may cause irritation to eyes and skin. If swallowed, do not induce vomiting; dilute with one to two glasses of water or milk and seek medical attention.
- Page 6 8 Snap the terminal cover in place by pressing on the molded arrow as shown in Figure 7. Figure 7 Snapping Cover in Place 9 Proceed to “How to Activate” on page 10. 4 Wiring the Pit Set Version Complete the steps to wire the pit set version. Figure 8 shows the components required for installation.
- Page 7 2 Take one non-stripped black wire from the pigtail and one from the receptacle/MIU by inserting the wires into the Scotchlok connector until fully seated. See Figure 10. Figure 10 Seating Connector Wires Do not strip the colored insulation from the wires or strip and twist the bare wires prior to inserting in the connector.
- Page 8 6 Repeat steps one through five for each color wire. See Table 2 for the wiring configuration to connect Neptune MIUs or competitive MIUs to the E-CODER. Table 2 Color Codes for Wires MIU Wire Color / Encoder Terminal MIU Type...
- Page 9 Enhanced R900 v4 MIUs are not Dual Port capable. These instructions only apply to v3 MIUs. The Dual Port R900 and R450 MIUs work only with Neptune ProRead™ or E-CODER registers. Each register must be programmed in “RF Network” mode prior to installation.
- Page 10 Programming the HI Register To complete the following steps, use the Neptune field programmer to select the ProRead Program tab for programming. 1 Select RF Compound HI format. 2 Match the Connectivity 3 Match the Dial Code 65. 4 Type the appropriate register ID.
- Page 11 2 Proceed to “How to Activate” on page 10. 7 Crimping Tool Manufacturers To apply the Scotchlok connectors, Neptune requires the use of a proper crimping tool. Table 3 on page 10 shows a list of various manufacturers and model numbers.
-
Page 12: How To Activate
To read the E-CODER you must first activate it. Complete the following steps to activate the E-CODER. 1 Expose the E-CODER to sunlight or activate with a flashlight for five seconds. If the LCD is able to power on, but there is insufficient light to read the ASIC, the LCD displays LO LIGHT. -
Page 13: How To Read
9 How to Read It is important to become familiar with the information available from the meter. Figure 21 lists various icons and displays along with a description of each. Figure 21 Icons and Displays... -
Page 14: Common Causes Of Leaks
10 Common Causes of Leaks If the leak indicator is Flashing or Continuously ON, the E-CODER is indicating that a possible leak may exist. Leaks can result from various circumstances. To better help you identify a possible leak, the following table contains some common causes of leak problems that can occur. -
Page 15: How To Tell If Water Is In Use
• If the arrow is not Flashing, water is not running. 12 What to Do if There is a Leak The following checklist can be helpful if the E-CODER leak indicator shows a possible leak. Table 5 Checklist for Leaks Check all faucets for possible leaks. - Page 16 If the leak has been correctly repaired, the leak icon changes from Flashing to OFF. 2 Refer to the following tables which describe the standard functions of the E-CODER flags. Table 6 E-CODER Flags Backflow Flag (Resets After 35 Days) Based on reverse movement of the eighth digit, the eighth digit is variable based on the meter size.
-
Page 17: Contact Information
After 35 Days) Number of days the “leak status” was at a minimum value 15 Contact Information Within the United States, Neptune Customer Support is available Monday through Friday, 7:00 AM to 5:00 PM Central Standard Time, by telephone, email, or fax. - Page 18 By Fax To contact Neptune Customer Support by fax, send a description of your problem to (334) 283-7497. Please include on the fax cover sheet the best time of day for a customer support specialist to contact you. By Email To contact Neptune Customer Support by email, send your message to hhsupp@neptunetg.com.
- Page 20 11560 México, Distrito Federal Tel: (525) 55203 5294 / (525) 55203 4032 Fax: (525) 55203 6503 QI E-CODER 02.17 Part No. 12563-001 © Copyright 2003- 2017, Neptune Technology Group Inc. Neptune is a registered trademark of Neptune Technology Group Inc.
Need help?
Do you have a question about the E-CODER and is the answer not in the manual?
Questions and answers