Table of Contents
Advertisement
Quick Links
Advertisement
Table of Contents

Related Manuals for Neptune Leak Spy


Summary of Contents for Neptune Leak Spy
- Page 1 Leak Spy Quick Install Guide...
-
Page 3: General Instructions
The Leak Spy is designed for use with the R900 R450™ pit meter interface unit (MIU). Before installing, a Leak Spy unit must be correctly wired to work with the MIU. 2 Safety and Preliminary Checks • Verify that you are at the location specified on the Site Work Order. - Page 4 • Prewire with a Nicor male connector standard as illustrated in Figure 2. Figure 2 Nicor Male Connector Neptune recommends use of R900 or R450 MIUs prewired with Nicor female connectors. Part numbers are shown below in Table 1. Table 1 MIU Part Numbers...
- Page 5 4 Preparing the Leak Spy Unit Prior to field installation, complete the following steps. 1 Program the Leak Spy, using the Leak Spy User Guide that comes with the Leak Spy unit. Programming sets the internal clock which is essential for correct operation.
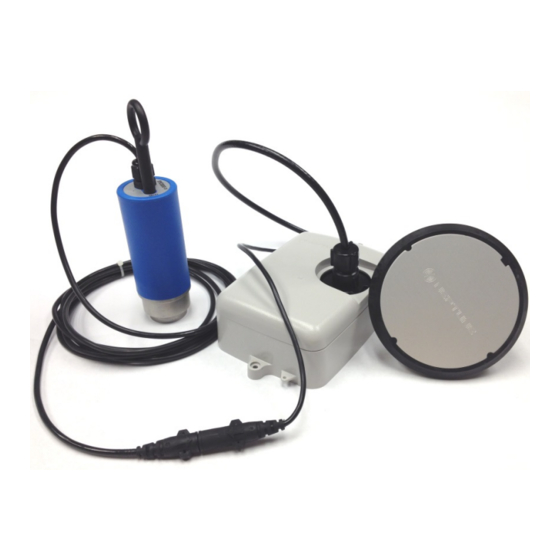
- Page 6 5 Connecting the Leak Spy to the R900/R450 Pit MIU 1 Connect the Leak Spy and MIU by lining the connectors up with the arrows pointed toward each other. 2 Gently insert the Leak Spy connector into the MIU connector and press together securely as shown in Figure 4.
- Page 7 1 Feed the antenna cable and housing through the 1.75 inch hole in the meter valve box. See Figure 6. Figure 6 Pit Antenna Cable and Housing 2 Slip the large plastic nut over the antenna cable and thread it onto the antenna assembly to secure it to the pit lid.
- Page 8 4 Place the flat black rubber washer on the latch plate around the male coax connection. See Figure 10. Figure 10 Black Rubber Washer 5 Apply a coating of NovaGuard on the “F” connector and connect the coax to the “F” connector if not already applied.
- Page 9 Figure 14 Cable Tie Mounting and Activating the Leak Spy Unit The Leak Spy is capable of being mounted to a metal or plastic pipe. The powerful magnet allows mounting on metallic pipes; however, for plastic and non-metallic pipes, Metrotech has accessories available.
-
Page 10: Installation
Leak Spy reading appear on the HHU’s display within one minute. All Leak Spy units return 6 digits. • If the first 3 digits are 111, the Leak Spy has not been programmed. • If the first 3 digits are 255, the Leak Spy is... - Page 11 Example of actual leak data reading: 015038. • Level, first three digits: 015 (15dB) • Frequency, last three digits x 10: 038 x 10 (380 Hz) 2 If a Leak Spy does not appear on the HHU’s display, complete the following steps. •...
-
Page 12: Miu Activation
8 Testing the Leak Spy Unit and R450 MIU Installation After the R450 MIU has been installed and connected to the Leak Spy, follow these steps to verify that the MIU is working properly. MIU Activation 1 Position the magnet against the left side of the MIU directly in line with the Neptune logo, as shown. - Page 13 RSSI Values and N_SIGHT™ PLUS Host Software Capabilities In the N_SIGHT PLUS host software (formerly N_SIGHT R450, ARB N_SIGHT R450, or ARB N_SIGHT FixedBase), the Signal Strength (RSSI values) is a key indicator of the system health as well as the communication capabilities of the MIU with the R450 DC.
-
Page 14: Contact Information
9 Checklist Before leaving the installation site, be sure to: Record the MIU ID for each Leak Spy unit. Verify that you have followed all requirements of this Quick Install Guide. Verify that you have recorded all required information. Clean up any installation debris. - Page 16 Delegación Miguel Hidalgo 11560 México, Distrito Federal Tel: (525) 55203 5294 / (525) 55203 4032 Fax: (525) 55203 6503 QI Leak Spy 06.15 © Copyright 2015, Neptune Technology Group Inc. Neptune is a registered trademark of Neptune Technology Group Inc.
Need help?
Do you have a question about the Leak Spy and is the answer not in the manual?
Questions and answers