
Related Manuals for golmar VESTA7 GB2


Summary of Contents for golmar VESTA7 GB2
- Page 1 TECHNOLOGY C m ra/ Light Intercom About Settings Door panel VESTA G 2 M ONITOR Code 50121960 REV.0 1 TVESTA G 2 EN...
-
Page 2: Table Of Contents
6 Installing the monitor in an embedding box........................7 Operation..................................Description and communication with hearing aids (Vesta7 GB2/H monitor only) ............8 Receiving a call from the door panel ........................8 Call not answered (missed call) ...................... -
Page 3: Characteristics
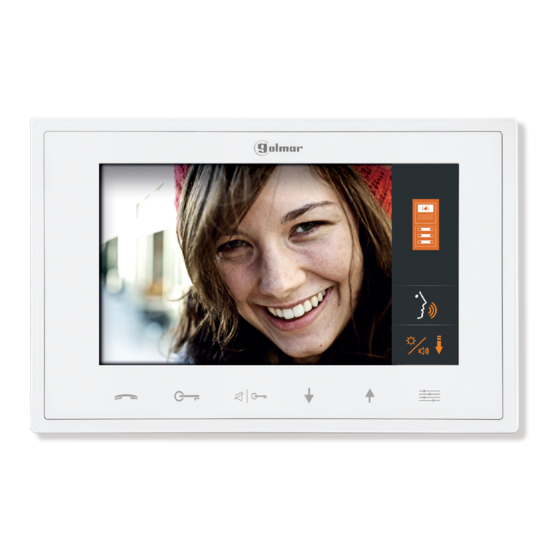
7” TFT colour screen. Monitor with simple installation (non-polarised 2 wire BUS). The VESTA7 GB2/H monitor interacts with hearing aids equipped with T-mode, making conversation between the door panel and apartment easier. Capacitive function buttons to access and select menu functions: User menu: Displaying the door panel image. -
Page 4: Description Of The Monitor
Connector. In standby: Enter menu. continued m.Bus connection terminals. Communication with hearing aids (Vesta7 GB2/H only) Set the hearing aid switch to T-mode, see p. 8. Menu buttons: On menu screen: Display door panel image. Menu entry and user settings button. -
Page 5: Setting The Monitor's Address Codes
VESTA7 G 2 MONITOR DESCRIPTION OF THE MONITOR Setting the monitor's address codes (addresses 0 to 31): DIP6: Sets the end of line. Set to ON in monitors where the video cable terminates. Set to OFF only in intermediate monitors. Dip6 Dip6 DIP1 to DIP5: To set the monitor address (addresses 0 to 31). -
Page 6: Installing The Monitor In A Wall Mounting Connector
VESTA7 G 2 MONITOR INSTALLING THE MONITOR IN A WALL MOUNTING CONNECTOR Avoid dusty or smoky environments or locations near sources of heat. Positioning the wall mounting connector: The top of the connector must be positioned at a height of 1.60m. The minimum distance between the sides of the connector and the closest object must be 5cm. -
Page 7: Installing The Monitor In An Embedding Box
VESTA7 G 2 MONITOR INSTALLING THE MONITOR IN AN EMBEDDING BOX Avoid dusty or smoky environments or locations near sources of heat. Positioning the embedding box: Make a hole in the wall to position the top of the universal embedding box at a height of 1.60 m from the ground. The minimum distance between the sides of the embedding box and the closest object must be 5cm. -
Page 8: Operation
Start/stop communication. Call: LED blinks rapidly. Communication: LED blinks slowly. Communication with hearing aid (Vesta7 GB2/H monitor only): Make sure that the hearing aid is 20 cm away from the monitor to ensure maximum audio quality during communication with the door panel. -
Page 9: Call Not Answered (Missed Call)
VESTA7 G 2 MONITOR OPERATION Continued from previous page. Call not answered (missed call): When a call is received, the monitor(s) will play a melody, the LEDs will illuminate (the LED of button will blink rapidly) and the image from the door panel will be displayed on the master monitor without the visitor knowing. If the call is not answered within 40 seconds the monitor returns to standby mode. - Page 10 VESTA7 G 2 MONITOR SCREEN AND VOLUME SETTINGS MENU To adjust brightness, the monitor must be in communication or auto switch-on mode. Then press button display option . Using menu buttons , select the required brightness level. Press button to change the following option or press to exit the settings menu.
-
Page 11: User Direct Access Functions
VESTA7 G 2 MONITOR USER DIRECT ACCESS FUNCTIONS Description of buttons with user direct access functions: Display door panel image. Activate intercom function within apartment. Activate outdoor light. Activate/deactivate 'Do not disturb' mode function. Displaying door panel/camera images: To display the image from one of the installed door panels/cameras, press button while the monitor is in standby. -
Page 12: Activating The Outdoor Light
VESTA7 G 2 MONITOR USER DIRECT ACCESS FUNCTIONS Continued from previous page. Then, using menu buttons and , select the required door panel/camera (DQ-CAM-GB2 module required) in descending and ascending mode respectively (carousel mode). The connection will last for 30 seconds or until option is pressed twice if a door panel is selected or once if a camera is selected. -
Page 13: Activating 'Do Not Disturb' Mode
VESTA7 G 2 MONITOR USER DIRECT ACCESS FUNCTIONS Continued from previous page. Activating 'Do not disturb' mode: To activate 'Do not disturb' mode, press button on the master monitor while in standby. The status LED of button of the master and secondary monitors in the apartment will illuminate indicating that the function is activated. - Page 14 VESTA7 G 2 MONITOR USER DIRECT ACCESS FUNCTIONS Continued from previous page. On the other monitors in the apartment, the status LED of button will blink rapidly and a melody will indicate that an intercom call is being made. Press button to accept the call and establish communication, the status LED of button will blink slowly, or press button to cancel it.
-
Page 15: User Menu
VESTA7 G 2 MONITOR USER MENU Description of the menu buttons: C m ra/ Light Intercom About Settings Door panel Menu entry and user settings button. Display door panel image. Menu screen exit and selection button. Activate outdoor light. Intercom function between apartments. Menu entry and selection button. -
Page 16: Displaying Door Panel/Camera Images
VESTA7 G 2 MONITOR USER MENU Continued from previous page. Displaying door panel/camera images: To display the image from one of the installed door panels/cameras, press button Main menu screen C m ra/ Light Intercom About Settings Door panel The following screen will display the image from the door panel with address 1, indicating the selected door panel '01' and the elapsed connection time. -
Page 17: Activating The Outdoor Light
VESTA7 G 2 MONITOR USER MENU Continued from previous page. Activating the outdoor light: To activate the outdoor light, press button . The outdoor light (SAR-GB2 module required) will activate for 1 minute. See the “TSAR-GB2 ML” user manual for how to set other light activation times. Main menu screen C m ra/ Light... -
Page 18: Exiting The Menu
VESTA7 G 2 MONITOR USER MENU Continued from previous page. On the monitor(s) of the apartment called, the status LED of button will blink rapidly, a melody will indicate that an intercom call is being made and the address of the apartment making the call will be shown. Press button accept the call and establish communication, the status LED of button will blink slowly, or press button to cancel... -
Page 19: About (Information And Installer Setup)
VESTA7 G 2 MONITOR USER MENU Continued from previous page. About (information and installer setup): Press button . The following selection and information screen will be displayed. Main menu screen Selection and information screen 00.00 00.01.00 AUTO C m ra/ Light Intercom About... -
Page 20: Settings (Ringtone, Ringtone Volume, Default Settings And Language Selection)
VESTA7 G 2 MONITOR USER MENU Continued from previous page. Press button to go to the main menu screen. Selection and information screen Main menu screen 00.00 00.01.00 AUTO C m ra/ Light Intercom About Settings Door panel Settings (ringtone, ringtone volume, default settings and language selection): To access the monitor settings, press button . - Page 21 VESTA7 G 2 MONITOR USER MENU Continued from previous page. To change the intercom ringtone, use buttons . Then press option to change the apartment door ringtone. Intercom ringtone settings Apartment door ringtone settings To change the apartment door ringtone, use buttons Then press option to change the ringtone volume.
-
Page 22: Cleaning The Monitor
VESTA7 G 2 MONITOR USER MENU Continued from previous page. Default settings. To reset the default settings (ringtone, ringtone volume, brightness, colour, contrast and communication volume), press button . A long tone will confirm that the function has been set. Then press option to select the language. -
Page 23: Notes
VESTA7 G 2 MONITOR NOT S:... - Page 24 C/ Silici, 13 08940- Cornellá de Llobregat SPAIN Golmar se reserva el derecho a cualquier modificación sin previo aviso. Golmar se réserve le droit de toute modification sans préavis. Golmar reserves the right to make any modifications without prior notice.
Need help?
Do you have a question about the VESTA7 GB2 and is the answer not in the manual?
Questions and answers
sonnette ne fonctionne pas