Table of Contents
Advertisement
Advertisement
Table of Contents

Related Manuals for Launch CR-HD


Summary of Contents for Launch CR-HD
- Page 2 V1.00.000 2011-12-27...
- Page 3 Copyright Information Copyright © 2012 by LAUNCH TECH. CO., LTD. All rights reserved. No part of this publication may be reproduced, stored in a retrieval system, or transmitted in any form or by any means, electronic, mechanical, photocopying and recording or otherwise, without the prior written permission of LAUNCH.
- Page 4 General Limitations This is a license, not a transfer of title, to the materials, and LAUNCH retains ownership of all copies of the Materials. Customer acknowledges that the...
- Page 5 LAUNCH. Customer shall implement reasonable security measures to protect such trade secrets. To the extent required by law, and at Customer’s written request, LAUNCH shall provide Customer with the interface information needed to achieve interoperability between the Materials and another independently created program, on payment of LAUNCH’s applicable fee, if any.
- Page 6 Materials and any Document. Customer’s rights under this Agreement will terminate immediately without notice from LAUNCH if Customer fails to comply with any provision of this Agreement. Upon termination, Customer shall destroy all copies of Software in its possession or control.
- Page 7 • Neither LAUNCH nor its affiliates shall be liable to the purchaser of this unit or third parties for damages, losses, costs or expenses incurred by purchaser or third parties as a result of: accident, misuse, or abuse of this unit, or unauthorized modifications, repairs, or alterations to this unit, or failure to strictly comply with LAUNCH operating and maintenance instructions.
- Page 8 Don’t connect or disconnect any test equipment while the ignition is on or the engine is running. • Keep the CR-HD dry, clean, free from oil/water or grease. Use a mild detergent on a clean cloth to clean the outside of the CR-HD, when necessary.
-
Page 9: Table Of Contents
2. General Information ..................1 2.1 About DTC ....................1 2.2 J1708/J1587/J1939 ................. 1 3. Product Descriptions ................... 3 3.1 Outline of CR-HD ..................3 3.2 Specifications................... 4 3.3 Accessories Included ................4 3.4 Power supply ................... 5 4. OPERATION ....................5 4.1 Connection.................... -
Page 10: Introduction
This section explains the basic elements of fault codes for J1587/J1708 and J1939 data bus protocols, how to view these codes on CR-HD, and what they mean. Each fault code on CR-HD contains three distinct pieces of information, as described below. - Page 11 LAUNCH CR-HD User's Manual SAE J1708 SAE J1708 is a standard used for serial communications between ECUs on a heavy duty vehicle and also between a computer and the vehicle. With respect to Open System Interconnection model (OSI), J1708 defines the physical layer.
-
Page 12: Product Descriptions
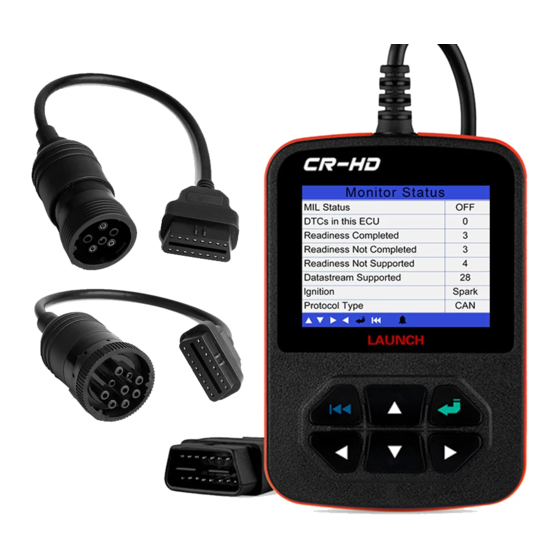
LAUNCH CR-HD User's Manual 3. Product Descriptions 3.1 Outline of CR-HD Figure 3-1 Name Descriptions Cable with OBD II Connects the CR-HD to the vehicle’s Data ① CONNECTOR Link Connector (DLC). LCD DISPLAY Indicates test results. ②... -
Page 13: Specifications
⑤/⑦ RIGHT/LEFT BUTTONs Move cursor right or left for selection; Or turn page up or down when more than one page is displayed. USB PORT Connects to computer to update the CR-HD ⑧ online. EXIT BUTTON Returns to previous menu. -
Page 14: Power Supply
LAUNCH CR-HD User's Manual 3.4 Power supply The power of the CR-HD is provided via the vehicle’s Data Link Connector (DLC). Follow the steps below to power it up: Find DLC on heavy-duty vehicle; A plastic DLC cover may be found for some vehicles and you need to remove it before plugging the 6 PIN or 9 PIN DLC diagnostic adaptor. -
Page 15: Diagnose
LAUNCH CR-HD User's Manual 4.2 Diagnose In Figure 4-1, use [ ] [ ] button to select [Diagnose] and press [ ], the system will switch to the following protocol selection interface: Figure 4-2 A. Selecting SAE J1708 6 PIN Deutsch... - Page 16 LAUNCH CR-HD User's Manual Figure 4-4 Press [ ] [ ] button to highlight [SAE J1587/1708], and press [ ], the following screen will appear: Figure 4-5 If [SAE J939] is selected in Figure 4-4, press [ ], the screen will appear as...
- Page 17 LAUNCH CR-HD User's Manual After selecting the system item, press [ ], the screen will appear as below: Figure 4-7 4.2.1 Read DTC Select [Read DTC] and press [ ] in Figure 4-7, it will jump to the following screen:...
- Page 18 LAUNCH CR-HD User's Manual Indicates there are total 8 codes and SPN0100 is the first code to Further display. descriptions on current Figure 4-9 Generally, there are three elements displayed on the first row and the second row indicates detailed descriptions on DTC, as shown in Figure 4-9: •...
- Page 19 LAUNCH CR-HD User's Manual 4.2.2 Clear DTC Select [Clear DTC] and press [ ], the system will switch to the following screen. Figure 4-11 Select one desired item and press [ ], a prompt message will appear on the screen, as shown in Figure 4-12.
- Page 20 LAUNCH CR-HD User's Manual Figure 4-13 Follw the on-screen instructions to check the possible cause. Press [ ] to exit and return to the previous screen. Note: After clearing, you should retrieve trouble codes once more or turn ignition on and retrieve codes again. If there are still some trouble codes in the system, please troubleshoot the code using a factory diagnosis guide, then clear the code and recheck.
- Page 21 LAUNCH CR-HD User's Manual Figure 4-15 Press [ ] [ ] to view other data streams; press [ ] to return to the Data Stream menu screen. 4.2.3.2 Select Items Use [ ] [ ] button to select [Select Items] in Figure 4-14 and press [...
- Page 22 LAUNCH CR-HD User's Manual Figure 4-17 Figure 4-18 After selecting items and press [ ], it will enter Figure 4-18. See Figure 4-18 shown as above. 4.2.3.3 View Graphic Items Press [ ] [ ] button to select [View Graphic Items] in Figure 4-14 and press ], the system will enter the datastream selection interface.
-
Page 23: Tool Setup
LAUNCH CR-HD User's Manual 4.3 Tool Setup Select [Tool Setup] in the main menu and press [ ], the system will enter the following screen: Figure 4-21 1) Beeper: Turn ON/OFF the Beeper. Select [Beeper] in the main menu and press [... -
Page 24: Help
LAUNCH CR-HD User's Manual Figure 4-23 Use [ ] [ ] button to change the highlighted numbers; press [ ] [ ] to move the highlight bar to different position; press [ ] to confirm. Press [ ] to return to the Tool setup menu screen. -
Page 25: Upgrading
LAUNCH CR-HD User's Manual 5. Upgrading 5.1 CR-HD upgrading flow... - Page 26 CR-HD User's Manual 5.2 User registration As you buy a CR-HD, please visit www.crecorder.com to register, only after successfully registered, you can logon at the site and can download the CR-HD driver & latest version program of CR-HD. 5.3 Upgrading Log on to www.crecorder.com, download the latest version of the CR-HD...
- Page 27 CR-HD User's Manual 6. FAQ Here we list some frequently asked questions and answers relating to CR-HD. Question: System halts when reading data stream. What is the reason? Answer: It may be caused by a slackened connector. Please turn off the CR- HD, firmly connect the connector, and switch on it again.
- Page 28 The exclusive remedy for any automotive meter found to be defective is repair or replacement, and LAUNCH shall not be liable for any consequential or incidental damages.
Need help?
Do you have a question about the CR-HD and is the answer not in the manual?
Questions and answers