Launch X-431 PADII User Manual
Android-based vehicle trouble diagnostic
device
Hide thumbs
Also See for X-431 PADII:
- User manual (126 pages) ,
- Manual (92 pages) ,
- Quick start manual (4 pages)
Table of Contents
Advertisement
Quick Links
Advertisement
Table of Contents

Related Manuals for Launch X-431 PADII


Summary of Contents for Launch X-431 PADII
- Page 1 Version: V1.00.001 Revised date: 12-22-2014...
- Page 2 LAUNCH • Do not use X-431 PADII in exceptionally cold or hot, dusty, damp or operating and maintenance instructions. LAUNCH shall not be liable dry environments.
-
Page 3: Table Of Contents
LAUNCH X-431 PADII User's Manual • Do not disconnect power abruptly when X-431 PADII is being Table of Contents formatted or in process of uploading or downloading. Or else it may 1 Introduction ..................1 result in program error. 1.1 Product Profile ................1 Precautions on Using X-431 PADII 1.2 Features .................. - Page 4 5.7.2 Assign a diagnostic device to a official account ....21 6.4.2 Test sample ................ 30 5.7.3 Pre-bind a golo user ............21 7 Batterybox (Optional) ..............31 5.7.4 Launch real-time remote diagnosis ........22 7.1 Product Summary ................ 31 5.8 Profile ..................22 7.2 Test Environment ................. 31 5.8.1 My Connector ..............
- Page 5 11.3.2 Allow other devices to search for X-431 PADII ....44 7.5 Precautions on battery test ............34 11.3.3 Search other devices and pair it with X-431 PADII ... 44 8 Oscilloscope(Optional) ..............36 11.3.4 Send file via Bluetooth ............44 9 Borescope (Optional) ..............
-
Page 6: Introduction
LAUNCH X-431 PADII User's Manual 1 Introduction efficiently. D. golo IM: Configures X-431 PADII as an IM (Instant Messaging) tool, which enables technicians to exchange repair experience and 1.1 Product Profile perform remote assistance more conveniently; X-431 PADII is a new Android-based vehicle trouble diagnostic Wi-Fi connection and Ethernet connection are supported;... -
Page 7: Knowledge Of X-431 Padii
, 5 . 0 m e g a p i x e l , A F w i t h There are three main components to the X-431 PADII system: Flashlight • X-431 PADII Tablet -- the central processor and monitor for the Sensor Gravity Accelerometer system (For details, please refer to Chapter 2.1.) Audio Input/Output •... -
Page 8: Padii Tablet
1. USB Port is reserved for add-on modules, and other USB devices use only. IPS Touch Screen Micro USB Port is reserved for Micro USB cable only. Microphone 2. It illuminates red while X-431 PADII tablet is charging. Once charging is Charging Slot -- To recharge X-431 PADII. finished, it will turn green. -
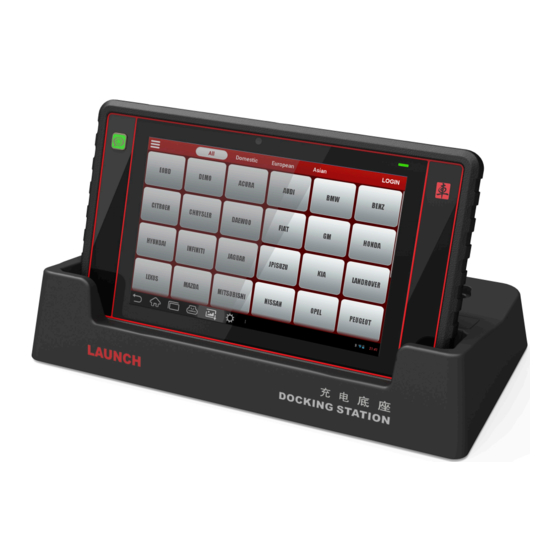
Page 9: X-431 Padii Docking Station
LAUNCH X-431 PADII User's Manual Table 2-2 formulates parts of X-431 PADII tablet (rear): Name & Descriptions Rear Camera Camera Flash Audio Speaker Battery Fig. 2-5 X-431 PADII Tablet (rear view) 2.2 X-431 PADII Docking Station Table 2-3 formulates ports of X-431 PADII docking station Name &... -
Page 10: Diagnostic Connector
LAUNCH X-431 PADII User's Manual 2.3 Diagnostic Connector software, testing connectors) may vary. Please consult from the local agency or check the package list supplied with X-431 PADII together. Table 2-5 -- X-431 PADII common accessories and descriptions Name Picture X-431 PADII Tablet Fig. - Page 11 LAUNCH X-431 PADII User's Manual Power Adaptor OBD I Converter (To convert 100~240V AC power (A converting cable for connecting supply to 5V DC power supply.) non-16 pin connector.) HDMI Cable Password (To connect to an external Envelope projector or monitor with HDMI (A piece of paper bearing interface.)
-
Page 12: Preparations
Choose any one of the followings to charge your X-431 PADII: A. Use the included 5V power adaptor: Connect one end of the power adaptor to DC IN port of X-431 PADII, then connect the other end to the AC outlet. Never use other similar adaptors to charge X-431 PADII. -
Page 13: Power On / Power Off X-431 Padii
3.5.1 Lock the screen Note: If it is the first time you use X-431 PADII or X-431 PADII keeps idle for a long time, X-431 PADII could fail to be turned on. It • When X-431 PADII is ON, press POWER key once to lock the results from low battery. -
Page 14: Screen Layout
The notification bar is used to display some activities, such as new screenshots are stored in the Screenshots folder. messages, to do list and running tasks. You can also open the to configure the X-431 PADII system settings. notification bar to view the reminder or activity notification. -
Page 15: Customize Your Desktop
Tips: Reducing the brightness of the screen is helpful to save the 3.10.1 Activate / hide on-screen keyboard power of X-431 PADII. By default, Android keybaord is available on X-431 PADII. On the main menu screen, tap Settings > Display > Brightness. Drag the slider to adjust it as desired. -
Page 16: Edit Text
LAUNCH X-431 PADII User's Manual • To input text, tap the input box and the on-screen keyboard will be To bring up an input options menu. Input languages and activated automatically. Android keyboard settings such as auto-capitalization and • After inputting, tap to hide the keyboard. -
Page 17: Wi-Fi Setting
For some Asian and European vehicles, the DLC is located behind the When X-431 PADII is in range of the WLAN, it will connect to the ashtray and the ashtray must be removed to access the connector. If previously linked network automatically. -
Page 18: Vehicle Connection
LAUNCH X-431 PADII User's Manual location. to DC IN port of X-431 PADII tablet, and the other end to AC outlet. B. Internal battery pack: For details on how to recharge X-431 PADII, see “Chapter 3.1 Charging X-431 PADII”. For non-OBDII vehicle, proceed as follows: Locate vehicle’s DLC socket. -
Page 19: Bluetooth Setting
Enter X-431 PADII Bluetooth setting screen (“Settings” --> “WIRELESS & NETWORK” --> “Bluetooth”), slide the Bluetooth switch to ON and X-431 PADII will start searching available Bluetooth device, tap the desired connector to pair and match. By default, the Bluetooth name is 98429*****00 (where ***** stands for 5 digits.). - Page 20 LAUNCH X-431 PADII User's Manual In Fig. 5-7, input the Serial Number and Activation Code, which can be found in the password envelope. Product S/N Fig. 5-5 Activation Code 1. If you are a new user, tap “New Register” to enter registration page.
-
Page 21: Diagnostic Software Layout
LAUNCH X-431 PADII User's Manual 5.4.2 Diagnostic software layout Fig. 5-10 In Fig. 5-10, tap “One-Click Update” to start downloading. It may take several minutes to finish it, please be patient to wait. To pause Fig. 5-11 downloading, tap “Stop”; To resume it, tap “Continue”. If network to pull down all function menu. -
Page 22: Function Menu
Name Description , and then tap “Update” to select the paired diagnostic Diagnostic Configures X-431 PADII to operate as connector. Tap the serial number and a list of diagnostic software will a diagnostic tool. pop up on the screen. Repair Data... -
Page 23: Start Diagnosing
Vehicle Selection: Tap to return to the vehicle selection screen. Print: Tap it to print the current screen. To perform printing, you need to purchase a Wi-Fi printer manufactured by LAUNCH separately. Search Bluetooth: Tap it to start searching all available Bluetooth devices. -
Page 24: Read Trouble Code
Select Page: Tap it to select all items of the current page. Print: Tap it to print the current screen. To perform printing, you need to purchase a Wi-Fi printer manufactured by LAUNCH separately. Unselect: Tap it to deselect all data stream items. -
Page 25: Special Function
LAUNCH X-431 PADII User's Manual After selecting the desired items, tap “Confirm” to enter the data Help: Tap to view the help information. stream reading page. Fig. 5-19 Fig. 5-18 Combine: Tap to display the selected waveform in combined form. -
Page 26: Register A Golo Official Account
Follow the steps described as below to proceed: Click “Apply now” at the upper right corner. Input X-431 PADII account and password, and click “Apply for an Log in http://ipublic.x431.com/; account”. Click “golo Clients” in the navigation bar;... -
Page 27: Launch Real-Time Remote Diagnosis
“Remote Diagnosis” from the serve for this golo user. After finished, click “Save” to confirm your pop-up window to launch a remote assistance. settings. Note: The pre-binding agreement is in effect for one year. During this 5.8 Profile... -
Page 28: My Report
LAUNCH X-431 PADII User's Manual 5.8.4 My Report 5.9.1 System of Units This option is used to view the diagnostic report generated in process It is designed to set the measurement unit. Metric System and English of vehicle diagnosis. Additionally, delete, send operations are also System are available. -
Page 29: Sensorbox (Optional)
Precision ±5% Voltage range -5V~+5V Max output current 70mA Predefined frequency range 0~150Hz Fig. 6-1 Structural diagram of Sensorbox Square-wave signal pulse frequency 0~15KHz Table 6-1 shows the ports and indicators for X-431 PADII sensorbox Square-wave signal duty ratio 10%~90%... -
Page 30: Sensorbox Accessories
VΩHz Testing terminal of multimeter Firstly, power on the main unit (Connect one end of the power adaptor into the DC IN port of X-431 PADII tablet, and the other 6.2.2 Sensorbox accessories end to the AC outlet.); X-431 PADII sensorbox accessories include sensor test cable, probe Plug one end of the sensor test cable (black) into the “COM”... - Page 31 X-431 PADII will begin to output the sensor or the connections between ECU and sensors, or ECU itself. simulation voltages. Please note the red probe is the output terminal In this case, we can make full use of simulation test to input the signal of simulation voltage.
- Page 32 LAUNCH X-431 PADII User's Manual In Fig. 6-3, tap “Predefined waveform simulation” to enter the screen HO2S: Heated Oxygen Sensor shown as Fig. 6-4. IAT: Intake Air Temperature Sensor MAF: Mass Air Flow Sensor MAP: Manifold Absolute Pressure Sensor TP: Throttle Position Sensor...
-
Page 33: Precautions On Checking Vehicle Sensor
]: Continues the following operation. waveform, then tap , X-431 PADII will output a waveform as desired. 6.3.3 Precautions on checking vehicle sensor Warning: Just draw a complete periodic waveform (when it is outputted, the system will regard the waveform in the drawing area as •... -
Page 34: Multimeter
Please choose the correct probes to match the different terminals. 6.4 Multimeter 6.4.1 Main Menu Make sure X-431 PADII main unit and the sensorbox are properly Fig. 6-10 connected (Refer to Chapter 6.3.1 Connections for details), power on The following operations can be done: X-431 PADII and enter the function menu interface, tap “Multimeter”... -
Page 35: Test Sample
LAUNCH X-431 PADII User's Manual from the left. Independent testing: Unplug the wire connector of coolant temperature sensor, then remove ]: Reduces the range and zoom in the waveform. the sensor from the engine; place the sensor into a breaker with water ]: Increase the range and zoom out the waveform. -
Page 36: Batterybox (Optional)
Society of Automotive Engineers 100~1700 7.1 Product Summary 7.2 Test Environment X-431 PADII provides an optional function of automotive battery 7.2.1 Test environment test, which adopts the latest state-of-the-art conductance testing Inside the vehicle test indicates that the battery connects to loading technology in the world and can test vehicle’s battery status. -
Page 37: Batterybox Structure And Test Accessories
Battery connector: Connect to battery for battery test. powered up; If the green light is always on, it indicates the clip is B type USB terminal: Connect to the X-431 PADII tablet with a USB well connected; while the green light blinks, it indicates that the cable. -
Page 38: Inside The Vehicle Test
LAUNCH X-431 PADII User's Manual 7.4.2 Inside the vehicle test floating electricity has been removed, please turn off the headlamp to continue the testing” will appear on the screen. Battery test and charging system & actuation system test can be done Follow the on-screen instructions to turn off the headlamp and in this mode. -
Page 39: Outside The Vehicle Test
LAUNCH X-431 PADII User's Manual If JIS is selected, tap , the system will enter Select testing capacity screen. Users can select corresponding standard capacity value according to battery model marked on battery. and the testing result will appear on the screen. - Page 40 LAUNCH X-431 PADII User's Manual special required, all loads need to be power off such as headlamp, system will prompt you a message of “Engine has been speeded” engine etc. before testing battery. It has no influence on test result in the event that engine’s output The operating time required for charging system and actuation system voltage or engine revolution is not very stable.
-
Page 41: Oscilloscope(Optional)
LAUNCH X-431 PADII User's Manual 8 Oscilloscope(Optional) 9 Borescope (Optional) Oscilloscope is an optional function of X-431 PADII, including 9.1 Introduction automotive oscilloscope and automotive ignition waveform. Automotive borescope is mainly applied to those unseen parts of Automotive oscilloscope can make the auto repair technician quickly engine, fuel tank, braking system. - Page 42 Snapshot button: To take a snapshot of the current view USB Port USB1.1/2.0/3.0 and save it to your LAUNCH diagnostic tool as an image. Power Supply 5V via USB Flexible tube: You can bend the neck to get in to hard-to-...
- Page 43 After connections are properly made, press the [ POWER] button on X-431 PADII to turn it on. Wait until the system enters the main menu, tap . Tap and select [Borescope] to run it, then the screen will display the scene captured from the borescope camera.
-
Page 44: 431 Hd Module (Optional)
Fig. 10-1 Ports and indicators of X-431 HD module Name Notes X-431 PADII provides an optional function of X-431 Heavy-duty module, which is specifically designed to diagnose diesel and gas- Indicators (from left fueled heavy-duty vehicle models of 12V & 24V voltage. -
Page 45: Technical Parameters
LAUNCH X-431 PADII User's Manual 10.1.3 Technical Parameters • Working voltage: 9~36V • Working temperature: -20 ℃ ~ 70℃ • Storage temperature: -30 ℃ ~ 80℃ • Relative humidity: 10% ~ 80% • Dimension: 110 mm * 178 mm * 50 mm 10.2 Connections... -
Page 46: Download And Install X-431 Hd Module App
Diagnosing a heavy-duty truck has same operation procedures corresponding to X-431 HD module; as DEMO program. For details, please refer to Chapter 5.6 “Start Note: If downloading using X-431 PADII, please make sure Wi-Fi has Diagnosing”. good or strong signals. -
Page 47: Others
After inputting, tap , you can perform any one of the followings: Once Email account is removed, X-431 PADII stops receiving the Attach file, add CC/BCC, save draft, discard and setting. emails from this account, but all messages in it still keeps as it is. -
Page 48: Browser
11.2.1 Open browser To protect your X-431 PADII and personal data, please download Enter main menu screen, tap Browser to launch the browser. You can applications from trusted sources. To configure it, tap Settings > choose the desired homepage or input the website address to browse. -
Page 49: Using Bluetooth
Bluetooth. 11.3 Using Bluetooth To transfer files via Bluetooth, please proceed with the following steps Bluetooth connection is supported on X-431 PADII. Using it, you described below: can connect X-431 PADII to other compatible devices for data Enter main menu screen, and tap “File Manager”. -
Page 50: How To Record A Video
LAUNCH X-431 PADII User's Manual 11.4.2 How to record a video In camera mode, drag the slider to video mode. Fig. 11-2 Fig. 11-3 Drag the slider to toggle between camera and video mode. Drag the slider to toggle between camera and video mode. -
Page 51: Gallery
To zoom out, either double-tap again or place two fingers apart on the screen and then pinch them together. 11.7 Calendar Featuring gravity sensor, X-431 PADII will adjust the orientation of the This function lets you view calendar or create to-do events. pictures automatically if it is rotated. -
Page 52: Delete An Alarm
This option enables you to manage your files. 11.11 Set Date & Time Tap File Manager, and then choose the desired folder to perform X-431 PADII is preset to use the network-provided date, time zone and corresponding operations. time. 11.10 Applications Note: If Automatic date &... -
Page 53: Appendix - Faq
> Check all installed applications and remove the unnecessary In light that you often use X-431 PADII to diagnose vehicles and it may applications. take you several minutes to do resetting, you are not recommended to If all steps mentioned above are finished and the system still works define screen lock. - Page 54 X-431 PADII User's Manual 7. The data and time of X-431 PADII can not be set. It is because Automatic date & time is set on your X-431 PADII. Tap Settings > Date & time, deselect “Automatic date & time” and then set...
- Page 55 The exclusive Launch Industrial Park, remedy for any automotive meter found to be defective is repair or replacement, and LAUNCH shall not be liable for any consequential or North of Wuhe Avenue, incidental damages.
Need help?
Do you have a question about the X-431 PADII and is the answer not in the manual?
Questions and answers