Table of Contents
Advertisement
Advertisement
Table of Contents

Related Manuals for Thermo Scientific DSQ II


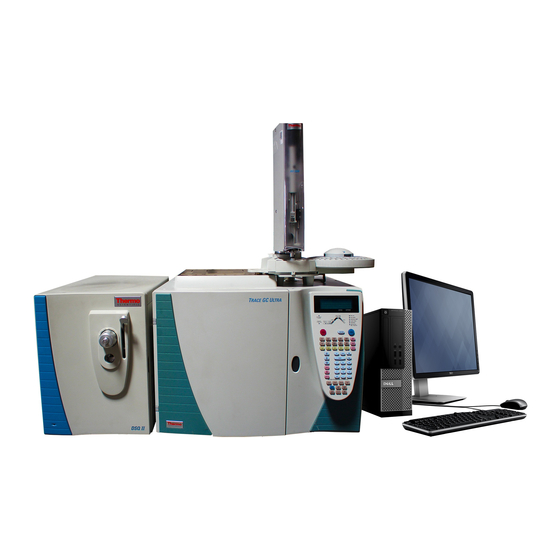
Summary of Contents for Thermo Scientific DSQ II
- Page 1 DSQ II Hardware Manual 120299-0002 Revision C December 1, 2009...
- Page 2 SGE product. All other trademarks are the property of Thermo Fisher Scientific and its subsidiaries. Ion Trap series refers to ITQ and PolarisQ instruments. DSQ series refers to all DSQ and DSQ II instruments. Information about the TRACE GC and FOCUS GC instruments is included in this document.
- Page 3 Reader’s Survey DSQ II Hardware Manual, 120299-0002, Revision C Free gift for your returned Reader’s Survey. Please help us improve the quality of our documentation by completing and returning this survey. Circle one number for each statement: Strongly Strongly Agree...
- Page 5 • DSQ standards: EMC EN 61326-1:1998 + A1:1998. Safety EN 61010-1:1990 + A1:1992 + A2:1995 • DSQ II standards: EMC EN 61326-1:1997 + A1:1998 + A2:2001. Safety EN 61010-1:2001 • Direct Probe Controller (DPC) standards: EMC EN 55011:1991 + EN 50082-1:1992. Safety EN 61010-1:1994 Low Voltage Safety Compliance This device complies with Low Voltage Directive 73/23/EEC and harmonized standard EN 61010-1:2001.
- Page 6 Notice on Lifting and Handling of Thermo Scientific Instruments For your safety, and in compliance with international regulations, the physical handling of this Thermo Fisher Scientific instrument requires a team effort to lift and/or move the instrument.
- Page 7 WEEERoHS for further information on Thermo Fisher Scientific’s compliance with these Directives and the recyclers in your country. WEEE Konformität Dieses Produkt muss die EU Waste Electrical & Electronic Equipment (WEEE) Richtlinie 2002/96/EC erfüllen. Das Produkt ist durch folgendes Symbol gekennzeichnet: Thermo Fisher Scientific hat Vereinbarungen mit Verwertungs-/Entsorgungsfirmen in allen EU-Mitgliedsstaaten getroffen, damit dieses Produkt durch diese Firmen wiederverwertet oder entsorgt werden kann.
-
Page 9: Table Of Contents
Running Benchmark Tests ........24 Preparing the DSQ II for Maintenance ....... 25 Removing the Front and Top Covers . - Page 10 Power Supply Symptoms......... 139 DSQ II Hardware Manual...
- Page 11 Electron Multiplier ..........189 Thermo Scientific DSQ II Hardware Manual...
- Page 12 Reordering DSQ II Components ........
- Page 13 Preface This guide contains detailed instructions for operating, maintaining, and troubleshooting the DSQ II mass spectrometer. About Your System Thermo Fisher Scientific systems provide the highest caliber gas chromatography/mass spectrometry (GC/MS) instrumentation available on today’s market. GC/MS represents a combination of two powerful analytical techniques: GC, which acts as a separation technique and MS, which acts as a detection technique.
- Page 14 Note Emphasizes important information about a task. Tip Helpful information that can make a task easier. DSQ II Hardware Manual Thermo Scientific...
- Page 15 We use this symbol and another appropriate safety symbol to alert to an imminent or potential hazard that could cause personal injury. Thermo Scientific DSQ II Hardware Manual...
- Page 16 • Send an e-mail message to the Technical Publications Editor at techpubsaustin@thermofisher.com. Related Documentation In addition to this guide, Thermo Scientific provides the following documents for the DSQ II. These documents are also available on a “Print-By-Request” basis. DSQ II Document Set, PN 120299 •...
-
Page 17: Basic Operations
Basic Operations This chapter describes basic operations of the TRACE GC Ultra and DSQ II. Contents • “Installing a Column into the GC/MS System” page 4 • “Removing a Column from the GC/MS System” page 15 • “Starting Up the GC/MS System”... -
Page 18: Getting The Right Tools
Getting the Right Tools Getting the Right Tools The following table contains the tools and parts you will need to install the DSQ II system. Some items are included with the system and some are not. Table 1. DSQ II System Installation Tools... - Page 19 Basic Operations Getting the Right Tools Table 1. DSQ II System Installation Tools, continued Tools Needed Power cords with appropriate plugs Preinstallation Guide (PN 120299-0001) Scoring wafer (or sapphire scribe) to cut capillary column Screwdriver, flat blade Screwdriver, Phillips #1 Screwdriver, Phillips #2 Syringe, 10 μL, 70 mm needle (PN 3650-0103)
-
Page 20: Installing A Column Into The Gc/Ms System
• Methanol or other suitable solvent • Scoring wafer (or sapphire scribe) to cut capillary column • Leak detector (Thermo Scientific GLD Pro PN 66002-001 or equivalent) • Flowmeter (Thermo Scientific GFM Pro flowmeter PN 66002-010 or equivalent) • Tissue, lint-free •... - Page 21 Basic Operations Installing a Column into the GC/MS System a. Unwind the column about a half turn for the inlet and two turns for the DSQ II. Note Wear clean, lint- and powder-free gloves when you handle the column and injector ferrule.
- Page 22 LEFT COLUMN INFO Length (m) 15.00 ID (mm) 0.25 Film th. (um) 0.25 1. These settings could also apply to a right column. DSQ II Hardware Manual Thermo Scientific...
- Page 23 Measured Flow: 4.90 Use <STOP> to abort Note To abort column evaluation, you can press STOP. The following message will display if the operation was successful. L. COL. EVALUATION COMPLETED Calc’d ID 0.242 K. 0.9020 Thermo Scientific DSQ II Hardware Manual...
- Page 24 1. This item appears if the relevant channel is present and configured. c. Scroll to a channel to open the left or right column’s leak check menu. L. COL. LEAK CHECK Start Leak Check Leak Check Settings DSQ II Hardware Manual Thermo Scientific...
- Page 25 Tip Leaks can be caused by not tightening the fitting on the clear plastic component. We recommend that you check that fitting before looking elsewhere. Repeat the column evaluation and leak check until no leaks are indicated. Thermo Scientific DSQ II Hardware Manual...
- Page 26 The ion source must then be cleaned. a. Raise the DSQ II temperature to the desired temperature (normally 220 °C). b. Run the slow temperature program that is recommended by the manufacturer. For example, hold the column at 40 °C for 15 minutes, then ramp at 10 °C/minute up to...
- Page 27 3. Pull the column back so that it is flush with the end of the column measuring tool. Tighten the transfer line nut. 4. Slide the septum up to the back of the transfer line nut. 5. Remove the column, transfer line nut and ferrule from the column measuring tool. Thermo Scientific DSQ II Hardware Manual...
- Page 28 Raise the oven temperature to the initial temperature you will use (normally 40 °C). Note Turn on vacuum compensation (under the Right or Left Carrier menu). DSQ II Hardware Manual Thermo Scientific...
- Page 29 1. Remove the DSQ II front and top covers to get a better view of the column. You can also use a flashlight to light the interior of the source through the vacuum interlock if you do not wish to remove the covers.
- Page 30 Method Three If you do not have an inlet valve, follow these steps: 1. Remove the DSQ II front and top covers to get a better view of the column. 2. Remove the vacuum manifold cover, as described in “Removing the Vacuum Manifold Cover”...
-
Page 31: Removing A Column From The Gc/Ms System
WARNING - BURN HAZARD: The oven, injector, and transfer line are hot. Allow them to cool to room temperature before touching them. b. Once the DSQ II is cooled down, power off the TRACE GC Ultra. 2. Remove the column from the transfer line. - Page 32 3. Remove the column from the injector. a. Unscrew the injector nut. b. Remove the column from the injector. Figure 7. TRACE GC ULtra Injector Components Injector Column Injector Ferrule Column Outlet Injector Nut Transfer Line DSQ II Hardware Manual Thermo Scientific...
-
Page 33: Starting Up The Gc/Ms System
3. Open Xcalibur on the computer. a. Check the heater status by clicking the Heaters tab in the DSQ II Status pane. If the ion source is not set to the right temperature (normally 200 °C), change it in Tune . -
Page 34: Shutting Down The Gc/Ms System
Wait for the transfer line to cool to < 175 °C. 3. Power off the DSQ II. a. When Xcalibur indicates that it is okay to turn off the main power to the DSQ II, click OK. Figure 9. - Page 35 Remove the DSQ II power cord from the wall socket. IMPORTANT The process ends here if you are planning to perform system maintenance on the DSQ II alone (for example, to clean the ion source). You don’t need to turn off the TRACE GC Ultra, data system, and autosampler.
- Page 36 Basic Operations Shutting Down the GC/MS System DSQ II Hardware Manual Thermo Scientific...
-
Page 37: Maintaining The Dsq Ii
Maintaining the DSQ II This chapter describes how to perform maintenance on every component in the DSQ II. Keeping your DSQ II in good working condition increases laboratory productivity and helps you get the most out of the instrument. Contents •... -
Page 38: Components That Require Maintenance
• Ion Detector • Rotary-Vane Pump There are many more components in the DSQ II that do not require maintenance, but may need to be replaced in the event that there is a problem with the instrument. These components are described in "Maintaining Components Outside the Vacuum Manifold"... -
Page 39: Recommended Maintenance Schedule
We recommend that you keep a maintenance log of the DSQ II service so that you can identify variations in normal operation, which will make maintenance even easier when the need arises. -
Page 40: Running Benchmark Tests
4. Run the benchmark test again and compare the results. 5. If the DSQ II is still not operating at optimal performance, clean the lenses, ion source assembly, and prefilter. The frequency in which you clean the DSQ II depends on the types and amounts of samples and solvents you introduce into the instrument. -
Page 41: Preparing The Dsq Ii For Maintenance
Before you can perform any maintenance on the DSQ II, you must shut down the system and remove the covers. The DSQ II covers overlap, so they must be removed in the order of front, top, right and left as you face the front of the instrument. - Page 42 WARNING - ELECTRICAL SHOCK HAZARD. Before proceeding. unplug the DSQ II to avoid an electrical shock 3. Remove the front cover. 4. Loosen the fastener located on the front of the DSQ II that attaches the top cover to the chassis. Figure 11. Removing the Top Cover Fastener Top Cover Fastener 5.
-
Page 43: Removing The Right Cover
2. Shut down and vent the DSQ II, as described in "Shutting Down the GC/MS System" on page WARNING - ELECTRICAL SHOCK HAZARD. Before proceeding. unplug the DSQ II to avoid an electrical shock 3. Remove the front and top covers, as described in "Removing the Front and Top Covers"... - Page 44 Maintaining the DSQ II Preparing the DSQ II for Maintenance 5. Remove the two screws connecting the right cover to the chassis. Figure 13. Removing the Screws Holding the Right Cover in Place Screws holding the right cover 6. Slide the cover towards the back of the instrument and pull it away.
-
Page 45: Removing The Left Cover
Maintaining the DSQ II Preparing the DSQ II for Maintenance Removing the Left Cover To remove the left cover, you will need a Phillips #2 screwdriver. 1. Cover the work area with a lint-free cloth. Figure 14. Components Accessed by Removing the Left Cover... - Page 46 2. Shut down and vent the DSQ II, as described in "Shutting Down the GC/MS System" on page WARNING - ELECTRICAL SHOCK HAZARD. Before proceeding. unplug the DSQ II to avoid an electrical shock 3. Remove the front and top covers, as described in "Removing the Front and Top Covers"...
- Page 47 Maintaining the DSQ II Preparing the DSQ II for Maintenance Figure 16. Removing the Screw Holding the Left Cover in Place Screw holding left cover in place WAR NING H IG H VO LTA G E A ND H O T SU R FA C E S C AU TIO N 5.
-
Page 48: Removing The Vacuum Manifold Cover
2. Shut down and vent the DSQ II, as described in "Preparing the DSQ II for Maintenance" on page WARNING - ELECTRICAL SHOCK HAZARD. Before proceeding. unplug the DSQ II to avoid an electrical shock DSQ II Hardware Manual Thermo Scientific... - Page 49 CAUTION - INSTRUMENT DAMAGE. Do not allow dust or lint to get on the electron multiplier or ion trap. It can cause spectral noise or instrument damage. 7. Reattach the vacuum manifold cover. 8. Reattach the front and top covers of the DSQ II. 9. Restart the DSQ II. Thermo Scientific...
-
Page 50: Cleaning Stainless Steel Components
Maintaining the DSQ II Preparing the DSQ II for Maintenance Cleaning Stainless Steel Components To clean stainless steel components, you will need: • Acetone, reagent grade (or other suitable polar solvent) • Aluminum oxide abrasive, number 600 • Applicators, cotton-tipped •... - Page 51 Maintaining the DSQ II Preparing the DSQ II for Maintenance 2. Rinse the components with clean water. Use a clean applicator or toothbrush to remove the aluminum oxide slurry. Do not let the slurry dry on the stainless steel because it is difficult to remove.
-
Page 52: Cleaning Non-Stainless Steel Or Hybrid Components
Maintaining the DSQ II Preparing the DSQ II for Maintenance Cleaning Non-Stainless Steel or Hybrid Components To clean non-stainless steel or hybrid components, you will need: • Acetone, reagent grade (or other suitable polar solvent, such as Methanol or Ethanol) •... - Page 53 Maintaining the DSQ II Preparing the DSQ II for Maintenance b. Using forceps, rinse the components thoroughly with tap water to remove the detergent. CAUTION - INSTRUMENT DAMAGE. Do not leave aluminum components like the heater ring in the detergent. It can potentially discolor the aluminum.
-
Page 54: Cleaning The Ion Source Components
• Gloves, clean, lint- and powder-free • Insertion/removal tool (I/R tool) and guide bar • Lint-free cloth 1. Open Xcalibur and click DSQ II in the Status tab. 2. Click the Insert/Remove Probe button on the Status tab to open the Insert/Remove Probe window. - Page 55 Guide Ball Hole Bayonet Lock Guide Ball Second Groove Handle b. Insert the guide bar into the DSQ II as far as it will go. Figure 21. Inserting the Guide Bar Inlet Valve Plug Guide Bar Track Inlet Valve Lever...
- Page 56 Make sure the inlet valve lever is closed (pointed down). e. Remove the inlet valve plug. 4. Insert the I/R tool into the DSQ II. a. Turn the I/R tool to the release position, as indicated by the icon, so that it can accept the ion volume.
- Page 57 Maintaining the DSQ II Cleaning the Ion Source Components b. Turn the I/R tool handle counter-clockwise toward the hold position, as indicated by icon. c. Withdraw the tool until the guide ball fits in the groove furthest from the instrument.
- Page 58 Once the inlet valve is evacuated, pull the lever up to open the inlet valve. 8. Reinstall the ion volume. a. Slide the I/R tool into the DSQ II with the ion volume attached until the guide ball is slightly beyond the groove closest to the instrument.
-
Page 59: Cleaning The Ion Volume Without An Inlet Valve
2. Shut down and vent the DSQ II, as described in "Shutting Down the GC/MS System" on page WARNING - ELECTRICAL SHOCK HAZARD. Before proceeding. unplug the DSQ II to avoid an electrical shock. 3. Remove the front and top covers, as described in "Removing the Front and Top Covers"... - Page 60 Maintaining the DSQ II Cleaning the Ion Source Components 5. Remove the ion volume from the ion source. Figure 24. Using the Ion Volume Tool to Remove the Ion Volume Vacuum Manifold Ion Volume Tool Magnet Yoke Ion Source Block (Ion Volume inside) Ion Source Board a.
-
Page 61: Cleaning The Ion Source, Lenses And Prefilter
"Preparing the DSQ II for Maintenance" on page 25. The ion source lenses (especially lens 1) come in direct contact with samples introduced into the DSQ II and need to be cleaned periodically (though not as often as the ion volume). -
Page 62: Cleaning The Ion Source And Lenses
2. Shut down and vent the DSQ II, as described in "Shutting Down the GC/MS System" on page WARNING - ELECTRICAL SHOCK HAZARD. Before proceeding. unplug the DSQ II to avoid an electrical shock. 3. Remove the front and top covers, as described in "Removing the Front and Top Covers"... - Page 63 Maintaining the DSQ II Cleaning the Ion Source Components Figure 26. Disconnecting the Ion Source and Surrounding Components from the DSQ IIl Vacuum Manifold Two Thumbscrews 3-Pin Lens Connector Source Spacer Transfer Line Source Spacer Connector 8-Pin Lens Connector Prefilter...
- Page 64 Maintaining the DSQ II Cleaning the Ion Source Components 8. Remove the components surrounding the ion source. Figure 27. Removing the Components Surrounding the Ion Source Source Spacer and Prefilter Two Magnets Lens Lens Stack Magnet Yoke 3-Pin Lens Connector...
- Page 65 Maintaining the DSQ II Cleaning the Ion Source Components Figure 28. Disassembling the Lens Stack Disassembled Assembled Lens Clip Lens 2 Lens 1 Lens 3 Lens Spacer Lens Holder a. Remove the lens clip by pinching the ends with your fingers or forceps.
- Page 66 Maintaining the DSQ II Cleaning the Ion Source Components 15. Disassemble the ion source. Figure 29. Ion Source Components Filament Spring Thumbscrew Filament Spacer Three Cartridge Heaters Heater Ring Temperature Sensor Ion Source Ion Source Board Alignment Pin/Ion Volume Key...
- Page 67 19. Insert the lens alignment tool (PN 120271-0001) through the magnet yoke and into the lenses to maintain alignment during assembly. 20. Install the ion source into the DSQ II. a. Slip the ion source over the end of the transfer line. Be careful not to damage the capillary column extending out of the transfer line.
-
Page 68: Cleaning The Prefilter
Maintaining the DSQ II Cleaning the Ion Source Components d. Attach the 3- and 8-pin connectors. e. Move the ion source left and right to ensure it is snapped in place. If it does not move, it is in place. If the ion source is not in its groove properly, it could affect performance and your ability to insert or remove the ion volume with an inlet valve. -
Page 69: Replacing The Ion Source Filament
2. Shut down and vent the DSQ II, as described in "Shutting Down the GC/MS System" on page WARNING - ELECTRICAL SHOCK HAZARD. Before proceeding. unplug the DSQ II to avoid an electrical shock. Thermo Scientific DSQ II Hardware Manual... - Page 70 Maintaining the DSQ II Cleaning the Ion Source Components 3. Remove the front and top covers, as described in "Removing the Front and Top Covers" on page 4. Remove the vacuum manifold cover, as described in "Removing the Vacuum Manifold Cover"...
- Page 71 Maintaining the DSQ II Cleaning the Ion Source Components Figure 31. Disconnecting the Ion Source and Surrounding Components from the DSQ IIl Vacuum Manifold Two Thumbscrews 3-Pin Lens Connector Source Spacer Transfer Line Source Spacer Connector 8-Pin Lens Connector Prefilter...
- Page 72 Maintaining the DSQ II Cleaning the Ion Source Components 8. Remove the components surrounding the ion source. Figure 32. Removing the Components Surrounding the Ion Source Source Spacer and Prefilter Two Magnets Lens Lens Stack Magnet Yoke 3-Pin Lens Connector...
- Page 73 Maintaining the DSQ II Cleaning the Ion Source Components 12. Disassemble the ion source. Figure 33. Ion Source Components Filament Spring Thumbscrew Filament Spacer Three Cartridge Heaters Heater Ring Temperature Sensor Ion Source Ion Source Board Alignment Pin/Ion Volume Key...
- Page 74 Attach the source spacer to the ion source. Reattach the magnet yoke, magnets, and thumbscrews. 17. Reinstall the ion source and its surrounding components back into the DSQ II. a. Slip the ion source over the end of the transfer line. Be careful not to damage the capillary column extending out of the transfer line.
-
Page 75: Replacing The Electron Multiplier
2. Shut down and vent the DSQ II, as described in "Shutting Down the GC/MS System" on page WARNING - ELECTRICAL SHOCK HAZARD. Before proceeding. unplug the DSQ II to avoid an electrical shock. 3. Remove the front and left covers, as described in "Removing the Front and Top Covers"... - Page 76 Maintaining the DSQ II Replacing the Electron Multiplier 5. Remove the ion detector. Figure 34. Removing the Ion Detector Ion Detector Two Screws on Ion Detector Conversion Dynode Connector Vacuum Manifold Electron Multiplier Connector a. Disconnect the conversion dynode and electron multiplier connectors from the connectors on the bottom of the vacuum manifold.
- Page 77 Attach the new electron multiplier cathode with the spring clip. Insert the end nearest the manifold mount first, then push the other end into the clip. c. Reconnect the electron multiplier connector. 10. Reattach the front and top covers. 11. Restart the DSQ II. Thermo Scientific DSQ II Hardware Manual...
-
Page 78: Maintaining The Turbomolecular Pump
Maintaining the Turbomolecular Pump Maintaining the Turbomolecular Pump The DSQ II is equipped with either a 70 L/s turbomolecular pump, a 250 L/s turbomolecular pump, or a 200/200 L/s split-flow turbomolecular pump. No maintenance is required. These pumps contain enough lubricant to support the bearings 70 L/s for life. -
Page 79: Checking The Oil Level Of A Rotary-Vane Pump
Maintaining the DSQ II Maintaining the Rotary-Vane Pump Checking the Oil Level of a Rotary-Vane Pump To check the oil level (should be done on a monthly basis) of a rotary-vane pump: 1. Look in the oil-level sight-glass to see if the oil level is between the MIN and MAX marks. -
Page 80: Adding Oil To A Rotary Vane Pump
2. Shut down and vent the DSQ II, as described in "Shutting Down the GC/MS System" on page WARNING - ELECTRICAL SHOCK HAZARD. Before proceeding. unplug the DSQ II to avoid an electrical shock. 3. Add oil. Note The pump oil level must be between the MIN and MAX marks on the oil-level sight-glass for the pump to operate properly. -
Page 81: Purging Gas From The Oil In A Rotary-Vane Pump
Reattach the oil filler plug. 4. Plug the rotary-vane pump and DSQ II to the power source. 5. Restart the DSQ II. 6. Purge the rotary-vane pump for 10 minutes by using the gas ballast to remove excess gases from the new oil. - Page 82 Maintaining the DSQ II Maintaining the Rotary-Vane Pump Figure 38. Rotary Vane Pump Components Foreline Vacuum Hose Drain Plug Inlet Port MIN (minimum level mark) Gas-Ballast Control Mode Selector Oil Filler Plugs On/Off Switch Outlet Port Handle MAX (maximum level mark)
-
Page 83: Changing The Oil In A Rotary-Vane Pump
WARNING - ELECTRICAL SHOCK HAZARD. Before proceeding. unplug the DSQ II to avoid an electrical shock. 3. Unplug the rotary-vane pump. WARNING - ELECTRICAL SHOCK HAZARD. Shut down and unplug the DSQ II and rotary-vane pump before adding oil. Thermo Scientific... - Page 84 Maintaining the DSQ II Maintaining the Rotary-Vane Pump Figure 39. Rotary- Vane Pump Components Foreline Vacuum Hose Drain Plug Inlet Port MIN (minimum level mark) Gas-Ballast Control Mode Selector Oil Filler Plugs On/Off Switch Outlet Port Handle MAX (maximum level mark)
- Page 85 Reattach the oil filler plug. b. Place the rotary-vane pump on the floor. c. Reconnect the foreline vacuum hose. 9. Plug the rotary-vane pump into the mechanical pump outlet on the back of the DSQ II. 10. Restart the DSQ II. Thermo Scientific...
-
Page 86: Maintaining Components Outside The Vacuum Manifold
You can find these components by removing the front, left, and right covers, or by looking on the rear of the DSQ II. These components, which are listed below, do not require routine maintenance, but they may need to be replaced at a later date. -
Page 87: Replacing The Analog Board
2. Shut down and vent the DSQ II, as described in "Shutting Down the GC/MS System" on page WARNING - ELECTRICAL SHOCK HAZARD. Before proceeding. unplug the DSQ II to avoid an electrical shock. 3. Remove the left cover, as described in "Removing the Left Cover"... - Page 88 Maintaining the DSQ II Maintaining Components Outside the Vacuum Manifold 4. Remove the analog board. Figure 40. Removing the Analog Board Digital Board P7 Connector on Electron Multiplier/ Conversion Dynode Power Supply J1 Connector on RF Control Board P8 Connector on RF Generator Board...
-
Page 89: Replacing The Analog Board Fuse
Replacing the Analog Board Fuse To replace the analog board fuse: 1. Cover the work area with a lint-free cloth. 2. Shut down and vent the DSQ II, as described in "Shutting Down the GC/MS System" on page WARNING - ELECTRICAL SHOCK HAZARD. Before proceeding. unplug the DSQ II to avoid an electrical shock. - Page 90 CAUTION - INSTRUMENT DAMAGE. Only use a 125V fuse or else you could damage the instrument. Never replace DSQ II fuses with those of a different type, voltage, or current rating. Also, to avoid damaging the boards, you should always wear a properly grounded electrostatic discharge (ESD) strap on your wrist when replacing fuses.
-
Page 91: Replacing The Calibration Gas Flow Module
2. Shut down and vent the DSQ II, as described in "Shutting Down the GC/MS System" on page WARNING - ELECTRICAL SHOCK HAZARD. Before proceeding. unplug the DSQ II to avoid an electrical shock. 3. Remove the left cover, as described in "Removing the Left Cover"... - Page 92 Maintaining the DSQ II Maintaining Components Outside the Vacuum Manifold 5. Remove the calibration gas flow module. Figure 42. Removing the Calibration Gas Flow Module Gas Fittings Two Screws Foreline Adapter Tubing (not Two Twisted Pair Wires shown) Calibration Compound Vial...
-
Page 93: Refilling The Calibration Gas Flow Module
10. Reattach the right, left, top, and front covers of the DSQ II. 11. Restart the DSQ II. 12. Once the DSQ II has pumped down and is operational, check for vacuum leaks by reading the convectron gauge and ion gauge and running an automatic tune. - Page 94 Be sure liquid does not pour into the module when you install the vial. 6. Replace the cal gas vial by first tightening it by hand. 7. Reattach the covers on the DSQ II. 8. Restart the DSQ II. DSQ II Hardware Manual...
-
Page 95: Replacing The Ci Reagent Gas Flow Module
2. Shut down and vent the DSQ II, as described in "Shutting Down the GC/MS System" on page WARNING - ELECTRICAL SHOCK HAZARD. Before proceeding. unplug the DSQ II to avoid an electrical shock. 3. Remove the left cover, as described in "Removing the Left Cover"... - Page 96 Maintaining the DSQ II Maintaining Components Outside the Vacuum Manifold Figure 43. Removing the CI Reagent Gas Flow Module Gas Fittings Cable (not shown) Foreline Adapter Tubing (not CI Reagent Gas Flow Module shown) (PN 23331-0091) Two Screws a. Disconnect the cable.
-
Page 97: Replacing The Conversion Dynode/Electron Multiplier Power Supply
Use a leak detector to check for leaks on the high-pressure side of the CI reagent gas flow module. c. Use the DSQ II to check for leaks on the low-pressure side of the CI reagent gas flow module, as described in "High Vacuum Symptoms"... - Page 98 119377-0002 with the PPINICI upgrade). a. Insert the power supply. b. Reattach the screws. c. Reconnect the cables. 6. Reattach the left, top, and front covers of the DSQ II. 7. Restart the DSQ II. DSQ II Hardware Manual Thermo Scientific...
-
Page 99: Replacing The Dc Driver
2. Shut down and vent the DSQ II, as described in "Shutting Down the GC/MS System" on page WARNING - ELECTRICAL SHOCK HAZARD. Before proceeding. unplug the DSQ II to avoid an electrical shock. 3. Remove the left cover, as described in "Removing the Left Cover"... - Page 100 (J7), the black cable goes to J4, and the red cable goes to J3. d. Reattach the DC driver cover. e. Reattach the left, top, and front covers of the DSQ II. Restart the DSQ II. DSQ II Hardware Manual...
-
Page 101: Replacing The Dc Driver Fuse
2. Shut down and vent the DSQ II, as described in "Shutting Down the GC/MS System" on page WARNING - ELECTRICAL SHOCK HAZARD. Before proceeding. unplug the DSQ II to avoid an electrical shock. 3. Remove the left cover, as described in "Removing the Left Cover"... - Page 102 CAUTION - INSTRUMENT DAMAGE. Only use a 125V fuse or else you could damage the instrument. Never replace DSQ II fuses with those of a different type, voltage, or current rating. Also, to avoid damaging the boards, you should always wear an electrostatic discharge (ESD) strap on your wrist when replacing fuses.
-
Page 103: Replacing The Digital Board
2. Shut down and vent the DSQ II, as described in "Shutting Down the GC/MS System" on page WARNING - ELECTRICAL SHOCK HAZARD. Before proceeding. unplug the DSQ II to avoid an electrical shock. 3. Remove the left cover, as described in "Removing the Left Cover"... - Page 104 Reattach the nuts. c. Reattach the digital board cover. d. Reattach the screws. e. Reconnect the cables. 6. Reattach the left, top, and front covers of the DSQ II. 7. Restart the DSQ II. DSQ II Hardware Manual Thermo Scientific...
-
Page 105: Replacing The Electrometer Board
2. Shut down and vent the DSQ II, as described in "Shutting Down the GC/MS System" on page WARNING - ELECTRICAL SHOCK HAZARD. Before proceeding. unplug the DSQ II to avoid an electrical shock. 3. Remove the left cover, as described in "Removing the Left Cover"... - Page 106 Reattach the electrometer board cover. d. Reattach the screws to the cover. e. Reattach the cal gas vial. Reconnect the cable. 6. Reattach the left, top, and front covers of the DSQ II. 7. Restart the DSQ II. DSQ II Hardware Manual Thermo Scientific...
-
Page 107: Replacing The Foreline Pressure Gauge And Foreline Adapter
2. Shut down and vent the DSQ II, as described in "Shutting Down the GC/MS System" on page WARNING - ELECTRICAL SHOCK HAZARD. Before proceeding. unplug the DSQ II to avoid an electrical shock. 3. Remove the right cover, as described in "Removing the Right Cover"... - Page 108 Reattach the foreline hose and adapter clamps. c. Reconnect the foreline tubing. d. Reconnect the cable. 6. Reattach the right, top, and front covers of the DSQ II. 7. Restart the DSQ II. DSQ II Hardware Manual Thermo Scientific...
-
Page 109: Replacing The Inlet Valve Seal
Maintaining the DSQ II Maintaining Components Outside the Vacuum Manifold Replacing the Inlet Valve Seal You may need to replace the inlet valve seal if the seal is leaking, as indicated by the Xcalibur Insert/Probe graph. It may also need to be replaced if nothing improves when you tighten the seal or if the seal is worn, thin, or cracked. -
Page 110: Replacing The Ion Gauge (Optional Upgrade)
2. Shut down and vent the DSQ II, as described in "Shutting Down the GC/MS System" on page WARNING - ELECTRICAL SHOCK HAZARD. Before proceeding. unplug the DSQ II to avoid an electrical shock. DSQ II Hardware Manual Thermo Scientific... - Page 111 6. Reattach the left, top, and front covers of the DSQ II. 7. Restart the DSQ II. 8. Once the DSQ II has pumped down and is operational, check for vacuum leaks by reading the convectron gauge and ion gauge pressures and running an automatic tune.
-
Page 112: Replacing The Lens Interface Board
2. Shut down and vent the DSQ II, as described in "Shutting Down the GC/MS System" on page WARNING - ELECTRICAL SHOCK HAZARD. Before proceeding. unplug the DSQ II to avoid an electrical shock. 3. Remove the right and left covers, as described in "Removing the Right Cover"... - Page 113 Insert the new lens interface board. b. Reattach the screws that hold the lens interface board in place. c. Reconnect the cables. 6. Reattach the right, left, top, and front covers of the DSQ II. 7. Restart the DSQ II. Thermo Scientific...
-
Page 114: Replacing The Low Pass Filter Board
2. Shut down and vent the DSQ II, as described in "Shutting Down the GC/MS System" on page WARNING - ELECTRICAL SHOCK HAZARD. Before proceeding. unplug the DSQ II to avoid an electrical shock. 3. Remove the left cover, as described in "Removing the Left Cover"... - Page 115 Maintaining the DSQ II Maintaining Components Outside the Vacuum Manifold a. Disconnect the five cables from the RF module. b. Disconnect the three cables from the DC driver. 5. Remove the RF module. a. Remove the twelve screws holding the RF coil cover in place.
- Page 116 Maintaining the DSQ II Maintaining Components Outside the Vacuum Manifold 6. Remove the low pass filter board. Figure 59. Removing the Low Pass Filter Board Connector to J1 Cable Connector to J6 Wire (gold) Screws Around the Low Pass Filter...
-
Page 117: Replacing The Power Module
(J7), the black P2 cable goes to J4, and the red P4 cable goes to J3. a. Reconnect the cables to the DC driver. b. Reconnect the cables to the RF module. 10. Reattach the left, top, and front covers of the DSQ II. 11. Restart the DSQ II. Replacing the Power Module To replace the power module, you will need a 3 mm Allen wrench. - Page 118 It has been configured at the factory and cannot be changed in the field. a. Insert the new power module. b. Reattach the screws that hold the power module in place. 6. Reattach the top and front covers of the DSQ II. 7. Restart the DSQ II. DSQ II Hardware Manual...
-
Page 119: Replacing The Power Module Fuses
2. Shut down and vent the DSQ II, as described in "Shutting Down the GC/MS System" on page WARNING - ELECTRICAL SHOCK HAZARD. Before proceeding. unplug the DSQ II to avoid an electrical shock. 3. Remove the top and front covers, as described in "Removing the Front and Top Covers"... -
Page 120: Replacing The Rear Cooling Fans
8. Restart the DSQ II. Replacing the Rear Cooling Fans The rear cooling fans provide the necessary airflow to keep the DSQ II cool. The fans should be cleaned every four months by wiping them with a damp cloth. This helps prevent dust from accumulating inside the instrument. - Page 121 Maintaining the DSQ II Maintaining Components Outside the Vacuum Manifold 4. Remove the fan bracket. Figure 62. Removing the Rear Cooling Fans Two Rear Cooling Fans Two Screws Around the Fan (PN 119253-0001) Bracket Fan Bracket a. Remove the two screws holding the fan bracket in place.
- Page 122 6. Attach the new rear cooling fans to the fan bracket by reattaching the nuts. Make sure the airflow indicator arrows on the new rear cooling fans point into the DSQ II (away from the fan bracket) and the wires are pointing down.
-
Page 123: Replacing The Rf Detector Board
2. Shut down and vent the DSQ II, as described in "Shutting Down the GC/MS System" on page WARNING - ELECTRICAL SHOCK HAZARD. Before proceeding. unplug the DSQ II to avoid an electrical shock. 3. Remove the left cover, as described in "Removing the Left Cover"... - Page 124 Reattach the cover. d. Reattach the screws that hold the cover in place. e. Reconnect the cables. 6. Reattach the left, top, and front covers of the DSQ II. 7. Restart the DSQ II. DSQ II Hardware Manual Thermo Scientific...
-
Page 125: Replacing The Rf Generator Board
2. Shut down and vent the DSQ II, as described in "Shutting Down the GC/MS System" on page WARNING - ELECTRICAL SHOCK HAZARD. Before proceeding. unplug the DSQ II to avoid an electrical shock. 3. Remove the left cover, as described in "Removing the Left Cover"... -
Page 126: Replacing The Rf Generator Board Fuses
Reattach the screws that hold the RF Generator board in place. d. Reconnect the P1, J1, J2, and J3 cables. 6. Reattach the left, top, and front covers of the DSQ II. 7. Restart the DSQ II. Replacing the RF Generator Board Fuses To replace an RF generator board fuse, you will need: •... - Page 127 Lift out the RF generator board. d. Disconnect the P2 cable. WARNING - ELECTRICAL SHOCK HAZARD. Only use a DSQ II fuse or else you could damage the instrument. Never replace DSQ II fuses with those of a different type, voltage, or current rating.
-
Page 128: Replacing The Transfer Line
Reattach the screws that hold the RF generator board in place. d. Reconnect the P1, J1, J2, and J3 cables. 7. Reattach the left, top, and front covers of the DSQ II. 8. Restart the DSQ II. Replacing the Transfer Line To replace the transfer line, you will need: •... - Page 129 8. Restart the GC. 9. Restart the DSQ II. 10. Once the DSQ II has pumped down and is operational, check for vacuum leaks by reading the convectron gauge and ion gauge pressures and running an automatic tune. Thermo Scientific...
-
Page 130: Replacing The Turbomolecular Pump Power Supply
Disconnect the four cables (items 3, 4, 5, and 6 in ). b. From the bottom of the DSQ II, remove the four screws holding the turbomolecular power supply in place. c. Remove the turbomolecular pump power supply. -
Page 131: Replacing The Vacuum Control Board
5. Install the new turbomolecular pump power supply (PN 76330-0230). a. Insert the new power supply. b. Reattach the screws that hold the power supply to the bottom of the DSQ II. c. Reconnect the P2-1, P2-2, and P1-2L cables. - Page 132 Maintaining the DSQ II Maintaining Components Outside the Vacuum Manifold 4. Remove the vacuum control board. Figure 70. Removing the Vacuum Control Board Four Screws Around the Vacuum Connector to J3 Cable (to Control Board Turbomolecular Pump Power Supply) Connector to J1 Cable (to Fore...
- Page 133 Reattach the screws that hold the vacuum control board in place. c. Reconnect all the cable to the vacuum control board. 6. Reattach the left, top, and front covers of the DSQ II. 7. Restart the DSQ II. Thermo Scientific...
-
Page 134: Replacing The Vent Valve Solenoid
2. Shut down and vent the DSQ II, as described in "Shutting Down the GC/MS System" on page WARNING - ELECTRICAL SHOCK HAZARD. Before proceeding. unplug the DSQ II to avoid an electrical shock. 3. Remove the left cover, as described in "Removing the Left Cover"... - Page 135 6. Reattach the left, top, and front covers of the DSQ II. 7. Restart the DSQ II. 8. Once the DSQ II has pumped down and is operational, check for vacuum leaks by reading the convectron gauge and ion gauge pressures and running an automatic tune.
- Page 136 Maintaining the DSQ II Maintaining Components Outside the Vacuum Manifold DSQ II Hardware Manual Thermo Scientific...
-
Page 137: Troubleshooting
Troubleshooting This chapter will enable you to identify any issues related to operating the DSQ II. Once you understand the symptom, cause, and solution to the issue, use Chapter 2: Maintaining the DSQ II to find out how to address it. This chapter is organized according to the type of symptoms you may experience when using the DSQ II. -
Page 138: Running Tune Diagnostics
1. Open the Diagnostics window in DSQ II Tune. a. Open Xcalibur and click Instrument Setup. b. Click the DSQ II icon to open the Method Editor. c. Click the Tune button. d. Select Diagnostics | Run Tests to open the Diagnostics window. -
Page 139: Communication Symptoms
• Start, stop, pause and initialize functions How does the DSQ II communication work? The flow of digital information in the DSQ II system is bi-directional; the data system downloads analytical methods to the instrument and activates functions to start, stop, shutdown, startup, and initialize. - Page 140 Possible Solutions 1. Check the GC and/or autosampler remote start cables for loose or faulty connections. • GC remote start cable (8-pin) connects to the GC (Generic/HS port) and DSQ II (GC Start port). • Autosampler remote start cable connects to the GC (Autosampler port) and autosampler controller (GC port).
- Page 141 DSQ II. If the GC method has not been downloaded from Xcalibur, the GC may not have received a signal from the DSQ II allowing it to become ready. In this case, you can either send the GC method from Xcalibur or select When low or Do not inhibit as the Inhibit Ready parameter.
- Page 142 Communication Symptoms Unstable instrument readback. Possible Solutions • There is a faulty cable connection. Check connections to the analog board in the DSQ II. • The digital board is faulty. Reseat connector between Analog and Digital board; replace if necessary. See “Replacing the Digital Board”...
-
Page 143: Contamination Symptoms
• Autosampler communications malfunction. Contact Technical Support. Contamination Symptoms Chemical noise is always present in the DSQ II. Additionally, the spectra shown in DSQ II Tune and Real-Time Display are auto-normalized, which can make the background appear high when it really is not. - Page 144 • Capillary column is damaged as a result of exposure to oxygen. Find the source of the oxygen in the carrier gas or air leak. Recondition or replace the capillary column, as described in “Preparing the DSQ II for Maintenance” page • Capillary column is broken off in ion volume. Remove broken pieces from ion volume.
- Page 145 Acetone (m/z 43, 58, 59) Hexane (m/z 41, 43, 56, 57, 58, 85, 86) Methanol (m/z 31, 32) Methylene chloride (m/z 84/83) Toluene (m/z 91, 92) Trichloroethane (m/z 151, 153) Xylene (m/z 105, 106) Thermo Scientific DSQ II Hardware Manual...
-
Page 146: Filament And Lens Control Symptoms
• The cable connection between the analog and lens interface board is defective. Check the connection, as described in “Replacing the Lens Interface Board” page • There is a problem with the analog board. If necessary, replace the board, as described in “Replacing the Analog Board” page DSQ II Hardware Manual Thermo Scientific... - Page 147 • The power supply to the lens has a fault. Check regulator board in the power module; replace if necessary, see “Replacing the Power Module” page 101. • There is a fault with the lens drivers. Replace the analog board, as described in “Replacing the Analog Board” page Thermo Scientific DSQ II Hardware Manual...
-
Page 148: Heated Zone Symptoms
TRACE GC Ultra or FOCUS GC. Often, a heated zone problem is the result of downloading a method to the DSQ II that has a different setpoint from the current setting, which causes a delay while the heated zone heats or cools. - Page 149 RTD (108 Ω at 20 °C, 176 Ω at 200 °C). Replace the ion source board if necessary. • There is a problem with the analog board. If necessary, replace the analog board, as described in “Replacing the Analog Board” page Thermo Scientific DSQ II Hardware Manual...
- Page 150 Transfer line will not heat. Possible Solutions • Aux1 zone of GC is not configured for the DSQ II transfer line. Configure Aux1 zone of the GC and set transfer line temperature in Xcalibur’s Method Editor for the GC. • Transfer line heater elements are defective. Turn off the GC. Unplug the transfer line connector.
-
Page 151: High Vacuum Symptoms
• Check the transfer line or inlet ferrules. Replace them if they are broken. • Clean dust or debris from the top cover O-ring • No helium flow from the GC. This causes the DSQ II to suck air through the column. Thermo Scientific... - Page 152 Possible Solutions • The rotary-vane pump is off. Check the rotary-vane pump switch. • The rotary-vane pump power cable from the DSQ II is not connected. Connect the power cable. • The rotary-vane pump is configured for incorrect line voltage. Configure the rotary-vane pump for proper line voltage.
- Page 153 • The system was vented through the inlet valve, there was a GC column break at the transfer line or the foreline was cut. Shut off the DSQ II main circuit breaker. Allow the system to vent and cool to room temperature.
-
Page 154: Linearity Symptoms
A well-maintained instrument will provide good linear response over a wide range of concentration for most compounds. Like any instrument, however, the DSQ II has a saturation point. -
Page 155: Power Supply Symptoms
Power Supply Symptoms Power Supply Symptoms DSQ II Tune diagnostics detects most power supply symptoms. Power supply problems often involve a blown fuse, faulty electronic components, or even something as simple as a disconnected cable. Use extreme care when you replace a fuse or electronic component. - Page 156 • No 28 V current. Check connections to RF generator board, RF control board, RF coil, and RF feedthroughs. • No +28 V current, -28 V, or +36 V (system is off ). Turn system on from DSQ II Tune. +28 V current is below acceptable range.
-
Page 157: Rf And Dc Control Symptoms
Automatic RF frequency calibration or RF dip and gain problems can be caused by several things. Begin troubleshooting control problems using DSQ II Tune diagnostics. Diagnostics helps you identify whether the fault is due to a power supply problem, a break in the RF signal path, or a faulty component. - Page 158 • Also, check the wires inside the RF coil box. Make sure the four wires going to the RF feedthroughs are far from any surface and especially each other. Check for burn marks or evidence of arcing. Clean components if necessary. Replace the components if problems persist. DSQ II Hardware Manual Thermo Scientific...
- Page 159 Check RF dip and RF gain calibrations. The RF may not be working properly or the DC driver is disconnected or faulty. Check the RF null (see the DSQ II User’s Guide). Thermo Scientific DSQ II Hardware Manual...
-
Page 160: Sensitivity Symptoms
• Injection port liner is contaminated. Clean or replace the injection port liner. • Graphite or septa particles have contaminated the injection port. Clean the injection port. • The injector or septum is leaking. Replace the septum and perform a leak check on the DSQ II Hardware Manual Thermo Scientific... - Page 161 See “Cleaning the Ion Source, Lenses and Prefilter” page 45 for more information. • Ion volume or holder may be loose. Adjust the ball valve to ensure they fit snugly. Thermo Scientific DSQ II Hardware Manual...
- Page 162 “Cleaning the Ion Source, Lenses and Prefilter” page • Prefilter is misaligned or broken. Check the alignment of the prefilter. • Lens voltages are incorrect. Select Restore Default Tune in DSQ II Tune. DSQ II Hardware Manual Thermo Scientific...
- Page 163 Isotopes are missing or isotope ratios are incorrect. Possible Solutions • Masses are not resolved. Adjust resolution and/or ion offset in DSQ II Tune by selecting Tune | Show Manual Tune View and then click the Resolution tab. • Detector gain is too low. Increase the detector gain.
-
Page 164: Stability Symptoms
CAUTION INSTRUMENT DAMAGE. Failure to ensure a good vacuum seal around the I/R tool will leak air into the DSQ II. This air leak could damage the filament if it is on. Stability Symptoms Stability problem symptoms occur when the instrument is not consistently precise and when accurate results are not reproducible. -
Page 165: Tuning Symptoms
Automatic tune performs several functions and symptoms or error messages indicate different problems. A tuning symptom can usually be found by running diagnostics in the DSQ II Tune software. Automatic Tune reports “Cannot perform RF frequency calibration”. - Page 166 “Replacing the Electron Multiplier” page • The filament is the source of too much background noise. See “Filament and Lens Control Symptoms” page 130. • The GC column flow is too high. Lower it to1 mL/min. DSQ II Hardware Manual Thermo Scientific...
- Page 167 Troubleshooting Tuning Symptoms • Mass and resolution are not calibrated. Adjust the detector gain in DSQ II Tune to see background ions and run resolution and mass calibrations as part of an automatic tune. • The calibration gas vial is empty. Add 200 μL (max) to calibration gas vial.
- Page 168 135. Tune reports an error while saving a Tune file. Possible Solutions A file with the same name already exists with read-only attributes. Change the existing file’s attributes so it can be overwritten. DSQ II Hardware Manual Thermo Scientific...
-
Page 169: Chapter 4 Vacuum System And Gas Inlets
(turbomolecular) pump. All components, except the rotary-vane pump, are located around the vacuum manifold. The vacuum system consists of the following components: • Fore pressure gauge • High vacuum pump • Ion gauge (upgrade) • Rotary-vane pump • Vacuum manifold Thermo Scientific DSQ II Hardware Manual... - Page 170 Figure 74. Vacuum System Components (Right Side) Vacuum Manifold Fore Pressure Gauge Ion Gauge (on Left Side of Vacuum High Vacuum (Turbomolecular) Manifold) Pump Foreline Adapter (Connects the Foreline Hose to the Rotary-Vane Pump DSQ II Hardware Manual Thermo Scientific...
-
Page 171: Fore Pressure Gauge And Foreline Adapter
The foreline adapter connects the foreline hose from the rotary-vane pump inlet to the high vacuum pump. Figure 75. Fore Pressure Gauge and Foreline Adapter (Right Side) High Vacuum (Turbomolecular) Fore Pressure Gauge Pump Foreline Adapter High Vacuum (Turbomolecular) Pump Outlet Foreline Hose Outlet Thermo Scientific DSQ II Hardware Manual... -
Page 172: High Vacuum Pump (Single Turbomolecular Pump)
High Vacuum Pump (Single Turbomolecular Pump) The high vacuum pump creates the low pressure require by the ion source, quadrupole, and ion detector. The DSQ II can be equipped with one of two types of single turbomolecular pumps: a 70 L/s or a 250 L/s. -
Page 173: High Vacuum Pump (Split-Flow Turbomolecular Pump)
Vacuum System High Vacuum Pump (Split-Flow Turbomolecular Pump) As an upgrade option, a differentially pumped configuration of DSQ II is available. In a differentially pumped instrument, the ion source is pumped separately from the quadrupole and ion detector. Rather than using two individual turbomolecular pumps, a split-flow turbomolecular pump is used. -
Page 174: Ion Gauge (Upgrade)
If you have an ion gauge, it must be on and the pressure below 1x10 Torr to turn on the filament, electron multiplier, or conversion dynode. This protects these components from damage. DSQ II Hardware Manual Thermo Scientific... -
Page 175: Rotary-Vane Pump
CAUTION - INSTRUMENT DAMAGE. Always connect the rotary-vane pump power cord to the outlet on the rear of the DSQ II and never into a wall outlet. If the pump is not plugged into the DSQ II rear, it will not shut down when the instrument is powered off. -
Page 176: Vacuum Manifold
Vacuum System Vacuum Manifold The vacuum manifold is located on the top right of the DSQ II, directly above the high vacuum pump. The vacuum manifold is a thick walled, aluminum chamber that encases the heart of the DSQ II (the ion source, quadrupole, and ion detector). The vacuum manifold has a removable cover, machined flanges on the front and rear, and various electrical feedthroughs and gas inlets. - Page 177 Vacuum System and Gas Inlets Vacuum System Figure 81. Vacuum Manifold Components Ion Detector Prefilter O-ring Ion Source Quadrupole Transfer Line Thermo Scientific DSQ II Hardware Manual...
-
Page 178: Gas Inlet Components
CI reagent gas into the ion source, and the vent valve solenoid vents the vacuum manifold to the atmosphere. Figure 82. Gas Inlets (Left Side) CI Reagent Gas Flow Module Vent Valve Solenoid Calibration Gas Flow Module DSQ II Hardware Manual Thermo Scientific... -
Page 179: Calibration Gas Flow Module
Calibration Gas Flow Module The calibration gas flow module controls the flow of calibration compound into the ion source and is mounted at the back left of the DSQ II. The calibration compound provides reference peaks to tune and calibrate the DSQ II. -
Page 180: Ci Reagent Gas Flow Module (Upgrade)
The CI reagent gas flow module controls the flow of CI reagent gas into the ion source and is located at the back left of the DSQ II. The module uses electronic pressure control to precisely set the flow of reagent gas. The flow is programmed using Xcalibur, which allows you to accurately reproduce flows. -
Page 181: Vent Valve Solenoid
This process takes about four minutes. Figure 85. Vent Valve Solenoid Vent Valve Solenoid Vent Valve Filter Cable Thermo Scientific DSQ II Hardware Manual... - Page 182 Vacuum System and Gas Inlets Gas Inlet Components DSQ II Hardware Manual Thermo Scientific...
-
Page 183: Chapter 5 Ion Source And Inlet Valve
Ion Source The ion source is the part of the DSQ II where ions are formed. It is located inside and to the front of the vacuum manifold. The ion source has two main functions: to generate a beam of electrons and to provide a site for these electrons to interact with sample or reagent gas molecules to form ions. - Page 184 Ion Source and Inlet Valve Ion Source Figure 86. Ion Source Source Spacer with PreFilter Lens Magnet Yoke Lens Assembly Two Springs Ion Source Two Thumbscrews Two Magnets DSQ II Hardware Manual Thermo Scientific...
-
Page 185: Filament
Figure 87. Filament Filament Retainer Clip Filament Spacer Filament and Reflector (inside Electron Lens) Electron Lens Thermo Scientific DSQ II Hardware Manual... -
Page 186: Ion Source
Cartridge heaters pass through and heat the ion source, as well as heat, align, and support the three ion source lenses. The temperature sensor monitors the temperature of the ion source. The heater ring slips over the cartridge heaters and transfers heat to the lenses. DSQ II Hardware Manual Thermo Scientific... - Page 187 Three Cartridge Heaters Heater Ring Temperature Sensor Ion Source Ion Source Board Alignment Pin/Ion Volume Key Three Base-Studs Thumbscrew Ion Volume Pin/Set Screw & Ball 3-pin Filament Connector Plunger Ion Volume and Holder Sample Inlet Aperture Thermo Scientific DSQ II Hardware Manual...
-
Page 188: Ion Volume
Figure 89. EI, PCI, NCI, and CEI Ion Volumes PCI Ion Volume Closed Exit Ion Volume NCI Ion Volume EI Ion Volume Electron Entrance Hole Ion Exit Hole GC Effluent, Calibration Gas, CI Electron Exit Hole Reagent Gas entrance hole DSQ II Hardware Manual Thermo Scientific... -
Page 189: Lenses
A small 3-pin lens connector attaches to these pins and carries the voltage from the electrical feedthrough to the lens. Figure 90. Ion Source Lenses Lens Clip Lens 2 Lens 1 Lens 3 Two Lens Spacers Lens Holder Thermo Scientific DSQ II Hardware Manual... -
Page 190: Magnets And Magnet Yoke
Position both magnets so the south pole is on top otherwise sensitivity will be poor. Electrons are not focused into the ion volume if one magnet is upside down. Figure 91. Magnets and Magnet Yoke Magnets Magnet Yoke DSQ II Hardware Manual Thermo Scientific... -
Page 191: Inlet Valve (Upgrade)
The inlet valve mounts on the front of the vacuum manifold and is the vacuum interlock mechanism for the DSQ II. The inlet valve is a vacuum sealed valve through which you insert and remove the ion volume assembly using an I/R (insertion/removal) tool. - Page 192 Figure 92. Inlet Valve Components (I/R Tool Not Shown) Vacuum Manifold Guide Bar Inlet Valve Solenoid Guide Bar Entry Inlet Valve Knob (Ferrule Inside) Four Hex Socket Screws Inlet Valve Plug Foreline Hose Connection Inlet Valve Lever DSQ II Hardware Manual Thermo Scientific...
-
Page 193: Ball Valve
Figure 93. Inlet Valve Components Ball Valve Inlet Valve Plug Inlet Valve Solenoid Inlet Valve Block Inlet Valve Chamber Ball Valve Lever Inlet Valve Seal Guide Bar Housing Inlet Valve Knob Vacuum Manifold Thermo Scientific DSQ II Hardware Manual... -
Page 194: Inlet Valve Lever
The ball valve is closed when the inlet valve lever is in the down position. The lever turns the ball valve to allow a probe device (sample probe or I/R Tool) to enter the vacuum manifold. Figure 94. Inlet Valve Lever Inlet Valve lever DSQ II Hardware Manual Thermo Scientific... -
Page 195: Guide Bar Housing
Guide Bar Housing The guide bar housing is an aluminum chamber mounted on the vacuum manifold. The guide bar housing has an opening for the guide bar. Figure 95. Guide Bar Housing Guide bar housing Thermo Scientific DSQ II Hardware Manual... -
Page 196: I/R Tool And Guide Bar
Figure 96. I/R Tool and Guide Bar Alignment Line Guide Bar Track Hold Position Guide Bar Release Position Guide Bar First Stop I/R Tool Guide Ball Hole Bayonet Lock Guide Ball Guide Bar Second Stop Handle DSQ II Hardware Manual Thermo Scientific... -
Page 197: Inlet Valve Plug
The inlet valve knob allows you to tighten the seal against the I/R tool to form a vacuum-tight seal or you can loosen it to allow the I/R tool to be inserted and removed. You should replace the inlet valve seal periodically. Figure 98. Inlet Valve Seal Thermo Scientific DSQ II Hardware Manual... - Page 198 Ion Source and Inlet Valve Inlet Valve (Upgrade) DSQ II Hardware Manual Thermo Scientific...
-
Page 199: Chapter 6 Prefilter And Quadrupole
As the RF and DC voltages are ramped, ions of different m/z ratios are transmitted through the exit lens to the ion detector. This produces the mass spectrum. Thermo Scientific DSQ II Hardware Manual... - Page 200 This increases the time needed between routine cleaning of the instrument. DSQ II Hardware Manual Thermo Scientific...
- Page 201 In addition, higher GC helium flows can be used without causing excessive amounts of noise that would blind an instrument without a curved prefilter to low-level signals. Figure 100. Prefilter Figure 101. Quadrupole Mass Filter Thermo Scientific DSQ II Hardware Manual...
- Page 202 Prefilter and Quadrupole DSQ II Hardware Manual Thermo Scientific...
-
Page 203: Chapter 7 Ion Detector
Figure 102. ETP Ion Detector Electron Multiplier Cathode Electron Multiplier Connection Conversion Dynode Connection Base Two Screws Around the Shield Two Screws Around the Base, Shield & Conversion Dynode Electron Multiplier Anode Thermo Scientific DSQ II Hardware Manual... -
Page 204: Conversion Dynode
Because of the off-axis orientation of the ion detector assembly relative to the quadrupole assembly, neutral molecules from the mass analyzer tend not to strike the conversion dynode or electron multiplier. Thus, neutral noise is reduced. DSQ II Hardware Manual Thermo Scientific... -
Page 205: Electron Multiplier
10 , then a current of 10 A leaves the electron multiplier through the anode. This current is converted to a voltage by the electrometer circuit and recorded by the data system. Thermo Scientific DSQ II Hardware Manual... - Page 206 Ion Detector Electron Multiplier DSQ II Hardware Manual Thermo Scientific...
-
Page 207: Chapter A Reordering Dsq Ii Components
This appendix contains DSQ II drawings and part numbers for replaceable parts and consumables. To ensure proper results in servicing the DSQ II system, order only the parts listed or their equivalent. Contact Technical Support and have your DSQ II serial number ready when calling. -
Page 208: Vacuum Manifold Parts List
O-ring, Top Cover 119805-0038 Prefilter 119800-0500 Prefilter Mount 119800-0525 Prefilter Wires 120159-0003 Quadrupole Mount 119800-0540 Quadrupole Strap 120155-0010 RF Feedthrough 119865-0500 Source, DSQ II Durabrite XL 120320-0001 Transfer Line 119640-1050 Vent Valve Solenoid 76461-1003 DSQ II Hardware Manual Thermo Scientific... - Page 209 Reordering DSQ II Components Vacuum Manifold Parts List Figure 105. Vacuum Manifold Components Ground Strap (120155-0011) Glass Cover (119805-0060)* Dynode Feedthrough (119875-0500) Ion Detector (76022-0001) O-ring, #126 Viton (A0107-10400)* Replacement Cathode, ETP (A0022-14633) Screws, Ion Detector (A0452-20000)* O-ring, Top Cover (119805-0038)
-
Page 210: Ion Source Parts List
Reordering DSQ II Components Ion Source Parts List Ion Source Parts List Table 8. Ion Source Parts List Component Part Number Ion Source includes: 120320-0001 • Ion Source 120320-0101 • Lens Alignment Tool 120271-0001 • Lens Assembly 119650-0151 • Magnet 70001-98195 •... -
Page 211: Ion Source Parts List
Reordering DSQ II Components Ion Source Parts List Ion Source Parts List Table 9. Ion Source Parts List Component Part Number Base Stud 119650-0215 Ball Plunger 119572-0001 Filament 120320-0030 Filament Retainer Clip 120320-0050 Filament Spacer 119650-0235 Heater Ring 120320-0020 Ion Source... - Page 212 Reordering DSQ II Components Ion Source Parts List Figure 107. Ion Source Components Filament Retainer Clip (120320-0050) EI Ion Volume (119650-0220) Wave Washer, PK (5) (A0474-51001) Filament (120320-0030) Ion Volume Holder (70001-20532) Filament Spacer (119650-0235) (3) Base Studs (119650-0215) Ion Source (120320-0101)
-
Page 213: Lens Assembly Parts List
Reordering DSQ II Components Lens Assembly Parts List Lens Assembly Parts List Table 10. Lens Assembly Parts List Component Part Number Lens 1 119650-0414 Lens 2 119650-0416 Lens 3 119650-0423 Lens Clip 119650-0428 Lens Holder 119650-0420 Lens Spacer 119650-0426 Figure 108. Lens Assembly Components... -
Page 214: Quadrupole Parts List
Quad Wiring, Short (120153-0100) Exit Lens (120170-0001) Quadrupole Mass Filter (120151-0001) Strap for Quadrupole (120155-0012) Screw, Button Head, 3mm x 6mm (76900-0306) Screw, Flat Head, 2mm x 6mm (76912-0206) DSQ II Entrance Lens (120286-0001) DSQ II Hardware Manual Thermo Scientific... -
Page 215: Gas Inlets And Gauges Parts List
Reordering DSQ II Components Gas Inlets and Gauges Parts List Gas Inlets and Gauges Parts List Table 12. Gas Inlets and Gauges Parts List Component Part Number Cable, CI Flow Module to Analog Board 119378-0014 Cable, Vacuum Control Board to Calibration Gas... - Page 216 Reordering DSQ II Components Gas Inlets and Gauges Parts List Figure 110. Gas Inlets and Gauges Components CI Reagent Gas Flow Module (23331-0091) Cable CI Flow Module to Analog Board (119378-0014)* Tee, Hose Barb CI to Cal Gas Foreline Vent (76256-0042)) with CI: Union, Tee, 1/8-in., SS (4032-0182)
-
Page 217: Boards And Cables Parts List
Reordering DSQ II Components Boards and Cables Parts List Boards and Cables Parts List Table 13. Boards and Cables Parts List (Left Side) Component Part Number Analog Board 119590-0022 Cable, Analog Board to Low Pass Filter Board 119378-0039 Cable, Ground Strap... - Page 218 Reordering DSQ II Components Boards and Cables Parts List Figure 111. Boards and Components (Left Side) Cable, Ribbon, Analog Board to Dynode/Multiplier Power Supply (119378-0009)* Cable, Ground Strap (119378-0030) Dynode/Multiplier Power Supply (119377-0001) PPINICI Dynode/Multiplier Power Supply (119377-0002) RF Generator Board (119590-0060)
- Page 219 Reordering DSQ II Components Boards and Cables Parts List Table 14. Boards and Cable Parts List (Left Side) Component Part Number Cable, Analog to RF Detector Board 119378-0004 Cable, Coax, RF Generator to Low Pass Filter Board 119378-0013 Cable, Electrometer to Digital Board...
- Page 220 Reordering DSQ II Components Boards and Cables Parts List Figure 112. Boards and Components (Left Side) Power Module 115 V (119655-1115) Power Module 230 V (119655-1230)* Cable, Electrometer to Digital Board (119378-0008)* Electrometer Board (119590-0500)* Cable, Analog to RF Detector Board (119378-0004)*...
- Page 221 Reordering DSQ II Components Boards and Cables Parts List Table 15. Boards and Cable Parts List (Right Side) Component Part Number Cable, Vacuum Control Board to Fore Pressure 119378-0015 Gauge 119253-0001 Lens Interface Board 119590-0110 Figure 113. Boards and Components (Right Side)
- Page 222 Reordering DSQ II Components Boards and Cables Parts List Table 16. Boards and Cable Parts List (Under the RF Detector Cover) Description Part Number Cable, Analog Board to DC Driver 119378-0037 Cable, DC Driver to Low Pass Filter Board 119378-0036...
- Page 223 Reordering DSQ II Components Boards and Cables Parts List Figure 114. Boards and Components RF Detector Board (119590-0270) RF Capacitor (119669-0250) RF Coil (119668-1000)* Cable, RF Coil to Low Pass Filter Board (119378-0040)* Low Pass Filter Board (119590-0480)* DC Driver (120152-1000)
-
Page 224: Turbomolecular Pump Parts List
Reordering DSQ II Components Turbomolecular Pump Parts List Turbomolecular Pump Parts List Table 17. Turbomolecular Pump Parts List Component Part Number Cable, Turbomolecular Pump Power Supply to Main Power 119378-0042 Cable, Turbomolecular Pump Power Supply to Vacuum Control Board 119378-0041... - Page 225 Reordering DSQ II Components Turbomolecular Pump Parts List Figure 115. Turbomolecular Pump Components Turbomolecular Pump Controller (76505-3005) 250 L/s Turbomolecular Pump Clamp, NW25 (76505-2002)* O-ring, w/Centering Ring, NW25 (76505-2001)* 70 L/s Turbomolecular Pump Clamp, NW16 (76505-1013)* Rotary-vane Pump (76505-3007)* O-ring, w/Centering Ring, NW16 (76505-0005)*...
-
Page 226: Split-Flow Turbomolecular Pump (Upgrade) Parts List
Reordering DSQ II Components Split-Flow Turbomolecular Pump (Upgrade) Parts List Split-Flow Turbomolecular Pump (Upgrade) Parts List Table 18. Split-Flow Turbomolecular Pump Parts List Component Part Number Foreline Adapter Assembly includes: 119259-0002 Fore Pressure Gauge A0105-00501 Cable, Turbomolecular Pump Power Supply to Main Power... - Page 227 Reordering DSQ II Components Split-Flow Turbomolecular Pump (Upgrade) Parts List Figure 116. Split-Flow Turbomolecular Pump Components Split-flow Turbomolecular Pump (119268-0002) Turbomolecular Pump Controller (76505-3005) Rotary-vane Pump (76505-3007)* Foreline Hose (76505-0003)* Foreline Adapter Assembly (119259-0002)* includes: Fore Pressure Gauge (A0105-00501) - Not Shown...
-
Page 228: Inlet Valve (Upgrade) Parts List
Reordering DSQ II Components Inlet Valve (Upgrade) Parts List Inlet Valve (Upgrade) Parts List Table 19. Inlet Valve Parts List Component Part Number Ball Valve A0101-02530 Ball Valve Seal Replacement Kit 76461-2002 Ball Valve Stem Bearing Kit 76461-2003 Ferrule, Inlet Valve... - Page 229 Reordering DSQ II Components Inlet Valve (Upgrade) Parts List Figure 117. Inlet Valve Components Ferrule, Inlet Valve (119684-0001) Knob (119685-0010) Inlet Valve Solenoid (119262-0001) Inlet Valve Housing (119682-0100) Ball Valve (A0101-02530) Tubing (76433-0107) Plug (119273-0001) Lever (119554-0001) Guide Bar (119687-0010)
-
Page 230: Power Module Parts List
Reordering DSQ II Components Power Module Parts List Power Module Parts List Table 20. Power Module Parts List Component Part Number Power Module • 115 V 119655-1115 • 230 V 119655-1230 Circuit Breaker, 15 A, 115 V A0019-00520 Circuit Breaker, 10 A, 230 V A0019-00505 Fuse, 3.15 A SB, 5x20 mm, 250 V (F1, F2) -
Page 231: Documentation Parts List
• Oxygen, Hydrocarbon, Moisture Trap (replacement for use with a quick change A0950-R1600 base) • Oxygen, Hydrocarbon, Moisture Trap (with quick change base) A0950-01600 • DSQ II User’s Guide 120299-0003 • Syringe, 10 μL with 70 mm Needle 36500103 • Test Mix, octafluoronaphthalene, benzophenone 120150-TEST •... -
Page 232: Miscellaneous Items Parts List
Component Part Number Cable, TRACE GC Ultra to PC 230 980 00 Cable, TRACE GC Ultra to DSQ II Remote Start 76396-0050 Capillary Column, 5MS, 0.25 mm i.d., 15 m, 0.25 μm 76317-3015 Injector Ferrule, for 0.25 mm i.d. Column 290 134 88 Syringe, 10 μL with 70 mm Needle... - Page 233 Functional Block Diagrams This appendix contains functional block diagrams for the DSQ II system and its subsystems. Contents • Electronic Assemblies p. 218 • Power Distribution p. 219 • Remote Start Cable Connections p. 220 Thermo Scientific DSQ II Hardware Manual...
-
Page 234: Electronic Assemblies
Functional Block Diagrams Electronic Assemblies Electronic Assemblies Figure 118. Electronic Assemblies DSQ II Hardware Manual Thermo Scientific... -
Page 235: Power Distribution
Functional Block Diagrams Power Distribution Power Distribution Figure 119. Power Distribution Thermo Scientific DSQ II Hardware Manual... -
Page 236: Remote Start Cable Connections
Use these connections to determine which connection to plug the remote start cable into. Plug one end of the remote start cable into the back of the DSQ II and the other end into the device you intend to use to start injections. - Page 237 38 analog to RF detector board 204 ion volume with an inlet valve 38 CI flow module to analog board 200 lenses 45 DC driver to low pass filter board 207 supplies 214 Thermo Scientific DSQ II Hardware Manual...
- Page 238 216 cable 82 ground strap 193 connection 60 guide bar 180, 213 electronic assemblies 218 entry housing 179 entrance lens 183, 198 ETP conversion dynode 188 ETP replacement cathode 193 exit lens 183, 198 DSQ II Hardware Manual Thermo Scientific...
- Page 239 194, 195 spacer 194 octafluoronaphthalene (OFN) 3 temperature sensor 170 oil 63-66 thumbscrew 194 troubleshooting 132 ordering parts 191 ion volume O-rings 193, 200 cleaning with an inlet valve 38 EI 172 EI/CI combo 172 Thermo Scientific DSQ II Hardware Manual...
- Page 240 114 vacuum control board 115 vent valve solenoid 118 reproducibility, troubleshooting 148 RF capacitor 207 RF coil 207 RF coil cover 99 RF control, troubleshooting 141 RF detector board 107, 108, 207 DSQ II Hardware Manual Thermo Scientific...
- Page 241 216 gas fitting 113 O-ring 193 replacing 112 troubleshooting 132 troubleshooting 121 communication 123 contamination 127 filament and lens control 130 heated zones 132 high vacuum 135 leaks 135 linearity 138 power supply 139 Thermo Scientific DSQ II Hardware Manual...
- Page 242 Index DSQ II Hardware Manual Thermo Scientific...
Need help?
Do you have a question about the DSQ II and is the answer not in the manual?
Questions and answers