Advertisement
Available languages
Available languages
Quick Links
Ford/Mazda multi-kit 1995-2011
99-5027 / AT-586FT / AW-586FT / CF-586FT / IBR-527FD
KIT FEATURES
• DIN radio provision with pocket
• ISO DIN radio provision with pocket
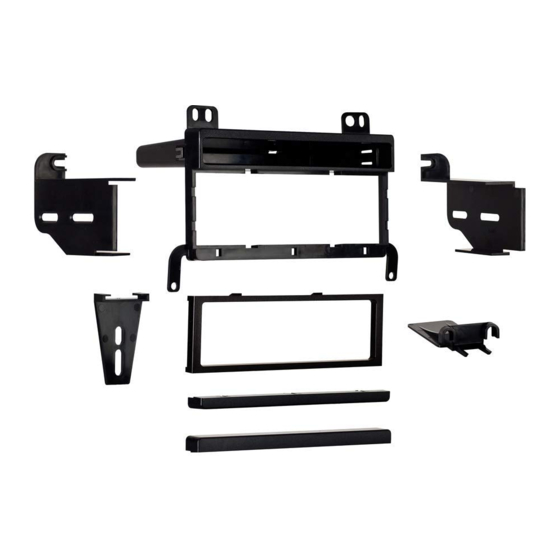
KIT COMPONENTS
• A) Radio housing • B) Radio housing trim piece "A" • C) Radio housing trim piece "B" • D) ISO Brackets
• E) Rear support • F) ISO Trim plate • G) Mounting bracket • H) (4) #8 x 3/8" Phillips screws
A
B
F
METRA - The World's best kits
Installation instructions for part 99-5027
C
G
APPLICATIONS
See application list inside cover
metraonline.com
®
®
D
E
H
WIRING & ANTENNA CONNECTIONS (sold separately)
Wiring Harness:
• Please visit www.metraonline.com
for specific interface applications
Antenna Adapter:
• Not required
TOOLS REQUIRED
• Panel removal tool • Phillips screwdriver
• 86-5618 Ford radio removal keys
CAUTION!
All accessories, switches, climate controls panels, and
especially air bag indicator lights must be connected before cycling
the ignition. Also, do not remove the factory radio with the key in the
on position, or while the vehicle is running.
© COPYRIGHT 2016 METRA ELECTRONICS CORPORATION
Advertisement

Related Manuals for Metra Electronics 99-5027


Summary of Contents for Metra Electronics 99-5027
- Page 1 Installation instructions for part 99-5027 Ford/Mazda multi-kit 1995-2011 WIRING & ANTENNA CONNECTIONS (sold separately) Wiring Harness: 99-5027 / AT-586FT / AW-586FT / CF-586FT / IBR-527FD • Please visit www.metraonline.com KIT FEATURES for specific interface applications • DIN radio provision with pocket Antenna Adapter: •...
- Page 2 99-5027 Applications Table of Contents Ford Mazda Dash Disassembly Lincoln (Cont) Crown Victoria .....1995-2011 B-Series Pickup ....1995-2009 Ford – Mark 8 1996-1998 ........3 Econoline ......1997-2008 – Crown Victoria 1995-2011 ......3 Mercury – Navigator 1997-2002 ........3 Expedition ......1997-2002 Grand Marquis .....1995-2010...
-
Page 3: Dash Disassembly
99-5027 Dash Disassembly Ford Crown Victoria 1995-2011/Econoline 1997-2008/Explorer 1995-2001/F-250 1999-2004/ F-350 1999-2004/F-550 1999-2004/Ranger 1995-2011, Lincoln Continental 1995-1997/Mark 8 1996-1998/Town Car 1995-2002, Mazda B-Series Pickup 1995-2009, Mercury Grand Marquis 1995-2010/Marauder 2003-2004/Mariner 2005-2007/Mountaineer 1997-2001 1. Using Metra’s 86-5618, pull the factory radio from the “A”... -
Page 4: F-150 (Heritage)
Dash Disassembly Ford Expedition 1997-2002/F-150 1997-2003/ F-150 (Heritage) 2004/F-250 1998 “A” “A” Excursion 2000-2005, Lincoln Blackwood 2002/Navigator 1997-2002 1. Place your index fingers on the inner edges of the A/C vents and push inward. Grasp the exposed lip of each vent opening and pull out on the radio trim bezel. - Page 5 Dash Disassembly Ford Expedition (without Ford Explorer 2002-2005 NAV) 2003-2006 Mercury Mountaineer 2002-2005 1. Remove (2) 9/32” 1. Unclip and remove entire panel screws from above surrounding radio including climate instrument cluster. controls and vents. (Figure A) (Figure A) 2. Remove (2) 9/32” screws securing 2.
-
Page 6: Lincoln Aviator 2003-2005
99-5027 Dash Disassembly Ford Mustang 2001-2004 Lincoln Aviator 2003-2005 1. Unclip and remove 1. Unclip and remove vent panel above shift lever trim panel. radio on top of dashboard. (Figure A) (Figure A) 2. Remove (2) 9/32” screws exposed under 2. -
Page 7: Navigator (With Nav, Thx Amp)
99-5027 Dash Disassembly Lincoln Aviator 2003-2005 (Cont) Lincoln Navigator (with NAV, THX amp) 2003-2006 4. Unclip and remove vents Navigator (without NAV) 2003-2006 below radio. (Figure D) 1. Open center console and remove 5. Remove (2) 9/32” screws Top view... -
Page 8: Kit Preparation
99-5027 Kit Preparation 1. Attach the corresponding radio housing trim piece to the radio housing. (Figure A) The following applications will use radio housing trim piece “B” (thicker trim piece): Ford Expedition (without NAV) 2003-2006 Ford Explorer 2002-2005 Ford Mustang 2001-2004... -
Page 9: Kit Assembly
99-5027 Kit Assembly DIN radio provision with pocket 1. Remove the metal DIN sleeve from the aftermarket radio. 2. Slide the sleeve into the radio housing and secure by bending the metal locking tabs down. 3. Slide the radio into the sleeve until it clicks in. -
Page 10: Din Radio Provision With Pocket
99-5027 Kit Assembly ISO DIN radio provision with pocket 1. Attach the ISO brackets to the radio housing, and then secure using the (2) #8 x 3/8” Phillips screws provided and then snap the correct radio housing trim piece to the radio housing. (Figure A) 2. - Page 11 99-5027 Kit Assembly DIN radio provision with pocket 1. Remove the metal DIN sleeve from the aftermarket radio. 2. Slide the sleeve into the radio housing and secure by bending the metal locking tabs down. 3. Slide the radio into the sleeve until it clicks in.
- Page 12 99-5027 Kit Assembly ISO DIN radio provision with pocket 1. Attach the ISO brackets to the radio housing, and then secure using the (2) #8 x 3/8” Phillips screws provided. (Figure A) 2. Remove the metal DIN sleeve and trim ring from the aftermarket radio.
- Page 13 99-5027 Notes...
- Page 14 99-5027 Notes...
- Page 15 99-5027 Notes...
- Page 16 ® Installation instructions for part 99-5027 IMPORTANT If you are having difficulties with the installation of this product, please call our Tech Support line at 1-800-253-TECH. Before doing so, look over the instructions a second time, and make sure the installation was performed exactly as the instructions are stated.
- Page 17 ® Instrucciones de instalación para la pieza 99-5027 Ford/Mazda multi-kit 1995-2011 CABLEADO Y CONEXIONES DE ANTENA 99-5027 / AT-586FT / AW-586FT / CF-586FT / IBR-527FD (se venden por separado) Arnés de cableado: • Visite metraonline.com para aplicaciones CARACTERÍSTICAS DEL KIT de interfaz específicas...
- Page 18 99-5027 Aplicaciones Indice Ford Mazda Desmontaje del tablero Lincoln (Cont) Crown Victoria .....1995-2011 B-Series Pickup ....1995-2009 Ford – Mark 8 1996-1998 ........3 Econoline ......1997-2008 – Crown Victoria 1995-2011 ......3 Mercury – Navigator 1997-2002 ........3 Expedition ......1997-2002 Grand Marquis .....1995-2010 –...
- Page 19 99-5027 Desmontaje del tablero Ford Crown Victoria 1995-2011/Econoline 1997-2008/Explorer 1995-2001/F-250 1999-2004/ F-350 1999-2004/F-550 1999-2004/Ranger 1995-2011, Lincoln Continental 1995-1997/Mark 8 1996-1998/Town Car 1995-2002, Mazda B-Series Pickup 1995-2009, Mercury Grand Marquis 1995-2010/Marauder 2003-2004/Mariner 2005-2007/Mountaineer 1997-2001 1. Usando las llaves 86-5618 de Metra, jale la unidad “A”...
- Page 20 Desmontaje del tablero Ford Expedition 1997-2002/F-150 1997-2003/ F-150 (Heritage) 2004/F-250 1998 “A” “A” Excursion 2000-2005, Lincoln Blackwood 2002/Navigator 1997-2002 1. Coloque sus dedos índices en los bordes internos de las rejillas del aire acondicionado y jale hacia adentro. Sujete el borde expuesto de cada apertura de rejilla y jale hacia afuera el bisel de la moldura del radio.
- Page 21 Desmontaje del tablero Ford Expedition (sin NAV) Ford Explorer 2002-2005 2003-2006 Mercury Mountaineer 2002-2005 1. Quite los (2) tornillos 1. Desenganche y quite todo el panel de 9/32” de arriba que rodea el radio, incluyendo los del conjunto de controles del clima y las rejillas. instrumentos.
- Page 22 99-5027 Desmontaje del tablero Ford Mustang 2001-2004 Lincoln Aviator 2003-2005 1. Desenganche y quite el panel de la 1. Desenganche y quite rejilla arriba del radio sobre el tablero. el panel de la moldura (Figura A) de la palanca de velocidades.
- Page 23 99-5027 Desmontaje del tablero Lincoln Aviator 2003-2005 (Cont) Lincoln Navigator (con NAV, amp THX) 2003-2006 4. Desenganche y quite las Navigator (sin NAV) 2003-2006 rejillas debajo del radio. (Figura D) 1. Abra la consola central y quite (1) Vista superior...
- Page 24 99-5027 Preparación del kit 1. Una la pieza correspondiente de la moldura de la carcasa del radio a la carcasa del radio. (Figura A) Las siguientes aplicaciones utilizarán la pieza “B” de la moldura de la carcasa del radio (pieza más gruesa de moldura):...
- Page 25 99-5027 Ensamble del kit Provisión de radio DIN con cavidad 1. Quite la manga de metal DIN del radio de mercado secundario. 2. Deslice la manga en la carcasa del radio y sujétela doblando hacia abajo las pestañas de metal.
- Page 26 99-5027 Ensamble del kit Provisión de radio ISO DIN con cavidad 1. Fije los soportes ISO a la carcasa de la radio, y luego asegure el uso de la (2) # 8 x 3/8 “tornillos Phillips proporcionados. (Figura A) 2. Quite la manga de metal DIN y el anillo de moldura del radio de mercado secundario.
- Page 27 99-5027 Ensamble del kit Provisión de radio DIN con cavidad 1. Quite la manga de metal DIN del radio de mercado secundario. 2. Deslice la manga en la carcasa del radio y sujétela doblando hacia abajo las pestañas de metal.
- Page 28 99-5027 Ensamble del kit Provisión de radio ISO DIN con cavidad 1. Fije los soportes ISO a la carcasa de la radio, y luego asegure el uso de la (2) # 8 x 3/8 “tornillos Phillips proporcionados. (Figura A) 2. Quite la manga de metal DIN y el anillo de moldura del radio de mercado secundario.
- Page 29 99-5027 Notas...
- Page 30 99-5027 Notas...
- Page 31 99-5027 Notas...
- Page 32 ® Instrucciones de instalación para la pieza 99-5027 IMPORTANTE Si tiene dificultades con la instalación de este producto, llame a nuestra línea de soporte técnico al 1-800-253-TECH. Antes de hacerlo, revise las instrucciones por segunda vez y asegúrese de que la instalación se haya realizado exactamente...
Need help?
Do you have a question about the 99-5027 and is the answer not in the manual?
Questions and answers