Olympus BX51 Operating Manual
Hide thumbs
Also See for BX51:
- Instructions manual (40 pages) ,
- Operating manual (17 pages) ,
- Instructions manual (37 pages)
Advertisement
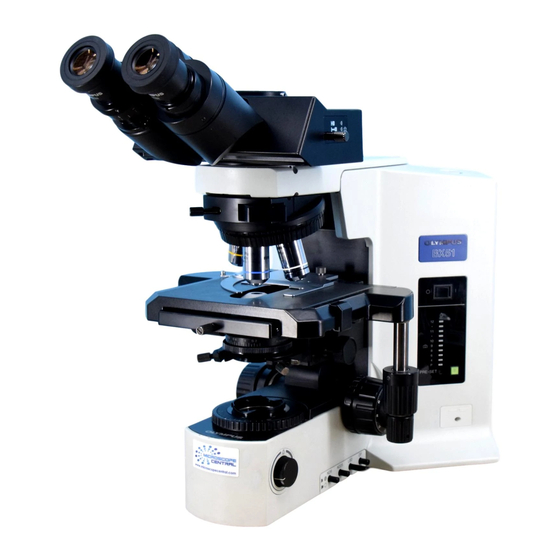
BX51 Microscope
Bright field halogen lamp ; reflected (top) or transmitted (bottom) illumination
Fluorescence mercury lamp
Filter positions
Objective
Magnification Immersion N.A. Working Distance Filters
M Plan Fluorite
UM Plan Fluorite
UM Plan Fluorite
LM Plan Fluorite
LM Plan Fluorite
LM Plan Fluorite
Filters
Wheel Position 1 – HQ:Rdil red
Position 2 – DAPI, fluorescence filter for fluorophores, nuclear stain
Position 3 – DIC Nomarski Differential Contrast filter
Position 4 – BF, bright field (for all white light)
Position 5 – DF, dark field filter
Position 6 – Qdot hxCM red/blue
Cooke SensiCAM Camera
Black and White camera
ImagePro Plus Software
Capture single images (8‐bit or 12‐bit) or movies (.avi files)
Image adjustments (gamma, saturation, background subtraction, etc.)
Measure distances
Add labels or scale bars
Color adjustments and false color
Olympus BX51 Microscope
1. HQ:RDil (red)
2. DAPI (340‐380 Ex; 400 dichroic; 435‐485 Em)
3. DIC
4. bright field
5. dark field
6. Qdot hxCM (red/blue)
2.5X
Dry
5X
Dry
10X
Dry
20X
Dry
50X
Dry
100X
Dry
(May 2014)
0.08
0.15
0.30
0.40
0.50
0.80
10.7
bright field only (w/polarizer)
12.0
all
11.0
all
12.0
all
10.6
all
3.4
all (available upon request)
1
Advertisement

Related Manuals for Olympus BX51


Summary of Contents for Olympus BX51
- Page 1 Olympus BX51 Microscope (May 2014) BX51 Microscope Bright field halogen lamp ; reflected (top) or transmitted (bottom) illumination Fluorescence mercury lamp Filter positions 1. HQ:RDil (red) 2. DAPI (340‐380 Ex; 400 dichroic; 435‐485 Em) 3. DIC 4. bright field 5. dark field 6. Qdot hxCM (red/blue) Objective Magnification Immersion N.A. Working Distance Filters ...
-
Page 2: Table Of Contents
Table of Contents Quick Guide………………………………………………………………………………………………… page 3 Diagram Where’s that knob?……………………………………………………………….. 4 What’s that knob do?............... 5 Bright field (transmitted light)………..……………………………………………………………… 5 Bright field (reflected light)………..…………………………..…………………………………….. 6 Fluorescence………………………………………………………………………………………………… 7 Image acquisition and measurements………………………………………….…………….. 8 Troubleshooting…………………………………………………………………………………………….. 11 ... -
Page 3: Quick Guide
QUICK GUIDE (Bold numbers are shown on the microscope diagram). 1. Log in to CORAL. 2. Turn on the halogen lamp (1). 3. Select transmitted (bottom) light (4) for transparent samples or reflected (top) light. 4. Turn on the camera for pictures or measurements (switch atop the blue camera). 5. ONLY IF using fluorescence, turn on the mercury lamp (18). 6. Set the light path for the halogen or mercury lamp (30). 7. Choose the filter wheel setting (17) (NOT BF for UV light or you will damage your eyes). 8. Choose the objective (6). 9. Load sample on the stage. 10. Focus (10) and adjust illumination (3). If transmitting fluorescence Slide the filter wheel to position 2. The position 4 (BF) filter will expose your eyes to UV light. Use the 25% ND filter (31) to reduce the UV intensity. Close the shutter (20) to protect sample from excess UV light. For pictures (See page 9 for details). Send light to the camera with the camera/eyepiece splitter knob (2). Open Image Pro Plus software with the desktop icon. Open an acquisition window. Select the SensiCAM Cooke Driver v3.6. Set bit acquisition depth. Set file saving options. Set single, interval or time lapse capture modes. Set spatial calibration to match the objective that is being used. Set exposure time or use auto exposure. Open a live preview window. Focus, adjust exposure time or lighting, adjust stage position. Stop the preview and capture the image (or movie). ... -
Page 4: Where's That Knob
WHERE’S THAT KNOB? ... - Page 5 WHAT DOES THAT KNOB DO? (1) White (halogen) light power switch – turns on both transmitted and reflected light. (2) Eyepiece/Camera light path selector – sends light to eyepieces, camera or both. (3) Brightness adjustment – controls intensity of transmitted and reflected light. (4) Light intensity and toggle switches –The toggle selects the lower (transmitted) or upper (reflected) light source. The ‘PRESET’ button gives maximum illumination. (5) Eyepieces – can adjust the interpupillary distance and focus. The left eyepiece has a micrometer. (6) Objectives (7) Stage with steel plates for magnetic probe arms for fluidic devices. Remove the glass stage to use magnetic probes. (8) Stage clip. Ask Beth to put it on. (9) Stage controls (actually on left side of stage). (10) Fine and Coarse focus. Each unit is 1 micron in stage height adjustment. (11) Diopter ring – for focusing the ocular (12) Rotating nosepiece – for selecting objectives (13) Field iris diaphragm for transmitted light – for establishing Koehler illumination (14) Condenser height adjustment ‐ for establishing Koehler illumination (15) Condenser centering screws ‐ for establishing Koehler illumination (16) Condenser aperture iris diaphragm ‐ for establishing Koehler illumination (17) Filter wheel holding mirrors and filters for reflected light (18) Mercury lamp power switch – to turn the fluorescence light on and off. (19) Mercury lamp power indicator – red when the mercury bulb is ON. (20) Shutter knob –shutter for reflected light (white or fluorescent) to protect sample from excess UV light. (21) Field iris diaphragm – restricts the diameter of the beam of light entering the objective (excludes extraneous light and improves image contrast). Also slows fading in other parts of the sample. (22) Aperture iris diaphragm – adjusts the brightness of the observed image and improves contrast. Use to fine‐tune after using the ND filters. (23) Not on this model (24 top) ‐ condenser screw. Not on this model (24 bottom) – reflected light analyzer. Not on this model. (25) Polarizer (26) DIC prism slide filter – adjusts the contrast when using DIC (30) Light path selector – selects halogen lamp and or mercury lamp for reflected light. (31) Buttons for built‐in filters ND6 decreases excitation light intensity to 6% (fluorescence applications) ND25 decreases excitation light intensity to 25% (fluorescence applications) ...
-
Page 6: What's That Knob Do
BRIGHTFIELD Transmitted light White light transmits through a transparent sample from underneath. 1. Turn on the white (halogen) light switch (1) for transmitted light to “│” (ON). 2. Engage the bright field (BF) mirror unit (17). 3. Adjust the light path. The light path selector knob (2) should be pushed in all the way. 4. Select transmitted light (lower position) on the switch by the brightness indicator (4). 5. Adjust the light intensity using the brightness adjustment knob (3). The numerals by the lamp voltage indicator (4) indicate the voltage. Deselect the “PRESET” button (not illuminated green) to avoid maximum illumination. 6. Adjust the interpupillary distance. While looking through the eyepieces, adjust the eyepieces (5) until the left and right fields of view coincide. 7. Swing the 2.5x objective (6) in place. Mount the specimen on the stage (7). 8. Find the specimen using the stage controls (9). 9. Focus on the specimen using fine/course focusing knobs (10). 10. Adjust the diopter: ‐ Close your left eye and focus on the specimen using the fine focus knob. ‐ Close your right eye and focus on the specimen using the diopter ring (11) on the left ocular. ‐ Open both eyes to see if the focus is correct. 11. If needed, switch to the next objective by rotating the nosepiece (12) and focus. Continue to the desired magnification. 12. Establish Koehler illumination: ‐ Close the field iris diaphragm (13) until you can see the edges. ‐ Focus the image of the field iris diaphragm by raising or lowering the condenser using the condenser height adjustment knob (14). ‐ Check whether the light is centered in the field of view. If not, use the condenser centering screws (15) to move the field iris diaphragm image to the center of the field of view. ‐ Open the field iris diaphragm until its image circumscribes the field of view. ‐ Match the opening of the condenser aperture iris diaphragm (16) with the N.A. of the objective in use to achieve the optimum objective performance. 13. Examine specimen and take a picture, if needed (See page 9 for details). 14. When finished: ‐ Lower the stage by turning the focus knob (10) and remove the specimen. ‐ Turn the nosepiece (12) until the 2.5x objective is into place. ‐ Lower the light intensity to zero using the brightness adjustment knob (3) ... -
Page 7: Bright Field Reflected Light
BRIGHT FIELD Reflected light White light is shone onto a reflective sample from above. 1. Turn the halogen bulb switch (1) for reflected light to “│” (ON). Engage the bright field (BF) filter (17). 2. Adjust the light path. ‐ The light path selector knob (2) should be pushed in all the way. ‐ The knob on the reflected light splitter (30) should be pushed in all the way. ‐ The shutter knob (20) should be slid to the position marked “○” (OPEN). 3. Select reflected light (upper position) on the switch by the brightness indicator (4). 4. Adjust the light intensity using the brightness adjustment knob (3). The light intensity scale (4) indicates the lamp voltage. Deselect the “PRESET” button (not illuminated green) to avoid maximum illumination. 5. Adjust the interpupillary distance. While looking through the eyepieces, adjust the eyepieces (5) until the left and right fields of view coincide. 6. Swing the 2.5x objective (6) in place. 7. Place the specimen on the stage (7). 8. Find the specimen using the stage controls (9). 9. Focus on the specimen using fine/course focusing knobs (10). 10. Adjust the diopter: ‐ Close your left eye and focus on the specimen using the fine focus knob. ‐ Close your right eye and focus on the specimen using the diopter ring (11) on the left eyepiece. ‐ Open both eyes and confirm that it is in focus. 11. Switch to the next objective by rotating the nosepiece (12) and focus. Continue until you reach the desired magnification. 12. Establish Koehler illumination: ‐ Close the field iris diaphragm (13) until you can see the edges. ‐ Focus the image of the field iris diaphragm by raising or lowering the condenser using the condenser height adjustment knob (14). ‐ Check whether the light is centered in the field of view. If not, use the condenser centering screws (15) to move the field iris diaphragm image to the center of the field of view. ‐ Open the field iris diaphragm until its image circumscribes the field of view. ‐ Match the opening of the condenser aperture iris diaphragm (16) with the N.A. of the objective in ... -
Page 8: Fluorescence
FLUORESCENCE (Transmitted light) NOTE: The mercury bulb is fragile. It needs to be cool for 30 minutes before being turned on again. It needs to stay on for at least 15 minutes. 1. Switch on the mercury lamp by setting the switch (18) to “I” (ON). The indicator (19) should light up. The bulb will stabilize in 5 ‐10 minutes. 2. Set the microscope for bright field imaging (‘Bright field reflected light’ page 2, steps 2 – 12.) Use the reflected light splitter knob (30) to switch between white light and UV light lamps. 3. Turn the filter wheel (17) to select a filter cube: position # 1. HQ:RDil (red) 2. DAPI (340‐380 Ex; 400 dichroic; 435‐485 Em) 3. DIC 4. Bright field (BF) 5. Dark field 6. Qdot hxCM (red/blue) 4. When using the filter cubes, turn the light intensity down all the way (3). 5. To avoid photobleaching, close the shutter (20) “●”... - Page 9 Image acquisition Cooke SensiCAM B/W camera; driver v3.6 & ImagePro Plus software; v6.2 1. Turn on the blue SensiCAM camera (switch at the top of the camera). Wait until the blinking light turns green. 2. Slide the light path selector knob (2) to share the image with the camera (eye and camera position). 3. Open ImagePro Plus and adjust settings. ‐Log on the computer as CNF USER (no password). ‐Double‐click on the “USE this ImagePro Plus” desktop icon. ‐Select Acquire: Video/Digital. If a window to select an “Analog Simulation Image File” appears, click “Cancel” ‐A window titled ‘Analog Simulation’ appears. Use the Current Driver pull down menu to select the “SensiCAM Cooke Driver (3.6)” BE SURE THE DRIVER REMAINS SELECTED. ‐Set the Capture Depth to 8‐bit mono in the pull down menu. ‐Set the preview (pvw) and acquisition (acq) areas (Full is 1376x1040). 4. Open a live image Preview button. ‐Adjust focus and lighting (3) on the microscope. ‐Adjust camera exposure. ‐Set how the image file is to be saved using the Image Tab. ‐For multiple images/movies, check the ‘Enable Multiple Images Capture’ box, and set controls. 5. Capture the image. ‐Stop the live Preview using the ‘Stop’ button. ‐Click the ‘Snap’ button, and an image file will appear. ‐Save the image. If it was taken in 12‐bit mono, the computer can’t open it. You could convert it using File>Batch Conversion and select the source file and the destination folder and file type (TIFF is best). 6. Take measurements in the saved image. ‐Select the objective (spatial calibration). Click the caliper button on the menu bar, and select the objective that is in use. ‐Click the measure Distance button on the menu bar to open a ‘Measure Distance’ pop up window. ‐Click and drag to measure the feature (in microns). ...
-
Page 10: Troubleshooting
Troubleshooting 1. White (bright field) light isn’t making it to the sample. CAUSE & REMEDY Lamp not on. Turn on the lamp (1) and look to see if both bulbs come on. One lamp is under the stage (13) and the other is in the rear lamp housing (33). Turn on the mercury lamp (18) (if it has been off for at least 30 minutes). Wait 5‐10 minutes for the bulb to stabilize. Wrong light source or incorrect light path. Select the ocular path (2) to allow the sample to be seen in the oculars. Select reflected (top‐side) or transmitted (underneath) white light with switch (4). Select reflected white light vs. fluorescent light with slide knob (30). Open the shutter (20) for reflected light. Intensity is low. Turn (3) up the intensity of light source. Disengage the ND filters (32). Open the field iris diaphragm (13). Open the aperture iris diaphragm (22) and field iris diaphragm (21). Select BF, DF or DIC mirrors (17) when using white light. 2. PROBLEM: White light (bright field) is too intense. CAUSE & REMEDY “Preset’ (4) is pushed in which automatically turns on the maximum light voltage. Deselect the button (green light will go off). Intensity is turned up too high. Dial (3) it down. ... - Page 11 Incorrect light path for the camera to access the sample. Select the eyepiece path setting (2) to allow the sample to be seen by the camera. Wrong driver is selected for software image capture. Select the Cooke SensiCAM Driver. Select Acquire: Video/Digital from the menu. Click the ‘Setup’ tab in the window, and select the correct driver from the pull‐down menu. ...
Need help?
Do you have a question about the BX51 and is the answer not in the manual?
Questions and answers